mfiscus[TK] Posted August 20 Report Posted August 20 (edited) A little late on the start for this build thread. Got my big brown box from WTF on August 7th! Quickly got it unpacked. Did a lot of reading on here and watched a pile of videos and nervously did some light trimming to get used to the tools. Eventually trimmed a little more to get used to trimming down before final fitting. Hopefully pairing all the right parts. Got a little confused on these pieces, one is clearly a knee plate: After some expert guidance from Michael Rose and a hands on look at his kit, I start final trimming for the front strips to go on. Then I dived into the deep end of the pool and got the E6000 under the front strips and committed to clamps, with the knowledge I could redo them by using the right glue, with a lot of patience for it to dry. Many of the videos I watched, like the RS Props were all about the CA glue. Tonight should mark 24 hours of patiences, then I can move on to figuring out the perfect. Will be a few days of sizing with tape, making sure they fit comfortably on under suits that can accommodate 4 seasons. Still flipping back and 4th on where I can leave returns for added effect, versus comfort and hopes of getting into the 501st. Still way nervous on starting the helmet. I did pick up some Plastic Dip (black) spray to coat the inside, heard it was best to do before assembly. Any feedback is appreciated. Any other locals to Metro-Detroit that want to have mini build parties, let me know. My goal is mid September for the next St. Baldrick's Event. Edited August 21 by mfiscus Fixed the links to the images 1 Quote
gmrhodes13[Staff] Posted August 20 Report Posted August 20 Google apps images won't show in the forum, many of us use a free image host Imgur, here's a great tutorial We also try to use E6000 glue, this is in case you make a mistake or need go resize any pieces, CA glue is pretty permanent. FYI Top knee TD Sandtrooper Bottom knee TK Stormtrooper 2 Quote
mfiscus[TK] Posted August 20 Author Report Posted August 20 I think I fixed the images so they are more accessible, sorry for slapping the post together without properly testing. In my defense, wanted to get back to getting the kit to a wearable state. Thank you to Walt for throwing in the sand trooper option! Not sure if I'm feeling over confident after looking through the resources on here. Quote
gmrhodes13[Staff] Posted August 21 Report Posted August 21 8 minutes ago, mfiscus said: I think I fixed the images so they are more accessible, sorry for slapping the post together without properly testing. Need to use the "direct link" option or link with the file extension ie: .jpg, .png, .gif. If on computer you can right click on the image, select copy and past directly into your post Great thread for the first timer, lots of links to help with your build 1 Quote
mfiscus[TK] Posted August 21 Author Report Posted August 21 Thank you, lots of great stuff in that link. 1 Quote
JBar[TK] Posted August 21 Report Posted August 21 Looks like you got the photos figured out. Looking like an awesome start can't wait to see this all come together. You're gonna know more than you ever thought you would about stromtroopers by the time you're done with this 1 Quote
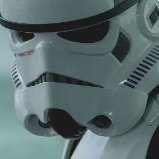
mfiscus[TK] Posted August 21 Author Report Posted August 21 (edited) Apreciate the patience and the advice. Hoping to get this all complete and approved by the 501st for a St. Baldrick's charity event next month. Any red flags, please let me know. Was getting nervous on these as I prepare to add the knee plate and size the back for final fitting. On the front strip glued on for now (e6000). I think I need to dial back the returns a little, but does the left shin look passable? Walt suggested small 45 degree cuts on the top pf the strips. Some of the recent WTF TK kits seemed to be trimmed a little shorter and level top and bottom, but I need the full height. 3 of the pieces are the same height, one is nearly an inch taller on top when the line up back and bottom. Edited August 21 by mfiscus added photo Quote
gmrhodes13[Staff] Posted August 21 Report Posted August 21 You need to align the top ridges and trim the bottoms of the shins to match Wearing boots will also make a difference so don't do a final trim until you can try with boots. Gallery sections can be a great help while building https://www.whitearmor.net/forum/gallery/category/24-anh-tk-reference/ If in doubt you can also check out the build areas, Expert Infantry or Centurion as these are built to the higher levels of accuracy. Many titles have the makers name in them ie: TK-91213 Requesting ANH Stunt EIB Status (WTF) (1075) 1 Quote
JBar[TK] Posted August 22 Report Posted August 22 (edited) Hate to say this but yeah you're gonna want to redo your right (left picture) calf. Don't sweat it you were smart and used E6000 so it's very fixable. Trust me I made mistakes like this a lot with my kit. So with the Walt kit that right calf has a super long ankle bottom once the top is lined up. It's meant to be that way so once you re glue the calf so that the knee is flush on both sides you'll just need to take a dremel and sand down the ankle openings so that they are more even with each other and retain their shape. Shave down as little as possible until you know for sure how much you can take off once you have your boots and thighs fitted properly. Basically I'd save that part for the very end. But for now I'd pop that right calf apart and re glue it. See if something like a butter knife can help remove the cover strip and just go slow with it. Your fingers should be able to rub a lot of the glue off once the cover strip is removed. If for some reason you feel that the second cover strip doesn't have enough strength you can always glue one on the backside as well. Here are mine: You can see I kept the shape but sanded down the ankles so that one isn't excessively long This is why a build thread is such a great idea. You can get help along the way like this and again this one is very fixable Edited August 22 by JBar 1 Quote
mfiscus[TK] Posted August 22 Author Report Posted August 22 (edited) Pulled apart pretty easy, thought it looked wrong, but 3 of the 4 edges lined up, just not the proper one at the top. Was just so excited to be gluing and rushed a little. Edited August 22 by mfiscus typo 1 Quote
JBar[TK] Posted August 22 Report Posted August 22 7 hours ago, mfiscus said: Pulled apart pretty easy, thought it looked wrong, but 3 of the 4 edges lined up, just not the proper one at the top. Was just so excited to be gluing and rushed a little. Yeah even with the front knee aligned I still had the issue of the back not lining up. I dunked the calves in some hot water and bent them into shape a bit but in the end I realized once the velcro is on that will hold the shape just fine so I wouldn't stress it at this point. Glad you were able to fix them easily Quote
mfiscus[TK] Posted August 24 Author Report Posted August 24 (edited) Pulled off the strips on the shins and went back at it. I now feel a lot better about it. Will wait to trim the bottom until my boots get here based on advice. I got a little Velcro strapping in place for now. Black series helmet while I get the courage to go at my kit helmet, along with finalizing some of the final touches. Edited August 24 by mfiscus Fixed photos Quote
gmrhodes13[Staff] Posted August 24 Report Posted August 24 Some info for helmet assembly and some references ears For higher levels clearance: In regards to the teeth don't leave any paint on the gums: Frown is painted gray and does not leave the teeth area. And don't forget this for higher levels: Fall of tube stripe tops ideally lean toward the front. The "ideal" ear placement is as seen below, where the screws line up with the rear angle of the trap right above it. Because some armorers design their helmets differently or send them pre-assembled this is not always possible to achieve, but it is suggested that you try to get as close as you can. Note: Top ear screws should ideally be located directly below the rear of the trap. Some references of screen helmets, many had gaps 1 Quote
mfiscus[TK] Posted August 25 Author Report Posted August 25 Thank you for the great references on the helmet, Starting on that a bit today. Got a little farther with the kit and strapping, still waiting on my keep trooping boots. Feeling a little tall with the torso parts, with the cod piece to neck line causing a gap. I did redo the shoulder straps after the photos to added 2 inches to let the back plate float better. I'm sure there is a lot of adjusting to do, just working with industrial velcro for now, lets me tweak as needed. So the back plate will sit a little lower to address the gap in the back. Walt's kit comes with the butt and kidney plates as one piece, he said I can leave it that way or cut it. Would the belt then fill the gap on the back? I pencilled a line on the side of the back plat to trim back, but I have a fair gap on my sides between front to back, can this stay to help fill the gap? Seems like a lot of mistakes can be seen in some of the troopers in the movies, but I really want to get to approval as quickly as I can and find a safe starting place for my first event. Trying to get this completed before a charity event on Sept 22. Any feedback, would be appreciated. 1 Quote
gmrhodes13[Staff] Posted August 25 Report Posted August 25 The butt plate and kidney should be separate Posterior Armor A separate rear armor piece is split from the Kidney Armor Most kits fit people up to 6" over that there can be issues with gaps, it's a matter of tweaking to get things sitting close to screen references. 1 Quote
JBar[TK] Posted August 26 Report Posted August 26 It looks like a dry fit so I'm sure it can be tweaked quite a bit down the road but if you can pull your chest up higher that would in return bring your back plate down so that the back and chest are even with each other. Hopefully you have enough ab armor available so that the chest can still overlap it. Also yeah you'll want to carefully cut the posterior and kidney armor right down that middle seam just be careful and go slow. This will definitely give you some more wiggle room with strapping to close that back armor gap 1 Quote
mfiscus[TK] Posted August 27 Author Report Posted August 27 Started in on the helmet, got the cut outs done and a pass at riveting the pieces together. I have a weird fold in the plastic from the pull, I may have to remove the rivet and deal with it of get the ear on properly. Also been trying to keep the look of the return edge on the top thigh parts, but I think they just need to go? You can see how light it is from the inside. I do see some return from the movie photos on the insides. I'm sure there are some options out there. How many people do the strips on the inside as well? Using E6000, a trusted source suggested it will give added strength, which sounds great. I may end up with enough material to add them, even after my initial mistakes with the front trim and needing to replace with slightly longer strips. I did recycle them done to other parts, so not too much wasted. There is a Irish Festival in Pittsburgh coming up that could use a trooper or 2, so I may try and get ready for that on Sept 8. Quote
JBar[TK] Posted August 27 Report Posted August 27 I just thought you can also increase the shoulder strapping length between the chest and back so that the back can be lowered down farther as well. Personally my gap between the two armor pieces is about 3" but this is unique to the trooper and you have some room to adjust this to meet your needs 1 Quote
mfiscus[TK] Posted August 27 Author Report Posted August 27 thanks for the tips on the shoulder strapping. Did what I hope is final sizing on the thighs. Blue tap is where the stripes would go, with a cut right through the middle to line up the backs. This fits comfortably on the my legs and with stay in place without strapping until I try to walk. Then the strapping would keep it up where it needs to be with a little room to slide up and down with movement. Trying to decide if I should make it a little more room or chop through with the current fit? 1 Quote
JBar[TK] Posted August 27 Report Posted August 27 (edited) Looks good and I would for sure leave plenty of room for them to slide up and down. The belt will be more than enough to hold them in place and you'll want room for things such as change in body weight, walking around a lot, and even just sweating and getting hotter makes your skin and under suit go a little bigger. You can always slim it down later so I'd err on the larger side by just a bit Edited August 27 by JBar 1 Quote
gmrhodes13[Staff] Posted August 27 Report Posted August 27 Personally I like to leave a fingers room around, thighs will want to come up when bending and stretch the legs, a little extra room won't help as the strapping will do all the work. Easer to leave some extra material on than trying to add some later. 1 Quote
gmrhodes13[Staff] Posted August 27 Report Posted August 27 Rivets can be a pain to remove, try to grip from behind and slowly drill into the rivet head, stopping if it gets too hot Entirely up to you if you want to leave any return edge, I have some as I have skinny legs and it looks better but either way is approvable. 1 Quote
mfiscus[TK] Posted September 11 Author Report Posted September 11 Getting closer. Did another dry fit. Still need some side strapping installed. Still waiting on the official ammo pack part of the main belt, have a place holder on there for now. Will get the rivets in when it arrives. hopefully placement is good. Seems to be according to the crl. My wife knocked out a great canvas belt. Need to reshape the shoulder bells a bit, very narrow and they like to push the biceps down. Maybe a heat gun or some boiling water? Missed the smaller holes on the frown, thank you mr. rose for that tip. Hoping to get this wrapped up and approved for a charity event on Sept 22. Is a voice changer critical for a troop, still needing to make a choice there? If any one has upgraded and has an old one to sell, please reach out. 1 Quote

Recommended Posts
Join the conversation
You can post now and register later. If you have an account, sign in now to post with your account.