46325[TK] Posted June 27, 2017 Report Share Posted June 27, 2017 (edited) And so it begins.... Received my kit from MTK and it's time to get started! Edited July 23, 2017 by 46325 Picture updated with flickr 2 Quote Link to comment Share on other sites More sharing options...
46325[TK] Posted June 27, 2017 Author Report Share Posted June 27, 2017 (edited) Since I have ordered latex hand guards, it was suggested to try cutting on the ones that came with the kit to get a feel for scoring, breaking and trimming. Not sure if these are supposed to be trimmed without a recess or not, but I am glad I practiced on them first. Edited July 15, 2017 by 46325 Quote Link to comment Share on other sites More sharing options...
gmrhodes13[Staff] Posted June 27, 2017 Report Share Posted June 27, 2017 Looking forward to the progress, good luck 1 Quote Link to comment Share on other sites More sharing options...
ukswrath[Staff] Posted June 27, 2017 Report Share Posted June 27, 2017 Build it and they will come, watch that is 2 Quote Link to comment Share on other sites More sharing options...
46325[TK] Posted July 2, 2017 Author Report Share Posted July 2, 2017 Arms trimmed. Going with a 5/16 edge on the sides, to accommodate 5/8 cover strips, and a 1/8 lip around edges, except on forearms where there is no edge. Still need to be sanded. Moving on to trimming shins and thighs next. On a side note: gloves and rubber hand guards came in last week. Neck seal on order from a fellow garrison member. Boots scheduled to arrive this week. Just need to decide if I am going to make my belt or order one. Quote Link to comment Share on other sites More sharing options...
ukswrath[Staff] Posted July 2, 2017 Report Share Posted July 2, 2017 Looking good trooper Quote Link to comment Share on other sites More sharing options...
46325[TK] Posted July 4, 2017 Author Report Share Posted July 4, 2017 More trim progress today (along with painting the spare room ). Trimmed with 7/16 edge on front to take a 7/8 cover plate. I left the backs sides at full length and only trimmed off the lip so I have room to play with when fitting. Again, still needs sanding. Tomorrow it's on to the torso. Quote Link to comment Share on other sites More sharing options...
46325[TK] Posted July 5, 2017 Author Report Share Posted July 5, 2017 Trimmed the torso large pieces last night. Depending on time tonight I should be able to knock out the remain small parts for the torso. Quote Link to comment Share on other sites More sharing options...
46325[TK] Posted July 8, 2017 Author Report Share Posted July 8, 2017 Today was a good day. Boots arrived from TK Boots. They fit great and look awesome. Also finished trimming the remaining bits of armor. Moving on to the helmet this weekend and plan to hit a garrison armor party next week to use a belt sander to clean up everything. Quote Link to comment Share on other sites More sharing options...
ukswrath[Staff] Posted July 8, 2017 Report Share Posted July 8, 2017 Purdy boots. Armor wise you're almost ready for assembly, a few trimming adjustment and you're ready to go . 1 Quote Link to comment Share on other sites More sharing options...
46325[TK] Posted July 9, 2017 Author Report Share Posted July 9, 2017 Wow, I think the most stressful part has been the trimming of the helmet pieces. The cut lines on the era caps were not very defined, hardly any on the left one. However, all the trimming is done now! Going to garrison members house this week to use his belt sander to knock out the sanding on the edges and maybe start on assembly. Quote Link to comment Share on other sites More sharing options...
Pretzel Posted July 9, 2017 Report Share Posted July 9, 2017 Wow! So new and so shiny. lol. You are looking great trooper! Keep it up! 1 Quote Link to comment Share on other sites More sharing options...
rwbowri[TK] Posted July 14, 2017 Report Share Posted July 14, 2017 (edited) I have the TK boots and They are great fit Edited July 15, 2017 by rwbowri 1 Quote Link to comment Share on other sites More sharing options...
46325[TK] Posted July 15, 2017 Author Report Share Posted July 15, 2017 Didn't have much time this week to work on my kit due to a impromptu trip to the beach (and a shirt I needed to make before next week), but I did get to spend a few hours today with my TK mentor and we made some good progress. Arms are pretty much done except the shoulder straps to attach to the torso. 95% of the sanding is done, so things should come together pretty quick when I can get with him again. I have some homework to do on the bucket, which will probably be mostly what I'll work on this week, time permitting. Oh... and here is the shirt I made. We have Hawaiian shirt day at work next Wednesday. (Note: All the what parts glow in the dark. ) 1 Quote Link to comment Share on other sites More sharing options...
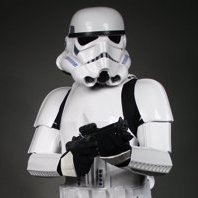
46325[TK] Posted July 23, 2017 Author Report Share Posted July 23, 2017 Okay, so I realise now I should have posted this thread in the ANH Build Threads.... but I see so many other build threads in the wrong place so I might as well keep it here unless I can get an admin to move it. So... on to my update. Outside of getting my hand armor from trooperbay.com and adding them to my gloves the main kit has had little progress this week. However I have focused on the bucket the last couple days. I re-adjusted the face and back to go more low brow. When we originally put them together I wasn't really sure which type I wanted, but after looking at pics (before starting to paint) I realized I wanted a low brow. So, that meant popping the rivets and making adjustments. Got the teeth cleanup and painted along with the vocoder earlier in the week. I wanted to get the ear caps in place before I started on the rest of the details. I'm not 100% sure I have the ear caps correct, but I am sure I can tweak them some after I meet up with my TK mentor sometime next week to get his input on them. My kit came with decals for the helmet, but I just don't feel like the decal kind of guys, so after looking at some other threads I decided on hand painting. I thought about getting templates, but decided to just wing it. My painting skills are fairly decent so I feel confident that I'll be okay without them. I do however think I will use the decals on the tube strips. Still thinking that part through. Tonight I was able to get the black down and 2 coats of gray on the traps, tears and era caps. Hopefully tomorrow I'll have time to paint the strips. Note: The weapon in the image is an E-22 I printed and built before starting my TK. E-11 is printed, just need to be assembled. Feeling pretty good about the lines. Needs a little cleanup I think. 1 Quote Link to comment Share on other sites More sharing options...
rwbowri[TK] Posted July 23, 2017 Report Share Posted July 23, 2017 coming along great there. the handguards look good, love your blaster. can't wait to see the finished helmet. 1 Quote Link to comment Share on other sites More sharing options...
CableGuy[Admin] Posted July 23, 2017 Report Share Posted July 23, 2017 Great job on the painting. Traps and tears (black pinstripe) can be a pain in the you-know-where - however yours looks great. :-) 1 Quote Link to comment Share on other sites More sharing options...
46325[TK] Posted July 24, 2017 Author Report Share Posted July 24, 2017 (edited) Thanks for the comments and encouragement! Traps and tears done! I made a makeshift mask using the decals that came with my kit to make a template, used a micron pen to give a guideline and then hand painted them in. Should have a hand painted look to them anyway, right? Also installed the lens sheet and neck trim. Down to installing the teeth mesh and the tube strips. I have decals for the tube stripes, but now that I have hand painted everything else I am leaning towards hand painting them too. Edited July 24, 2017 by 46325 Quote Link to comment Share on other sites More sharing options...
46325[TK] Posted July 24, 2017 Author Report Share Posted July 24, 2017 16 hours ago, rwbowri said: coming along great there. the handguards look good, love your blaster. can't wait to see the finished helmet. Since you noticed the blaster, here is a full pic of it. I have aspiration of making a shore trooper one day. The parts are all 3D printed and there is a PVC core that keeps it all together. 2 Quote Link to comment Share on other sites More sharing options...
rwbowri[TK] Posted July 24, 2017 Report Share Posted July 24, 2017 that looks totally awesome 1 Quote Link to comment Share on other sites More sharing options...
ukswrath[Staff] Posted July 24, 2017 Report Share Posted July 24, 2017 Nice work 1 Quote Link to comment Share on other sites More sharing options...
46325[TK] Posted July 25, 2017 Author Report Share Posted July 25, 2017 Helmet is done, well... the outside anyway. Still need to add some pads and some fans inside. It gets pretty hot here in Georgia and most troops are outside. Decided on painting the tube stripes. I took the decal that came with my kit and made a template with painters tape. Not the most attractive or clean template, but it gave me something to work with. I used the template to paint the basic layout. Nothing fancy since the template is rough. After removing the template I cleaned up the lines by hand. Belt came in last week, so I hope to get it and the thermal detonator done this week. Quote Link to comment Share on other sites More sharing options...
CableGuy[Admin] Posted July 25, 2017 Report Share Posted July 25, 2017 Nice work. You can always use a toothpick to make small adjustments to the stripes if needed. Toothpicks were my saviour. ;-) Just this evening I've ordered the components for my fans, switches and battery pack. Looks like we're at a similar stage. :-) 1 Quote Link to comment Share on other sites More sharing options...
ukswrath[Staff] Posted July 26, 2017 Report Share Posted July 26, 2017 Looking good Dana 1 Quote Link to comment Share on other sites More sharing options...
46325[TK] Posted August 8, 2017 Author Report Share Posted August 8, 2017 Okay... been a couple weeks without an update, but progress has been made. Went to armor parties that last two Thursdays and was able to to get some much needed help. Seems my thighs are much larger then the average TK, so shims were needed in the back. Assembly would be done on the legs except for a heat incident that required me to get a replacement thigh ammo boxes. The replacement arrived today (MTK is awesome and was able to ship one before he went on vacation) and I have already trimmed and sanded it. If I had a split rivet tool I'd have it installed already, but it can wait till Thursday when I hope to finish assembly of the upper torso. Still some finishing trimming to do post assembly. I also finished up the belt and thermal detonator (aka O2 cannister). I was only able to find a 22 gage steel sheet to cut some strips from to make the brackets. I'll need to treat them so they don't rust, but I think they look okay. Time to get some leather and knock out the holster and also starts assembling the E-11. Quote Link to comment Share on other sites More sharing options...

Recommended Posts
Join the conversation
You can post now and register later. If you have an account, sign in now to post with your account.