f0xtrooper[501st] Posted August 18, 2011 Author Report Share Posted August 18, 2011 Spent the last few days working on my ammo pouches... All the pouches are sewn, the completed toolkit pouch is still on the sewing machine. They are made from leatherete which is a leather topped plastic. Its cheap and easy to work with. It pretty much sews like denim so really easy to work with. Anyway im padding out the pouches to help maintain the shape and have come across 2 solutions that result in 2 different looks. Hopefully some opinions might help me get them finished. The straight pouch has a styrene insert to hold its shape where as the more curved pouch has a styrene reinforced back with a curved piece of "funny foam" holding its shape. Which do you think looks better? Quote Link to comment Share on other sites More sharing options...
f0xtrooper[501st] Posted August 22, 2011 Author Report Share Posted August 22, 2011 Could be the end of the road for my armour build Im 6ft 4" tall and although ive managed to get my armour together pouches etc; ive hit a massive problem...... I have T-21 blasters done, pouches done and ive shimmed and adjusted everything. It fits great except my chest piece. Its just too short. I have a large body length and no amount of adjusting will make it fit right (apart from moving the abdomin so far upwards that im crushing the jewels and the but plate begins to resemble a thong) I have an ABS ATA set of armour and the chest is relatively short anyway. It would seem I need a good 6-8cm more length on the chest piece. The funds are now completely dry and I dont know what to do here. I dont want to have to sell up my armour and "move along" not now im pretty much at the end of the build. Im outta ideas and feelin' that the dream is over......help anyone Quote Link to comment Share on other sites More sharing options...
Rich330[TK] Posted August 22, 2011 Report Share Posted August 22, 2011 Make the straps which connect the chest and back longer. It doesn't matter if there is a large gap between the two pieces of armour as it will be covered by the external (plastic) straps. Quote Link to comment Share on other sites More sharing options...
Rich330[TK] Posted August 22, 2011 Report Share Posted August 22, 2011 (edited) See 0:16 - 1:28 of this video for a demonstration ... http://youtu.be/Zdj4txqIgiI Edited August 22, 2011 by Rick330 Quote Link to comment Share on other sites More sharing options...
SCTrooper[TK] Posted August 22, 2011 Report Share Posted August 22, 2011 (edited) Dont give up yet! You could cut cod piece off the ab, this could give you 3 -4cm more lenth in the ab section. I cut mine because at 6' 2" I need a little more room. Basically your going to hide this under the belt, Check this thread out. http://forum.whitear...od&fromsearch=1 Edited August 22, 2011 by SCTrooper Quote Link to comment Share on other sites More sharing options...
f0xtrooper[501st] Posted August 26, 2011 Author Report Share Posted August 26, 2011 ... Quote Link to comment Share on other sites More sharing options...
f0xtrooper[501st] Posted August 29, 2011 Author Report Share Posted August 29, 2011 ...and then... Quote Link to comment Share on other sites More sharing options...
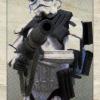
f0xtrooper[501st] Posted August 30, 2011 Author Report Share Posted August 30, 2011 ...ready for some Gelcoat....stay on target.... Quote Link to comment Share on other sites More sharing options...
pandatrooper[TK] Posted August 30, 2011 Report Share Posted August 30, 2011 Personally, I would have cut the cod and hidden some of the gap by extending with plastic and hiding it with the belt. This might have necessitated extending the kidney section too, but again it's covered by the belt. Then lower the chest as best you can. I feel extending the chest plate changes the look of the armor too much. Quote Link to comment Share on other sites More sharing options...
f0xtrooper[501st] Posted August 30, 2011 Author Report Share Posted August 30, 2011 I feel extending the chest plate changes the look of the armor too much. As a 6ft 4" trooper an extended chest piece makes the upper body armour look correct when worn. Where as the original piece makes it look like im wearing a 3/4 cut vest top from the 80's! Granted I can understand it might change the look of the armour on somebody thats 5ft 10" but that obviously isnt the case. It is exactly the same length as an RT-Mod chest; and the chest section is in the same position as an AM chest piece. I dont really see where your coming from pandatrooper. Quote Link to comment Share on other sites More sharing options...
SCTrooper[TK] Posted August 31, 2011 Report Share Posted August 31, 2011 (edited) The RT-Mod chest piece is very close in size to the anh. The RT-Mod AB piece is were the big difference is, 3 '' taller than the anh, check out the RT-mod site for yourself. Mike, take it Easy! Edited August 31, 2011 by SCTrooper Quote Link to comment Share on other sites More sharing options...
f0xtrooper[501st] Posted August 31, 2011 Author Report Share Posted August 31, 2011 The RT-Mod chest piece is very close in size to the anh. Thats kind of the point. Quote Link to comment Share on other sites More sharing options...
f0xtrooper[501st] Posted September 2, 2011 Author Report Share Posted September 2, 2011 It's ready to prime and paint. Gelcoated the extension for strength polypasted on top to give the shape more definition. I dont want it to look hashed together. Tougher than a Dewback steak and smoother than the emperor on a saturday night.... ...just got to find a good strong plastic gloss white. Quote Link to comment Share on other sites More sharing options...
TK_LEPER Posted September 2, 2011 Report Share Posted September 2, 2011 Nice save! Quote Link to comment Share on other sites More sharing options...
f0xtrooper[501st] Posted September 5, 2011 Author Report Share Posted September 5, 2011 ok finished the chest modifications. Primed the chest (of course showed up just how much more sanding was needed ) then set about painting it. I used 3 coats of satin white "Plastikote" followed by 2 coats of gloss clear. Looks pretty close to the original finish, not that it matters too much as the wethering should balance it all out. Back in the game Time to make a start on the backpack. Quote Link to comment Share on other sites More sharing options...
MartinSivertsen[501st] Posted September 5, 2011 Report Share Posted September 5, 2011 Christ, what a modification. I don't think I'd have the nerves to do that. Praising myself happy that I'm 6ft tall and pretty much spot on for a TM suit without modification. I'm looking forward to seeing this one done! Quote Link to comment Share on other sites More sharing options...
kaptinkaos Posted September 6, 2011 Report Share Posted September 6, 2011 Props dude. I just finished with some SERIOUS modification to an AM kit. I feel your woes, lol! It's kinda fun though, isn't it? Making it, forcing it to be what you need it to be. Keep up the good work! I can hardly wait to see it dirty! Quote Link to comment Share on other sites More sharing options...
f0xtrooper[501st] Posted October 12, 2011 Author Report Share Posted October 12, 2011 Not updated te build thread in a while as most of the stuff im doing now is fitting and clean up, but I thought id post some progress for those following the build. Due to my "manly" and strangly proportioned body I have had to make a few adjustments to my build for comfort purposes. All though pretty much put together I really couldnt manage to stay suited up for too long. As I intend to troop like crazy once cleared I set about making some changes. Due to being stuck on an island with no help avaliable and a missus who wets herself with laughter when she sees me in my bodysuit. I decided to build a duct tape mannequin to make it easier to adjust my armors fit. I wish that I had done this in the begining of my build it has really made things easier. Its a dead ringer for my body shape and was simple to make. The boots, gloves, suit and neck seal are part of the mannequin as I they have been replaced during my test fits. Using the mannequin I have adjusted biceps, shoulders, back, chest, shins and cod (thank goodness my boys were killing me!) A few adjustments left but nearly there.... Quote Link to comment Share on other sites More sharing options...
MartinSivertsen[501st] Posted October 12, 2011 Report Share Posted October 12, 2011 Cool. I really like the mannequin Quote Link to comment Share on other sites More sharing options...
Heavy D[TK] Posted October 19, 2011 Report Share Posted October 19, 2011 Nice work Mike, especially with the mod to fit your body style. Creative Quote Link to comment Share on other sites More sharing options...
f0xtrooper[501st] Posted October 19, 2011 Author Report Share Posted October 19, 2011 Onto the last update I decided to redo the inside of my helmet as there isnt a lot of space and to be honest I couldnt see me wearing it for a 4 hour stint. I removed all the padding and lenses and basically went back to the begining. I cut up a set of foam knee protectors to use to pad the inside of the helmet and give it some more space. I filled the eye surrounds with milliput and popped in some motherboard standoffs to hold the lenses. I ground off the outer screw with my dremel leaving this Next I made a template for the lenses using a piece of toy plastic from one of the many toys I have to buy for my little ones. I transfered the template to a piece of wielders mask and drilled the screw holes The wielders mask is much darker and stronder than the material that came with my helmet. I edged it off with C channel (So I dont scratch my face again ) and screwed it into the helmet Finally I ran some wheater stripping over the srew heads and placed the last piece of padding between the nose bridge. As the helmet is obviously not symetrical it needed padding here to stop irritation to my left eye. Much more comfortable and conclusive proof that even a melon as big as mine can fit into an ATA helmet This will hopefully be the last pic post. Final test fitting tonight then a week of weathering. I wont post anymore pics. Anyone interested will see my build in all its glory when I am cleared and request deployment Thanks to those who followed the thread and "See you in the ranks" Quote Link to comment Share on other sites More sharing options...
MartinSivertsen[501st] Posted October 19, 2011 Report Share Posted October 19, 2011 Very nice job on the eyes! Looks really comfortable. Quote Link to comment Share on other sites More sharing options...

Recommended Posts
Join the conversation
You can post now and register later. If you have an account, sign in now to post with your account.