Sithtrooper02
-
Posts
66 -
Joined
-
Last visited
1 Follower
About Sithtrooper02

Recent Profile Visitors
3,386 profile views


-
 The second one got even better and weights a little less, around 3.3lbs. I will update the details on the main built thread with the details of the latest one
 -
The first Ab for sale is out, next one to be completed next week (currently curing). Here are the details for those interested. I now take orders going forward and I will send out pictures before you have any commitment to buy of course. Dimensions 105cm long x 30cm high x 6-9mm thick. ***I strongly encourage you to do a model at home and test the size against you flight suit to insure it fits. It needs to fit tight on your flight suit to have the proper look. Weight : approx 4.5lbs Price 200USD + shipping cost (I will charge you exactly what Canada Post charges me to ship). There is a lot of material, prep and consumables to create this ab. I want this piece to be available to everyone, so I'm not really counting my time much in this mostly want people to get them as it is really not easy to do. I have tested to wrap it tightly for several days to see if I can ship it in a small footprint and it doesn't deform, so all good. I will probably ship them in a hard 3D printed cylinder to protect that you can use for carrying afterward This is a raw casting, you will need to trim it to your size with a very sharp razor blade (recommend that you don't cheap on them and use multiple to trim it completely to your size) The wax used to release the rubber does create a bit of surface finish unevenness, but I have rubbed it on the other casting with some dishwashing soap and it's a bit better. I'll try to take pictures of how I added straps and velcros on it. To have a nice joint on the right side to keep them together, I did make a special velcro with rigid sections. The Ab is flexible, but not too much as you don't want any deformation while wearing it. I used a balance between rigidity and flexibility so that there are no 'pockets' while wearing. IMPORTANT NOTE: The pictures below are with the worst lighting condition to expose the variations to a maximum, it's way better with standard lighting, and when it's on you with the armor overlapping. But I want full disclosure so that you guys are not surprised. This is a rubber casting so there are always tinny defects (the ones in the movie are certainly not better ). This one as a couple of tinny bubbles that I will try to fill a bit before shipping. The color is even everywhere on the casting, but the surface finish variation in these light conditions show like a bit of variation of color. Also, don't forget that the bottom 5cm will not show, as the belt is overlapping it all around, same for the top portion. There is some dust and a bit of water left on the rubber when I took the pictures, it can easily be cleaned with soap and water of course. Try not to put water on the back side, as the foam rubber is porous and will retain water. I can take additional pictures if needed. Enjoy!
-
Yes, I have a couple of ab in the process of being made that are probably 3-4 weeks out. Once they are done I will take pictures and post them on Etsy individually with specific details. I have one already that I will discount that is a bit heavier (about 1lbs) than the other ones that are to be made, but is very nice result. FYI on Etsy, it will be more expensive than buying directly from me as there are heavy fees that they charge. the dimensions of the casting is 100cmx30cmx8-9mm so I strongly advise you check if it will fit you correctly.
-
Thanks! It’s going to be very robust. After a couple of troops the urethane foam was having a few dents where the hard armor pinch. This new urethane is really resistant
-
It’s been a while but I finally got the Ab section with a new process done to my satisfaction. It took several trials and several weeks to get it right…! This new method gives an easy an very durable, flexible and lightweight Ab armor. I researched and tested various products to get to what I desired: a method that gives 100% yield with a uniform color so that no paint is required, just colouring. I stayed with urethane formulation as didn’t want to go with silicones as nothing adheres to it afterward( I have molded several parts of my Sith trooper armor and I wouldn’t repeat it ) I tried different hardness of flexible urethane to come up with the Smooth-on Vytaflex 40 as being the right hardness and viscosity to avoid bubbles and be rigid enough. I also have tried using a 100% of vytaflex 40, but it would not keep perfectly its shape without requiring 8mm thickness which would have weighted probably 7-8lbs. So I started using vytaflex on surface and Tuff Stuff 15 foam urethane for the backing. the best formulation is about 2mm thickness of Vytaflex ( with protruding shapes fully filled) and then a 5-6mm backing with Tuff Stuff. The total weight is about 3 lbs. below are pictures of the mold after the Vytaflex is casted, a cross section of the Ab and the finished Ab. I’ll post other pictures when I put on my armor again. I will order some more urethane soon to build at least 2 Ab sections for interested people. I have a trial version with 4mm thick Vytaflex with 5mm urethane foam (which weight about 5lbs if someone is interested by this one.l, it’s available now, just PM me. this is a molded rubber part, so it is never perfectly even surface finish and will have tiny defects, so don’t set the expectations too high. Its doesn’t show from a couple of feet away. I used smooth on mold release 2831 which is wax based. ***don’t use the universal mold release even though they say it’s good for Vytaflex, it will go through the rubber and prevent the foam from sticking to it! I use a full pint kit of Vytlaflex 40 (2lbs) for my mold. The colouring I used is the smooth on So-Strong white and black with 8 drops of white for each drop of black for the Vytaflex. I made the color a little lighter gray to better match screen color versus my previous Ab. Wait at least 16h before pouring the tuff Stuff 15 on it. 1lbs of mix product is enough to get the right height on my 105cmx30cm mold. I color the tuff stuff with a few drop of black, just to give a similar grey finish to match the Vytaflex. ll l
-
Black Series reference pictures
Sithtrooper02 replied to Sithtrooper02's topic in Gallery & Research
Fingers crossed, nothing on the radar yet -
Here are the pictures of the black series IAC (ahead of the official release ) , overall quality is pretty good, but typical to black series, the colors and painting are not perfect. A few places are missing colors (like the thigh plates red bars, the jetpack details,...) and flightsuit has a weird greenish grey color and the medium grey armor color and ab is more of a light grey.
-
Request your Centurion Certificate here:
Sithtrooper02 replied to justjoseph63's topic in Request Centurion Status
1- francois Pelletier 2- TK-20236 3-centurion 4-Letter 5-Mario Here you Go Centurion! https://www.whitearmor.net/eib/certificates/20236-centurion.png -
Dylans Imperial Armoured Captain
Sithtrooper02 replied to loyalImperialCitizen's topic in Imperial Commando Build Threads
Hey I just got my hand on the black series (I’ve got contact that provided me with it before it releases officially ) I can take some pictures of it. I will post the holster standard variant 3D model on Etsy tomorrow and I updated my build thread on the holster fabrication. It is very simple to do it like I did. The captain variant shouldn’t be different construction in my opinion, just adapted to the other pistol shape. -
I have started adding details on a few things in the build thread above. Per @loyalImperialCitizen (Dylan) ask, I added the holster build details, with on step by step how I did it, the 3D model will be on Etsy in the upcoming days. Probably a 1000 way to do it, mine is for DYI without any skills n fabric/leather work I am working on getting the remaining parts of the full armor available, still some time to complete but if someone has immediate need, I can certainly accommodate with current work in progress to get them the complete armor. I also worked on the Baton and shield as those are pretty simple and straight forward once I had the right pictures and fun to add. Below are the 3D models of the finished design, they will be available soon for everyone. I will start printing them in a few days. Any feedback is gladly welcome on things I would have missed/ didn't draw correctly from the reference pictures. The baton will have working lights, so I designed it with battery holders, cable wiring and possibility to change the LED if they become defective. I have designed it to be compatible with WS2812B LED strip (most common LED strip available., that way the color can be perfectly tuned to screen reference. The availability of purple light is close to none, thus adjustable color LED is the best path to get the right color. ...Unfortunately, I didn't designed it to fold and unfold like the real one ( too much time and complexity in 3D printing to make it work nicely ) Shield is nice but huge to print. I sized it in proportion with the reference pictures against my height (5'8''). It barely fits onto my printer 420x420mm bed in diagonal...! The triangular window will easily be cut from 1/8'' / 3mm transparent plastic and clamped between internal and external printed black seals I am left handed, so I will print it mirror to the image below. Having seen several left handed IAC rifles in hand, I guess that having left handed shield should be approvable I will post the results and details on how I did the assembly and lighting when I have printed and completed them. The metallic colors of the shield are somehow different from Hot toys and reference pictures and I'll compromise when selecting the pain: it seems to be matte/ satin finish metal in both cases. It is shown as matte aluminum on Hot Toy images, but seems darker and more reflective in the reference images. - The baton is more of a satin finish titanium color on the main body. I'll try to get this paint by mixing a couple, as I haven't seen this color readily available for airbrush.
-
I am completing the 3D design for the riot shield and baton and wanted to share reference pictures and have discussion/ agreement on those images I used, prior to moving to print. Hot toys reference pictures are useful for the baton, but there is enough pictures of the shield to complete the reference without using hot toys images. - Probably just like FOTK, shield and baton go together, no jetpack or rifle when having those. Shield: - Shield is similar to FOTK riot shield but somehow different. The IAC are also wearing them hanged on their back top anchor points, but unclear how they attached those. I'll try to find a way to have anchor points on the shield, but at the same time, there is nothing visible on the inside of the shield that suggest features to attach it to the back anchors. - It is clearly only hanged by the top anchors as we can see the shield pivot and swing on their back when the IAC are fighting with mando - Shield has a handle and a strap on the inside. - The 4 pointed greeblies are clearly defined in the reference pictures and different from the hot toys that seems simplified in multiple places. Baton - There is limited images, mostly blurred in the movie reference. On the hot toys, there are way more details and seem to correlate to blurr images. - the details of the inside of the tip section is only partially referenced, best guess design from there !
- 1 reply
-
- 3
-

-
Thank you! 🤗 It’s been real fun working on this project with you guys!
-
Hi, back from vacation! Here are the pics of the red lights in low ambient light conditions. The LED lights do interfere with the CCD camera sensors and the pictures are not representative of what the eye sees. In real, the lights are a pure RED (I used red LEDs for all lights except the jetpack for which I used a diffuse white LED and in front on them, I used red tinted clear plastic so that it still looks red if powered off, thus the only light emitted is red ), there is not yellow/white tint as the pictures tends to show when the CCD gets saturated. I tried my best to take a couple of light conditions with reflections that show how bright they are. They are clearly visible in daylight. N.B., the chest light is not mentioned in the CRL, but it should be included in the level 3 reference. Overall pictures of all the lights together. Zoom in on each component
-
Dylans Imperial Armoured Captain
Sithtrooper02 replied to loyalImperialCitizen's topic in Imperial Commando Build Threads
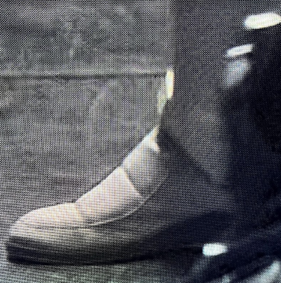
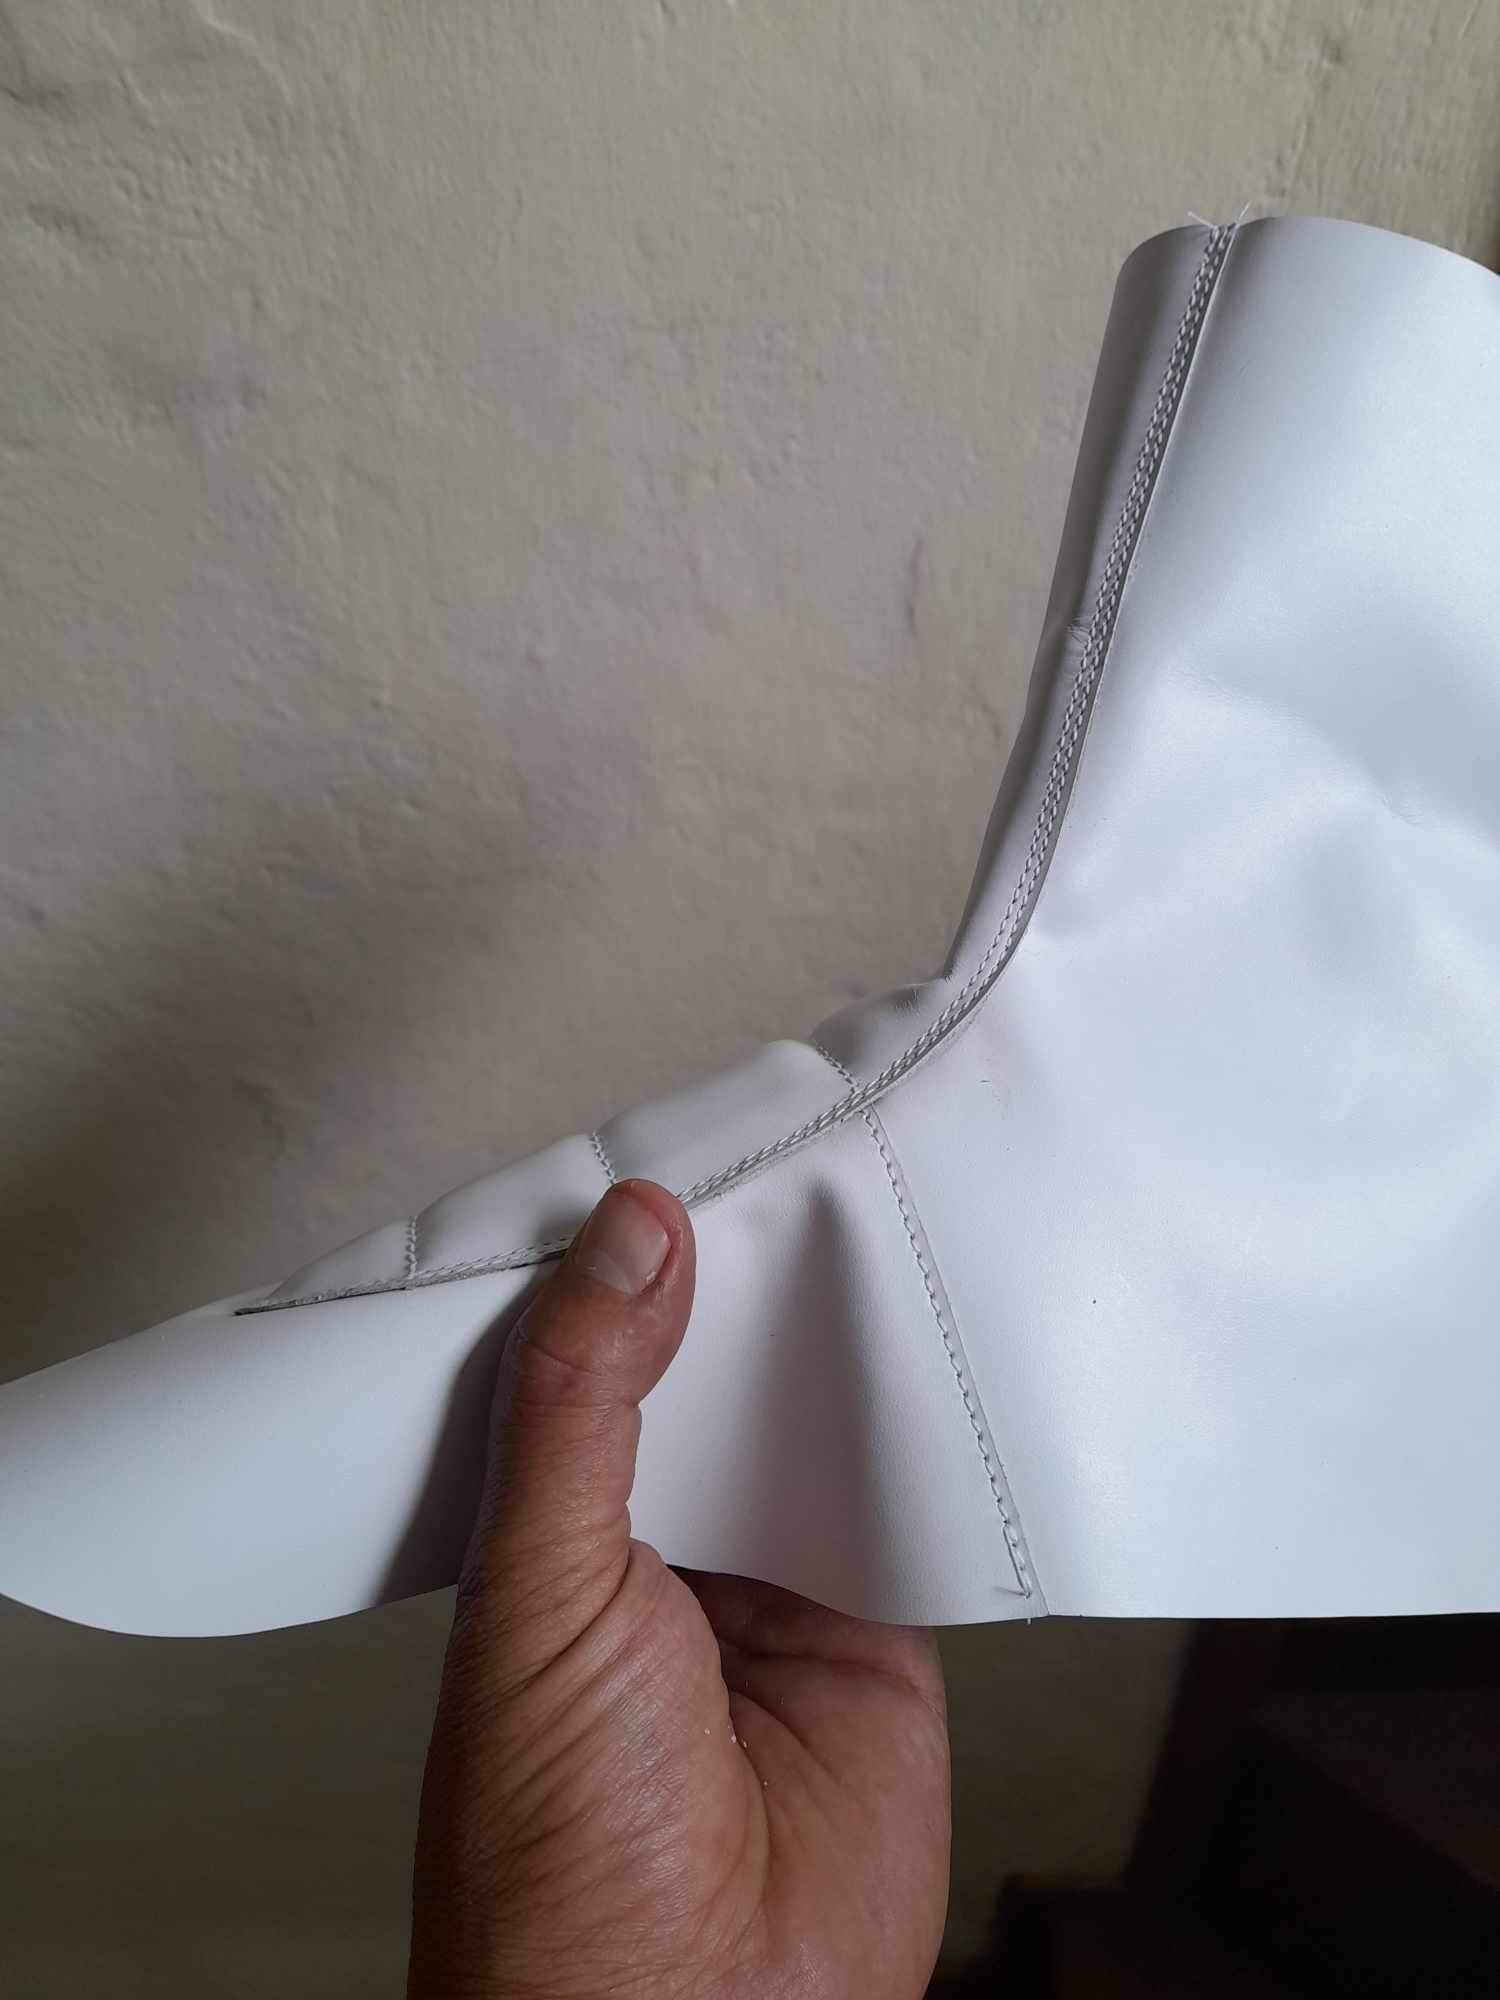
Talk with Giovanni Rodriguez from Crowprops to have same as mine, he is aware that this modified boot is now in the CRL reference. He sent me some pictures of the instep with padding while progressing through the fabrication. Here is one below :
-
Dylans Imperial Armoured Captain
Sithtrooper02 replied to loyalImperialCitizen's topic in Imperial Commando Build Threads
When the CRL was created, it referred to screenshots from the show. You can find all of them in the Gallery and research thread under CRL creation. I copied one of the most relevant picture here for reference. In my opinion, it seems like a thin layer of leather with backing,