-
Posts
106 -
Joined
-
Last visited
About Scout_Troop3R

Contact Methods
-
MSN
8734552991
Profile Information
-
Gender
Male
-
Location
Carleton Place, Ontario
-
Interests
Star Wars, Video games, Band, Transformers (G1 - 1984-86 preferrably), Food.
Standard Info
-
Name
Tyler
Recent Profile Visitors
1,018 profile views
-
Hey there, been a little while! Not much to say about my absence other than it's been a busy 2 months, but now I'm back with a quick question. I wanted to start painting the vocoder today and I'm just unsure if I should use the glossy or satin black (I think it's satin but I'm still not sure after looking around some other posts), so I figured I should get some answers.
-
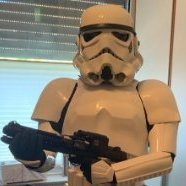
And huzzah! I think functionally it is complete! (aside from paint and fixes of course) Yes it's a bit of a mess but hey it works, and I can make it pretty after comic-con. Really happy with it, it's a good fit, and it stays on my head properly. That other velcro patch is for a battery pack that I have charging currently, and I definitely need a new microphone, the current one is crap.
-
I got the left ear installed in record time with zero problems, good day! I also got the visor finally installed, no more tape, better day! And man is this awesome. Aside from painting and fixing the right ear piece all that's left is installing padding, electronics, and the s-type neck trim.
-
looking at these now I see where I need to trim more trim trim trim
-
I did some trimming and I think it helped but I'm not sure. For tonight it's good enough.
-
I was just planning to cut a piece to fit that gap and ABS paste it on but trimming and then doing that (if I need to) is probably a better idea lol. I don't mind having the little gaps, it's just that big one which bothers me.
-
I got the last screw and rivet in for the right ear and it looks great with only a small thing or two to be fixed, mostly just that gap by the ear, which will be easy to mend. Tomorrow I'll see about getting the left ear and the visor done, then all the basics will be ready for Comic-Con and I can spend the last two days on the extras. (Audio, padding, etc.) Painting will come later when I actually get my paints in the mail.
-
Today I got started on the screws, and got the right ear piece screws countersunk and it is looking quite nice! I'm having lunch now but I'm going to trim some more off the back helmet piece so the ear sits more flush, and get started on the rest of the rivets/screws.
-
Update time! The past two days I've hardly been able to do anything because of work, and a visit to my grandfolks, but I'm very satisfied with what I got done in that time. I finally got those rivets secured thanks to a little advice from my grandpa, and it really looks way better now. Now that the rivets are secured I can also get started on the screws, which means I can also now get the visor secured, which means hopefully I can actually get it mostly done (minus the paint) before Saturday.
-
I'll do some more testing and read those threads again when I get home for sure.
-
Today has been less than productive, I think I'm a bit burnt out. Only thing I managed to get done today was practice on countersinking some screws which went great That was as close as I managed to get with various methods, so that means I'll probably have to go to home depot again and get a countersink drill bit.
-
Yeah I didn't mention this but on Thursday I put it together with the brow strip and electronics and showed it off, there was enough room for the brow to sit nice and snug, and even with the electronics there was still plenty of room I wasn't able to put the foam in though lol, that definitely needs some shaving down.
-
Right so I've figured out where I want to have the ears placed, and I'm going to cut the back plate to the profile which I'm outlining in pencil once I get my nerve up. then hopefully everything will sit much more flush and I can start putting the rest of the screws/rivets
-
Hello again! No update yesterday because I had a gamenight, and worked on my bucket right up to it. I assembled the front and back halves with loose-ish rivets so that I could take it apart if I needed to, and the visor anchor also works quite well, for the ends of the visor I'm just gonna have the ear screws hold them in place because that's easy and secure. Today I want to try and get the ears situated (or started on that), and considering these pieces do not line up at all I have a lot of reading and testing to do. Hopefully I can get something successfully done before work.
-
Not too much progress today, which sucks, but I have to wait for glue to continue. The visor anchor finished gluing together, so I drilled a hole in that and the visor for the screw. Now I'm just waiting for the anchor to glue to the faceplate, and I can't do any helmet adjustments of the front and back together, so I also marked out a line with a ruler from the traps for the screws. Once the helmet is situated properly I'll get to work on the ears. Also I figure my paints aren't coming until after comic con considering they're in LA right now, so oh well.


