
.png.c79477c1740a05d2252e896e392c2c0e.png)
Ensi
-
Posts
226 -
Joined
-
Last visited
About Ensi

Recent Profile Visitors


-
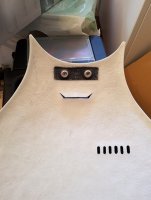
Great to see another FO! For the cracks I used fibreglass matting and polyester resin from a boat repair kit. I applied on the backside of the armor where the crack was and made sure to cover way more area than just the crack itself. This will kill the flex in that area and prevent the crack from progressing. After this you can use body filler as normal on the front and sand flush I sanded all of the pieces on the inside with 120grit sandpaper to get rid of stray fibers and sharp spots, then gave the entire kit a good wash. This eliminates itching/snagging and just promotes good adhesion for snaps etc. Some use plastidip on the inside but I don't see the point in that personally. After this i'd recommend giving the outside of the kit a light sanding with fine grit sandpaper (320+), then hit it with a coat of primer. This will show every single little blemish, pinhole, and crack. My kit looked flawless until I had a layer of primer on it
-

Request your Centurion Certificate here:
Ensi replied to justjoseph63's topic in Request Centurion Status
Daniel Andersen 61514 A4 shasha Thanks! http://www.whitearmor.net/eib/certificates/61514-centurion.png -
lmao this is profile picture material!
-
TK-61514 Requesting ANH Stunt Centurion Status [ATA] [424]
Ensi replied to Ensi's topic in Request Centurion Status
Aw man I liked having EIB Cohorts: Rebels -
TK-61514 Requesting ANH Stunt Centurion Status [ATA] [424]
Ensi replied to Ensi's topic in Request Centurion Status
If it helps, I just put the fluffy loop side of the velcro on the metal clips. No rough/hook side velcro on the belt or ABS, that would surely make it a pain! Thanks Shasha, you did a great job on the app. You and Dan sure have an attention to detail Thanks all! Appreciate all the help i've gotten through this journey Just ordered some FISD patches with Centurion rockers, aww yiss -
TK-61514 Requesting ANH Stunt Centurion Status [ATA] [424]
Ensi replied to Ensi's topic in Request Centurion Status
It's on the list I'll have to re-position the panel in order to keep the clips flush with the panel due to cutting/trimming the clips. Velcro is just awesome, you already have it from your build, takes a minute to install. A real no brainer! Just want to make this clear Joseph, since you are a DO, do you want me to do this before you guys can proceed with my application? -
Sick!! Always wondered, how are those under the gloves? Tedious to get on/off? Bulky?
-
TK-61514 Requesting ANH Stunt Centurion Status [ATA] [424]
Ensi replied to Ensi's topic in Request Centurion Status
These must've slipped through the cracks. I swore I included them lol Also added into the original post -
Hey again! Time to get that Centurion badge NOTE TO THE DO TEAM: These pics are exactly the same as my EIB application, except the ones in the very start. Name: Daniel TKID: 61514 Garrison: Nordic Garrison 501st page: http://501st.com/members/displaymemberdetails.php?userID=25720 Build thread: EIB Application Thread: Mandatory Information Armor = ATA Helmet= ATA Blaster= Praetorian Blasters Optional Height = 177cm / 5'10" Weight = 83kg / 183lbs Boots = Imperial Boots Canvas belt = Burkbench Designs Hand Plates (+TD screws + frown mesh + single-cap rivets)= @justjoseph63 Electronics= TRamp Neck Seal = The Imperial Seamstress (bought via Burkbench Designs) Holster = Burkbench Designs Here are the pics in album form: https://imgur.com/a/BOYLoSV Here are the updated pics in album form: https://imgur.com/a/sTwMqLl Click the pics in this post for higher resolution UPDATED PICTURES FOR CENTURION BASED ON RECOMMENDATIONS FROM MY EIB APPLICATION: Left cracked trap on helmet This is merely a reflection/weird angle. It looks totally fine normally Vocoder paint runs I sanded the vocoder and gave it a fresh coat of satin black #85! Chestplate return edge too big I trimmed the chestplate return edge. Black gap at wrists As I have these set up with velcro, it was just a matter of adjusting the velcro a bit. Frayed belt too frayed I gave the belt a haircut. Plastic belt bending outwards too much I can't remember if I did more to it after the original pictures, but I suited up and it looks just fine TD clips to be more squared I have not done anythting here, but it should not hold up my application. I will get to it as soon as I get access to some more power tools. Butt-plate overlapping issue This must've been a dressing error as it isn't a problem. And btw, @shashachu the overlap issue I was referring to, was that of the ab-plate and kidney. As I said in my EIB application i've fixed it with a bracketing system. For anyone new reading this, it is highly recommended! A couple of scrap ABS pieces and some glue is all you need Sniper-knee tucking under thigh This is due to my legs. I don't know if it's genetic or medical but I stand naturally with my legs like a darn flamingo: This is how it looks when I stand like a normal person: Forearm return edge This is just the nature of the super thick ATA kit. There is no return edge present on my forearms. Back shoulder gap This is mostly a dressing issue. After taking the original photos I upgraded with white polyester webbing under the shoulder-bridges which helped bring it in closer. (Sorry for the wonky photos, it's hard doing this by yourself!) Flexible handguards START OF OLD PHOTOS - Front Left Left arms up Left arms up detail Back Right (the overlap issue has been fixed with a bracketing system, let me know if you want updated photos) Right arms up Right arms up detail Ab detail Forearms Cod Buttplate Interior strapping Sniper knee Helmet Hovi mic tips Lens color Thigh attachment Boots Blaster Neckseal TD Belt / Holster Pop rivets + washers on front Snaps at the back
-
TK-61514 Requesting ANH Stunt EIB Status [ATA] [APPROVED] 2nd
Ensi replied to Ensi's topic in Request Expert Infantry Status
Thanks -
TK-61514 Requesting ANH Stunt EIB Status [ATA] [APPROVED] 2nd
Ensi replied to Ensi's topic in Request Expert Infantry Status
Thank you! And yes, so true Totally agree. It's on my to-do list when I get to unpacking everything I was gonna do that, but I am scared it's gonna pull through -
TK-61514 Requesting ANH Stunt EIB Status [ATA] [APPROVED] 2nd
Ensi replied to Ensi's topic in Request Expert Infantry Status
Just tried uploading the drop box pictures and it seems like Imgur is throwing a fit atm. So I had to use Photobucket for these Drop box side pictures: I agree. I've added velcro to that elastic connection so adjusting is no problem Here's one from a troop where it was more suitably placed, if needed i'll ofc take new pics in the same pose. I'm in the middle of a move atm so things are all over the place! -
TK-61514 Requesting ANH Stunt EIB Status [ATA] [APPROVED] 2nd
Ensi replied to Ensi's topic in Request Expert Infantry Status
Oh and here's the action photo: -
Hey! Finally time to get this going as I received my blaster. Name: Daniel TKID: 61514 Garrison: Nordic Garrison 501st page: http://501st.com/members/displaymemberdetails.php?userID=25720 Build thread: Mandatory Information Armor = ATA Helmet= ATA Blaster= Praetorian Blasters Optional Height = 177cm / 5'10" Weight = 83kg / 183lbs Boots = Imperial Boots Canvas belt = Burkbench Designs Hand Plates (+TD screws + frown mesh + single-cap rivets)= @justjoseph63 Electronics= TRamp Neck Seal = The Imperial Seamstress (bought via Burkbench Designs) Holster = Burkbench Designs Here are the pics in album form: https://imgur.com/a/BOYLoSV Click the pics in this post for higher resolution Front Left Left arms up Left arms up detail Back Right (the overlap issue has been fixed with a bracketing system, let me know if you want updated photos) Right arms up Right arms up detail Ab detail Forearms Cod Buttplate Interior strapping Sniper knee Helmet Hovi mic tips Lens color Thigh attachment Blaster Neckseal TD Belt / Holster Pop rivets + washers on front Snaps at the back
-
Praetorian not delivering or communicating
Ensi replied to Glorificus's topic in General Weapons Discussion
Just to update, received blaster today, looks great as expected!
