

kroenen77
-
Posts
122 -
Joined
-
Last visited
Content Type
Profiles
Forums
Gallery
Articles
Media Demo
Posts posted by kroenen77
-
-
Were can I buy a RT-Chestplate?
-
Spray it pure white...than you have no problems!;-)
But I like the blacktroopers,too.I hope they´re becomimg a place in the SW-Real-TV-Series.
-
Great helmet...I want one,too.But why I cannot preorder one of them?

-
Also fill/smooth out the chin seam, and fix the teeth if needed.
Oh,yes..the chin..what is need to fix at the teeth?
-
What are the exact mods for elite?My MR-CE has new lenses,new tubestripes and the srews in the ears!

-
don't mean to hijack the thread but just thought i'd show the interior for my MR lid.
I found a cheap snowbarding helmet and ripped out the guts.
Fits me like a (very comfortable) glove now.
Just needs to have proper lens', electronics and some visual greeblies to create an authentic sci-fi vibe then i'm pretty much done with it.
Respect
P.
Wow..awesome.Do you habe a pic of this helmet?What did you paid for it?
-
He has recasted from another recaster..and he from another..and,and,and...it´s a horror...if I don´t want,that someone recasts my work,I don´t sell it.Recasting is a f***,but it´s a part of life...I think all of us bought recastet parts in the past.You can´t know all handbuilders in the world.And who is telling the truth?If I am looking for an nonrecastet Armor,I would ask in the RPF-Forum.
The ROTS-Vaderarmor looks like an Rubiesrecast..also whats the problem?I can´t ask Rubies to make me a fiberglasarmor.I think that´s ok!?
-
But his ROTS-Vaderarmor looks very nice.

-
Great armor...welcome to the FISD!!!
-
yep. i didnt paint anything. haha. thanks guys. i put the fans and stuff in too. its so fun
Great...and with a ANH-Buttonkit from vaderdave,it would look a little bit more accurate.I ordered my kit today.
-
Nice work...the helmet looks awesome with the FX-armor.Are the parts all unpainted?
-
No problem...
I'm going to the post office today, so it will be on it's way this afternoon.
That´s a word...thanks.
-
This may help clarify size. the FX kit is pretty versatile as far as fitting a wide range of sizes, from short to tall with relative ease and some trimming:

ANH screenaccurate?I think the hands are ESB or ROTJ?But I´m no expert.
Thanks for this great pic..now I know,that I can never wear an original trooperarmor...haha..the FX is the right choise for me.;-)
-
Hey Mark,
I have an extra Empire logo decal too, so I'm sending that to you as well.
Thanks a lot my Trooperbrother!
-
I have an extra set of Arlon 05 Blue Tube Stripes left, if anyone wants them....for free.
Just send me your address and I'll get those to you!
Email me
toonman@msn.com
E-Mail send...
-
riveting said:
No prob's
I should have done this first time round I guess, all these spacer post's in the red circles have to go
Oh,that´s enough?I must cut nothing from this parts(orange markings)?

And what decals are you using for the blue stripes on the tubes?Or are they painted?I´ve stripes from trooperdecals.com,but under direct daylight,they are looking more violet as blue.

-
riveting said:
Here's an alternative method but it may leave a small indent where the knife goes in.
slide a thin strong knife down the earcap, then using repair kit jemmy's prize a small gap, then cut the lug away, there may be a popping sound
then cut the spacer post's of the helmet
& repeat the first post with the earcaps
Do you have pics from all cutted parts together?I don´t understand,what I must all cut exacactly..sorry.
-
Laspector said:What is this"Tamiya weathering master" in "soot"that you speak of? Is it some kind of spray paint or what? How about a pic of the stuff and the bucket?
It´s a weathering kit for military modellkits from the japanese Tamiya company.In the kit B,you get "soot"and "snow"..both good for troopers.It´s only to put some dark or white pigments in the white plastic of the helmet or armor(you must look,what gives your look the best effect)...so it reflects the lights different.I used some "soot"on the helmet and a little bit "snow"for the armor.So you need only a little bit of it and put it in circles over the helmet or/and armor..so you can not see it on the first look,but the helmet looks darker and better on pics.I don´t know,how much your white is different..but on my helmet it works great.
Here is a pic from the set I used.
-----------
Use your finger to work with it..but only a very little of the colour!!!
-
Has anyone re-painted their CE helmets completely?...just wondering...
I'm tempted, so it matches my FX armor better....
I think you must paint all together,because the white isn´t 100% the same,like the plastic of the armor.You see the real differnts under flashlight.You must use the same primer and colour for both(helmet and armor).But a little bit different white is movieaccurate for the Stuntversion,because in 1976 the original stunthelmets didn´t matched the armorwhite,too.I´ve posted pics in another post here.
-
thanks Mark, I removed a small bit of the flashing in the eye sockets with a needle file, I also used the same file to open up half the frown, the other half needs to be completed. The screws I used were X3 straight slot, countersunk 4mm by 25mm long, machine screws, you might want to cut down the screw by the bottom of the earcap or it may hit your head!
hope this helped
Oh,my englisch...I must translate it tomorrow...technical instructions are to hard for my old schoolenglisch,Steve.
Can you send me a pic of your machine srews?Here in germany I bought some,but the screwhead on the top is too high.So it´s not movieaccurate.
-
Great work..but what did you cut from the eyes exactly?What 3 screws did you use for the outside of the ears?
-
Yes,for more yellow ABS,that´s a great idea.The weatherinmaster in "sand"is possible,too.
-
Something new,for the guys,who wants the MR-helmets white a little darker for pics:
To make the helmet a little darker white,you can use "Tamiya weathering master" in "soot"..but VERY FINE(if you use too much,it looks like black soot!!) all over the helmet..makes it a better whitematch for pics.But I know,the different is sreenaccurate..the stunthelmets in 1976 had not exact the same colour like the Armors,too.But some guys want it a little bit better match..so that´s a possible way,to do that,without painting the complete armor.I hope that helps.
-
Lizzeh said:I'm around 5' 8" and the FX fits me ok. I had to trim the chest a little and the thighs to get them smaller but nothing major. You should be fine I'd think you should go with a more accurate helmet though, if you can afford it. I just have the UK MR

Your Armor looks absolutly awesome with the MR-Helmet.I´m waiting for some parts for my FX(Canvasbelt and screenaccurate Buttons)..than I begin to build it,too.Could you send me a pic of your back thights?I must look,to make my bigger.

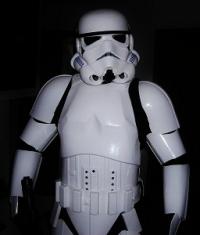
My ANH-FX-Trooper with updated MR-Helmet!,-)
in Build Threads Requireing Maintenance
Posted
Hi..I hope thats the right place to post it..here is my ANH-Trooperarmor..but I need a holster too.I´m a bodybuilder,so some parts are a little bit bigger in size..;-)