-
Posts
4,043 -
Joined
-
Last visited
-
Days Won
23
Content Type
Profiles
Forums
Gallery
Articles
Media Demo
Everything posted by gazmosis
-
All of bone's info is correct. The "hero" helmets for the original film were not just stunt helmets assembled differently. They were completely separate molds giving them a slightly different look used both for the hero TK and the TIE fighter pilot. If you were to make the ATA into a hero, I would suggest taking the time to iron out the 4th and 5th tooth indents leaving only the three as well as opening up the eyes slightly larger.
-
ATA armor build in progress
gazmosis replied to Squimspickle's topic in Build Threads Requireing Maintenance
WOW!! On point so far, trooper!! -

WTB: Acrylic/polycarbonite blaster tube
gazmosis replied to gazmosis's topic in General Weapons Discussion
Thank you, Norman! The big box stores do not carry plastic or PVC piping in the correct diameter or wall thickness to build an accurate blaster. The Pipe needs to have an EXTERIOR of 1.5 inches with a 1/16 wall thickness. Although metal piping is available, for those who want a plastic alternative, acrylic or polycarbonate tubing is the only option. -

WTB: Acrylic/polycarbonite blaster tube
gazmosis replied to gazmosis's topic in General Weapons Discussion
Holy crap!!! Yes Aaron, yes!!!!!!<br> Love you, Dude!<br> Thank you! -
I have the ink to buy an entire 8 foot section but I don't need an 8 foot section. Is there anyone who purchased a long tube and has a section long enough to make a blaster from? Doing a pipe build.
-

How to set/flatten split rivets?
gazmosis replied to Millar007's topic in Assembly, Mods, and Painting
A word of caution, If using a screwdriver to get the legs apart enough to hammer them flat, make SURE you use a lot of downward pressure against a hard surface while bending sideways. This will keep the pressure ON the split rivet and not the plastic. Remember, any hole drilled in the plastic creates a weak spot. Any hard twisting trying to bend that rivet leg and you could crack it. -

AM 2.0 first time build trying not to screw up
gazmosis replied to Darth_Tim's topic in Build Threads Requireing Maintenance
It really helps to have a helper when you are fitting ANY of the clamshell parts (forearms, biceps and legs) Keep in mind with the forearms, there is a right and left. When looking at the square indent ridge, you will see that one forearm is angled at the elbow side when you compare it to the ridge line. The other forearm is close to 90 degrees compared to the ridge line. The angled one is the right forearm. IT is so much easier to guide your helper. Bear in mind, you will have overlap of the plastic if you are a thinner build. It is very hard to mark a common cut line on both overlapping parts if you are doing this by yourself. -
Both eyes have fairly well defined ridges that marked the original eye openings. It looks to me that the Left eye (if you are wearing the helmet) could stand to have a bit more taken out of the outer edge. Nice work, so far!
-
You know the TKs in your picture are backwards
-
Someone recasted ATA and is selling it.
-

RS Prop Masters, Shin armour not Lining Up
gazmosis replied to FatalRewind's topic in Assembly, Mods, and Painting
You are exactly correct. That is just RS shins. Focus on getting the tops to align correctly and getting your front cover strip ridge the proper 20 mm width. Once you have the shin cut to fit, you can trim down the bottom to align properly together. Ideally, the outside of the shin should sit a little lower than the inside of the leg. This was to cover the elastic horseshoe on the boot. But if it doesn;t work out that way, no big deal. Just make sure you have no return edge on the bottom. -
Actually, it's not pointless. For some kids, meeting a Stormtrooper is something close to religious. But some kids are still skeptical. One of the things that makes kids question if we are real is the blaster. Although I never handed over my blaster, i "helped" kids hold it by letting them hold the front. When they feel cold steel and the added weight, they immediately question whether or not it's real. "Hey! That's not a plastic toy!"
-

Silly question about TK helmet teeth
gazmosis replied to drunken hutt's topic in Boots, Soft Parts, and other Accessories
Another good question. Simply because it is not a requirement. The mouth screen was started by members of the 501st for reasons mentioned above. The helmets in the films never used mouth screen. It is cool looking, but no required. -

Rocketsurgeon's HIPS don't lie
gazmosis replied to Rocketsurgeon's topic in Build Threads Requireing Maintenance
If assembled correctly, there will be no gap along he brow. Don't obsess about the alignment of the front and back cheek tubes. ATA and CAP helmets are close to identical. See this thread: <a data-ipb='nomediaparse' href='http://www.whitearmor.net/forum/topic/28633-howto-ata-helmet-build-hand-painted-details-pic-heavy/'>http://www.whitearmor.net/forum/topic/28633-howto-ata-helmet-build-hand-painted-details-pic-heavy/</a> -
Actually, sources tell that the parts for the film used suits were a polyurethane resin but they were all 3D printed. Most processes to make any of the armor you see here including the latest First Order TKs were all vacuformed plastic. The mold making and vacuform processes are sciences filled with methods and procedures that really cannot be explained on a single thread post like this. I suggest you start researching several sources at once including basic internet searches as well as you tube.
-

Gazmosis Retiring - Please stand by on EIB/Centurion Approvals
gazmosis replied to Darth Aloha's topic in Announcements
My fellow troopers: It brings heavy emotion to my heart to read the warm wishes and good thoughts from all of you. It has truly been my honor and privilege to be the guy who got to view all these incredible works of passion, dedication and art. It was both a challenge and a responsibility to look over each of these knowing the attention to detail and the effort that went into the final product. You guys and girls have made this detachment the greatest in the Legion both in costume appearance and in its brotherhood. It was an honor to work with so many of you incredible troopers which is why saying goodbye to this position made my heart hurt as bad as it does. Every armor application that comes in deserves the attention that you have put into building it. This is something that life has decided I can no longer do. These things happen, but I won't be gone forever. You just can't take something that was pretty much part of your daily life and just sweep it under the rug. The FISD and every trooper in it, will forever be a part of my life. Your new DO's will be fantastic I am certain of that. Thanks to my boss and friend, Eric Brager for all his support as well as the other staff members for their support in enduring my questions. But most of all, thanks to all of you troopers. Pass on what you have learned. Our future TKs depend on the best damn members in the Legion. YOU are it. My bucket is off in honor of you all. Thank you. Steve "Gazmosis" Gaza TK4034- 48 replies
-
- 13
-

-
http://www.whitearmor.net/forum/gallery/album/56-mg-34-detailed-dissassembly/
-
You have two choices: Since the base scope is brass, many start out by painting it brass with the black as a top coat. Then if you lightly sand certain areas, the brass will come through mimicking a weathered scope. OR...you can paint it black first, them detail and dry brush it with brass to weather it. Eaither way, gloss black is a little too glossy for a blaster. You want to stick with a matte or satin black.
-
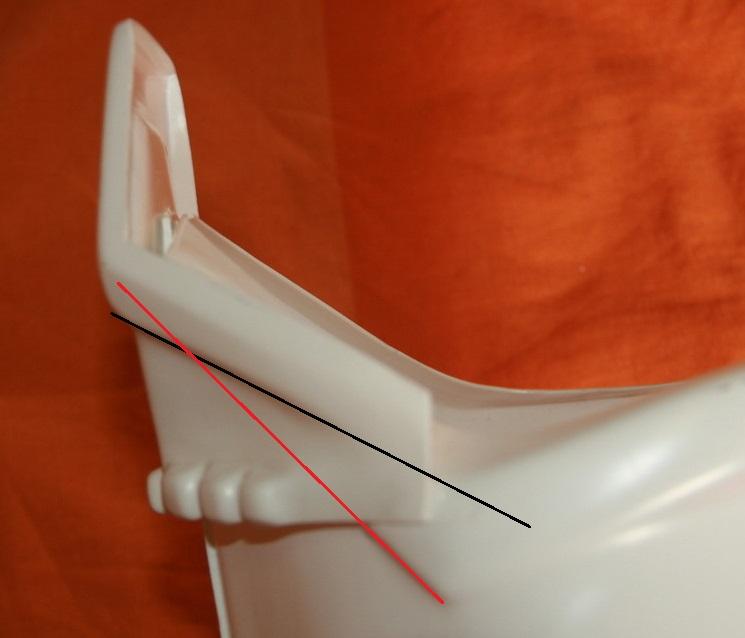
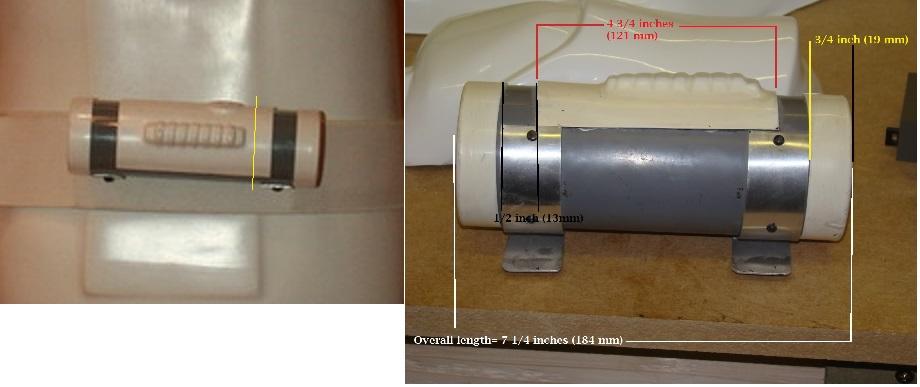
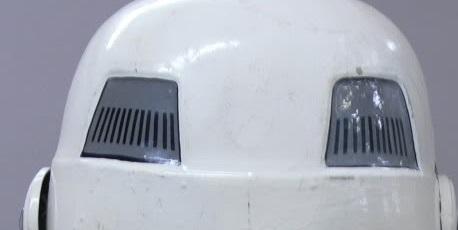
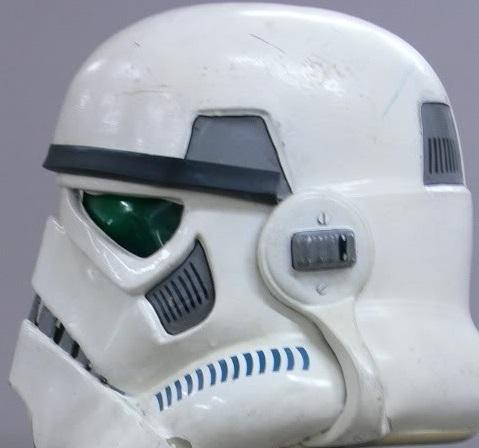
Hey there, Oscar!! Thank you for your application for Expert Infantry. Let's take a look at your armor!! CRL and EIB Application Requirements: All the required photos have been posted. Your armor contains all the necessary elements to qualify for EIB. With that, I would like to congratulate and welcome you to Expert Infantry. Other-Armor Fit/Assembly: In this section I will discuss observations made by your fellow troopers as well as my own. Sometimes changes and or adjustments are suggested. These are made so you can look your best. If any of these changes could affect a future application, I will discuss that separately. There are definitely some challenges to customize a set of armor like you did. You did very well. Your shim work on your thigh backs and sides look fantastic. Nice work on your blaster as well. At some point in time, I would go back to your helmet and increase the size of the vent lines in the rear traps and the tears. They are a little thin. Compare to these on the original helmet: Nice job overall! Centurion Suggestions: Although I try to spot everything that might affect a Centurion application, the ultimate accuracy is up to the trooper. From all your details you already have present, I would be surprised NOT to see an application from you. There are a couple things I will need to see before you apply. First is because of the history of SDS armor. SDS used to always be seen constructed with overlapping seams. I need a couple pics of the arms and legs to be certain butt joint and NOT overlap construction was used. Next couple points are in regards to your thermal detonator. There is far too much gap betwen your metal clips and the bottom of the center control panel. I'd like to see them moved up just a bit. Second, I think you might need to do some trimming. The detonator should end up about 184 mm in total length. I think your center control panel needs a little trimming on the right side. As you can see compared to the original on the right, the center detail is far to the right side of the center panel. Yours is almost centered. The yellow line in the picture indicates where that should be trimmed Please make sure your Centurion photos have the outside edge of the drop boxes aligned with the outer edge of the waist belt. Next, you need to find a way to get your shoulder bells up near the ribber shoulder straps. There is far too much distance between your bells and the ribbed shoulder bridges. The last thing is an adjustment to your sniper knee plate. In my picture, the red line is the path of the molded ridge on the shin itself. The black line is the path of the ridge on the sniper that should align with the red line. Please make sure to re-take any pictures with new ones showing your adjustments. Congratulations again!! I can't wait to see this all together.
-

TK-61214 Request ANH Stunt EIB Status [RS][501]
gazmosis replied to TK-61214's topic in Request Expert Infantry Status
Thank you Sir!!!! EIB # 501......501st Legion! Coincidence? I DON'T THINK SO!!!! -

TK-61214 Request ANH Stunt EIB Status [RS][501]
gazmosis replied to TK-61214's topic in Request Expert Infantry Status
Thank you, Shane! Look forward to seeing them! -
That is a good idea.
-
Nope. You are being too critical. Remember that things will slim up when you get your belt in place and get everything tightened around you. The elastic vs. webbing discussion was interesting. I have used both on builds but usually limit the webbing to torsos that are a little large for the trooper or if the trooper is on his/her way to losing weight. Elastic will eventually stretch around a rivet or snap post. This can be stopped by folding over the elastic on the end that received the snap or rivet and sewing it. This means the stretch will only occur between the the stitched portions. Thing look good so far. I thought one of your left side rivets might be located a bit too low. Here is the way they should be positioned.: Now in this pic, this armor has the kidney notch on the lower portion of the kidney but ignore that. Look at the rivet positioning on the ab and the kidney rivets should go directly across from them. Your caps on your Thermal Detonator seem very wide. When trimmed, they should measure around 3/4 inch or 20 MM. Total detonator length will be around 7 1/4 inches. Keep up the great work!!!
-
Do you mean where the new, re-shaped thigh sits now?
-

Impatience's AP Armor Build Log
gazmosis replied to Impatience's topic in Build Threads Requireing Maintenance
Done


