-
Posts
4,043 -
Joined
-
Last visited
-
Days Won
23
Content Type
Profiles
Forums
Gallery
Articles
Media Demo
Everything posted by gazmosis
-
1st time building armor
gazmosis replied to BraunasaurusRex's topic in Getting Started - Read this First!
Our knowledge here is great....our mind reading.......not so much! Welcome sir! If you think you made a mistake, so what! We all have at one time or another. We will tell you what needs to be done and support you the whole way. -

Diana's RS Props Build- ANH Stunt
gazmosis replied to AsBlondeAsLuke's topic in Build Threads Requireing Maintenance
You are the cod queen!!! -
If you can get the magazine out of the well, just trim the mag down until it hits the corner points on the front and on the rear lock clip.
-
to Eric you listen! Very few if any sniper plates just slide into position. Almost all that I have seen need extensive clamping and some even need to be heated to fit right. Hey...has anyone done that yet??? Put the whole sniper in a hot water bath??
-
I would honestly upgrade it. Thermal detonators from AP and ATA are a bit small to begin with. MTK, AM, have more accurate sized ones that are affordable. If money is no object, you could go with TM or RS, but they are $$$$$
-

Gift Giving at Philippine Children's Medical Center
gazmosis replied to themacalu's topic in Field Training Exercises
Another stellar example of why we do what we do! -

TK-12169 Requesting ANH Stunt EIB Status [TM][431]
gazmosis replied to TK-Sharp's topic in Request Expert Infantry Status
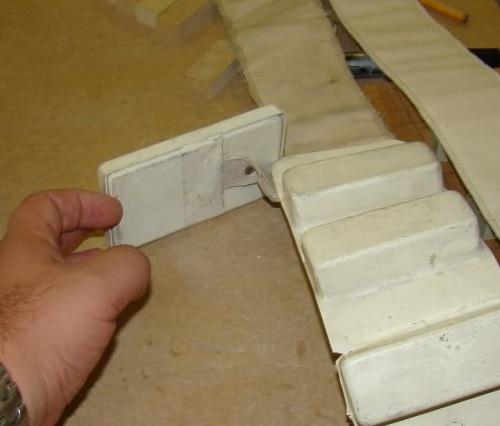
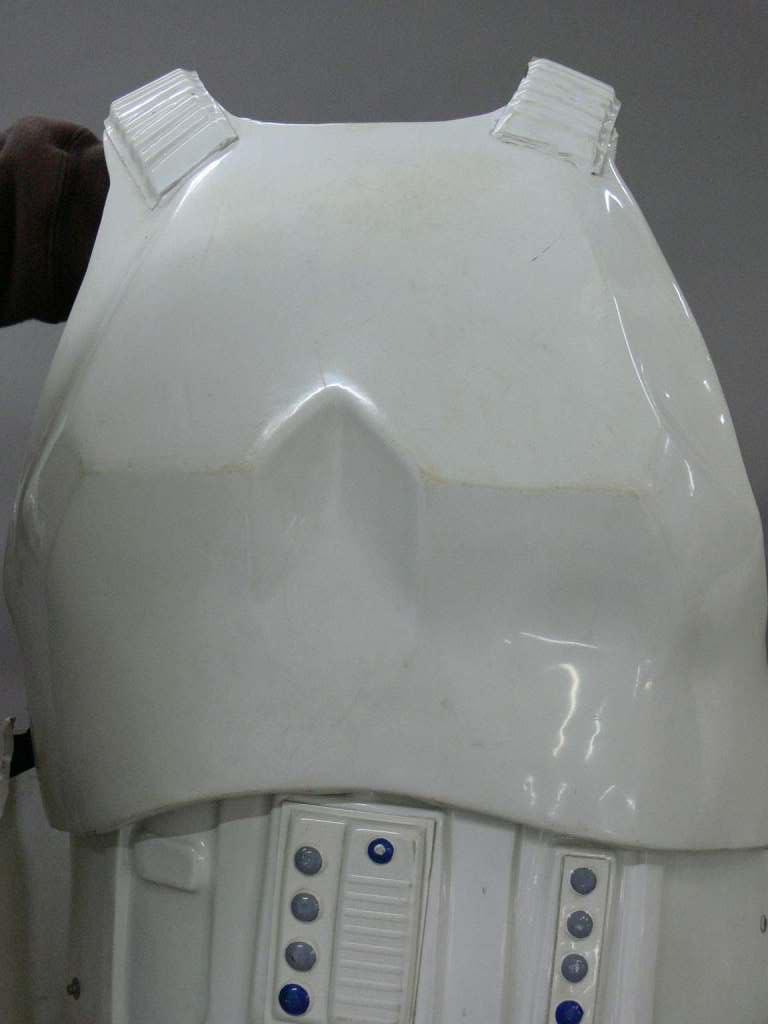
Hello Micheal!! Yet another incredible set of TM armor waved in front of my face. So jealous am I!!! Someday. Anyway, thank you for your application to EIB! Let's take a closer look at your armor! CRL and EIB Application Requirements: All required submission photos have been posted. I am happy to tell you that your armor contains all necessary requirements to pass for EIB!! Congratulations and welcome to Expert Infantry!! Other-Armor Fit/Assembly: This section is for myself and your fellow troopers to provide observations towards improving the overall look of your armor. The suggestions in this section, unless specifically stated, will not affect any application. You are a very resourceful young man in building close to all your accessories! Well done! Your armor is a great example of attention to detail. Well built! Your thighs seem to be a popular topic of conversation. A part of entering into the worlds of EIB and Centurion is making certain that your armor is worn correctly and I agree that your thighs do twist outward a little far. The front ridges on your shins and thighs should align with each other. It is not possible from your pictures to determine what method you use to hold your thighs up( I am assuming a garter system of some sort), but this is a simple fix with an adjustment in their position. (see "Centurion Suggestions" for further comment) I am REALLY glad you decided to not to make your drop boxes thicker than they are. This is about as thick as I would allow them to be. For you future troopers, they should be in the 10-12 mm range for thickness. Here is a shot of an original. It was a nice touch to add the strapping bracket screws. You could add some silver paint to certain areas of your blaster for a more realistic look. Chipping , weathering, and paint added to the trigger group area all help here. Since we are on the subject of paint, I want to commend you on your painted helmet details. Bravo!!! I do want to mention this from time to time; the vocoder are between the mic tips should be a satin (matte) black rather than a gloss black. Your execution of the paint in this area was spot on! You could dab a little black marker or paint on your thermal detonator screws if you wanted to Centurion Suggestions: I am glad to say that I have little to add here. I will ask you to make sure your photo submissions reflect a couple points: I would like to see your thighs in their proper position I would like to see the brow trim on that gorgeous helmet in its correct position and make sure the outer edges of your drop boxes align with the out edge of your waist belt. Congratulations again! I'd troop beside you ANY day!! -

TK76626 Requesting ANH Stunt EIB status [AM][430]
gazmosis replied to DarthDadio's topic in Request Expert Infantry Status
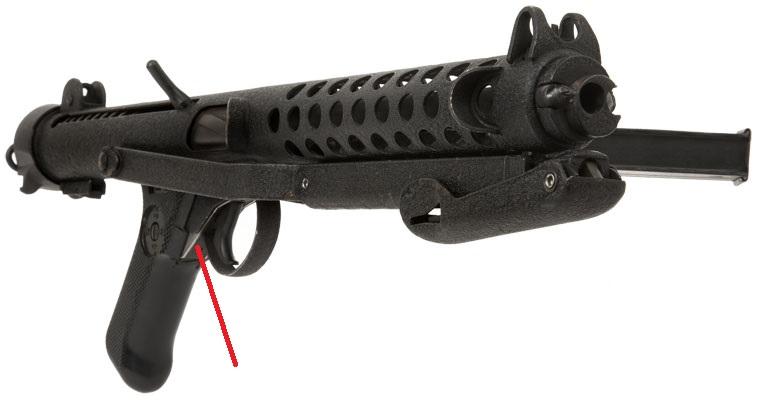
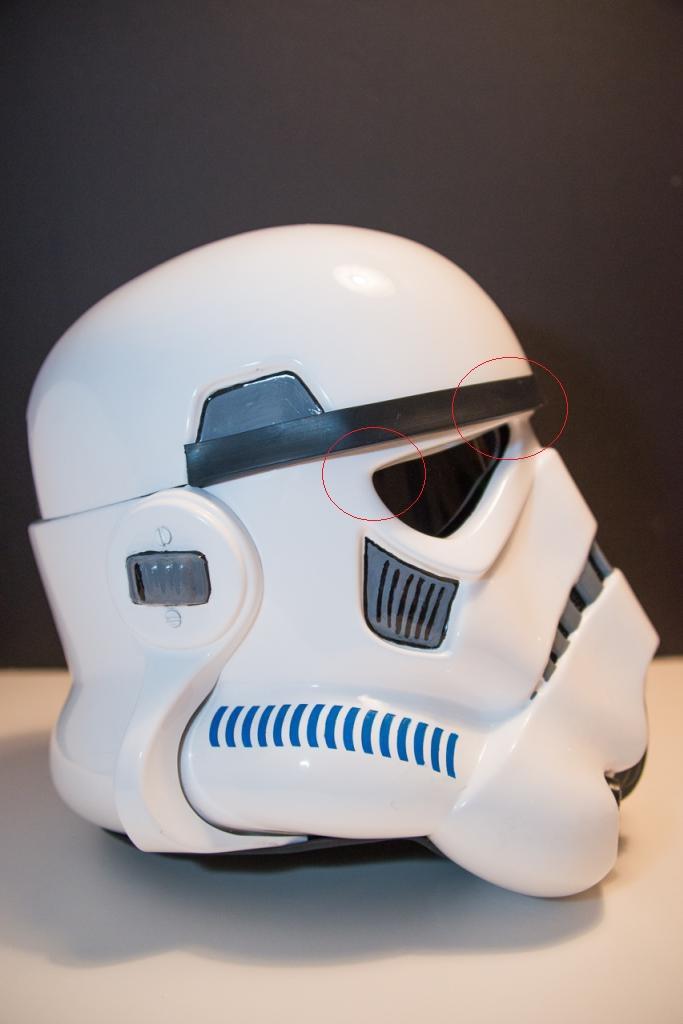
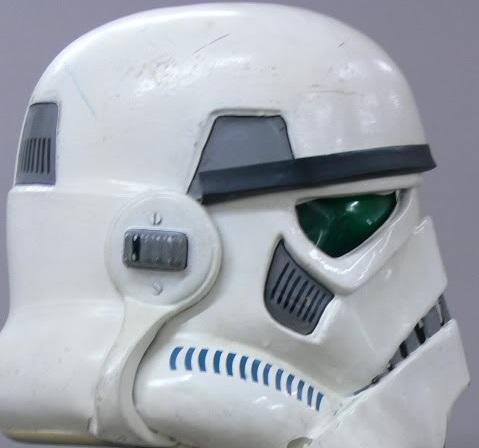
I want to aplologize for my short absence. It is that time of year that I am commissioned to build several Christmas gifts and I was hit with two that were both complicated and short of time. I have reached the point where I can get back to business. Sorry for delay again, troopers! Mr. James! Thank you for your application for EIB! I want to add a comment for you newer troopers. Jim's armor is a perfect example of finding the correct armor that works for your size. Jim is in the category of a "larger trooper". At 6'1" and 235, I certainly wouldn't mess with this enforcer! But his research led him to AM and it was a great choice. The armor is a wonderful fit for his frame! Well done, Sir! So let's look at your kit a little closer!! CRL and EIB Application Requirements: All required photos have been submitted. Nice work! Your armor contains all necessary elements for EIB. That saying, I would like to congratulate and welcome you to Expert Infantry!!! Other-Armor Fit/Assmembly: This section is for suggestions to be made by myself and your fellow troopers that go towards improving the overall look of your armor. Unless specifically stated, these suggestions will have no affect on any application. You did a very nice job on your build. It was well thought out and executed. Again, the fit is great for you as well! There was not a lot to add in this section which is always a good thing!! I did want to mention a comfort suggestion. There seems to be a lot of return edge at the top of your forearms. I just wonder if this cuts into your arms at all and/or restricts your movement. You can remove some or all of this if it is uncomfortable in any way. Also, there is nothing removed on your left forearm at the inner portion of your elbow. This can also be scooped out a bit if your movement is at all difficult. If you have no issues here, leave it be. Congrats on the handpainting of your helmet details. I applaud anyone who challenges this task. Although some lines are a bit choppy, the overall product has good character. Since we are on the subject of your helmet, I wanted to bring up your brow line. Again, this is totally up to you, but why I bring this up is the path of the brow trim itself. In the film, the spacing between the tops of the eyes and the brow trim itself varied greatly as seen here: Although the gap differences were minute, they were different. Which is fine. The path of the brow in relation to the eyes, however, remained constant. It was for the most part level across. On yours I noticed a fairly good drop in the center. I marked the right circle as much lower than the left circle. By comparison to the screen used helmet. I have run into this situation before and by removing the brow trim and trimming the browline then replacing the trim this can be remedied. If this is something you want to tackle. Lastly, with a couple neatly placed drops of CA (super) glue, you can hold that mouth screen in place with a little more reliability than tape. Tim had mentioned replacing the "X" head screws with slotted screws for accuracy sake. But that is also up to you. Very nice thermal detonator by the way! Centurion Suggestions: You thoughts towards Centurion were obvious in your build. There are a couple things that will need to be upgraded first. Your blaster will need to be upgraded to a Sterling based blaster. DVH or Doopy Kits are most commonly used. You will need to get the latex/flexible hand plates and glue them directly to the back of the gloves You have been around long enough to know about the chest and back upgrades needed. If you do decide to make these upgrades, make sure the straps that hold your shoulders in place allow them to be pulled up to come close to if not touch the ribbed shoulder bridges. Congratulations again!!! Your Garrison should be proud to be by your side! -

My first build. RS Armor
gazmosis replied to EDaniels's topic in Build Threads Requireing Maintenance
Remember when working on the proper location for the hardware on the ab, the dimples are SUGGESTED placements. Make sure you have them placed properly for YOUR build. You have done a bang up job so far!!!! Excellent work! -

DVH Pipe Build with Extras
gazmosis replied to I'm Batman's topic in Build Threads Requireing Maintenance
amazing build!!! -

New Build... TK Armor, ANH Stunt x 2
gazmosis replied to pyrofighting's topic in Build Threads Requireing Maintenance
Armor master -

frown painting - start over?
gazmosis replied to gr1fter's topic in Build Threads Requireing Maintenance
Do NOT under any circumstance use a scraper, razor or anything. Like Rhodie said, stick to a thinner that is mineral spirit based. You can get the majority of it off with a rag and massage the rest in hard to reach places with your paint brush. When re-painting, stick to the teeth as seen above. -

TK-16311 Requesting ANH Stunt EIB Status [AM][429]
gazmosis replied to cm325i's topic in Request Expert Infantry Status
Trooping is what it is all about! Get tout there, enjoy your suit and make people smile. Get to the changes when you can. We will be here!! -
MTK has slight accuracy advantages over ATA. Both have been derived from the same molds, but MTK has made some improvements. Both highly recommended!o
-

TK-16311 Requesting ANH Stunt EIB Status [AM][429]
gazmosis replied to cm325i's topic in Request Expert Infantry Status
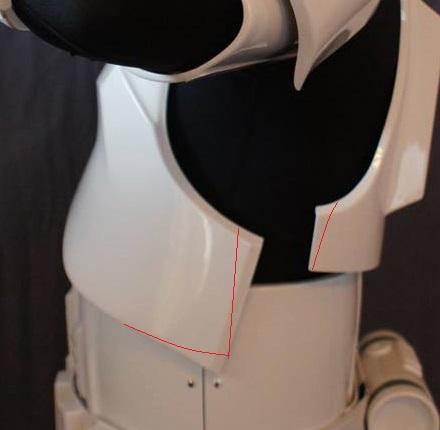
Mr. Clint! Thank you so much for your application for Expert Infantry! You have a very nice combination by pairing the AM armor with the MTK helmet. Well done. Let's have a closer look! CRL and EIB Application Requirements: A very well organized application (Hard not to when you have the list printed out in front of you ) All required photos have been submitted and your armor contains all required elements for EIB. That saying, I would like to congratulate and welcome you to Expert Infantry! Other-Armor Fit/Assembly: In this section, your fellow troopers and myself provide suggestions for adjustments to improve the overall appearance of your armor. Unless specifically stated, these will not affect any application. You have a very solid build. Scott and Ian both brought up points worth mentioning. First are the position of your shoulder bridges and I agree that they are mounted too high up on the chest. As you can see here: the front of the shoulder bridges should be in the front portion of the chest top. Moving these will give you a chance to re-position them so they align then sit properly on your back over your shoulder. Next is your chest. I will touch on this again in the Centurion section below. With a little trimming and some artistry with a heat iron, you can greatly improve the appearance of the chest. I have provided some suggested lines on your chest AND back.: This is not all about picking you apart. You need to be commended on your helmet details. Well done. Hand painting is tough no doubt about it. You did a good job. If you forced me to comment on anything, it would be that I thought your tube stripes might be a little too far down on your cheeks but it's nothing to be too critical over. The other thing I loved was your blaster. NICE!!! Lastly I agree with you.....re-paint your torso rivets! Centurion Suggestions: You are no stranger to these boards, Clint, so you know that if you want to venture into Centurionland, a new chest and back will be required. I have mulled over this point time and again and tried to see someway around it but the shapes between the ones that are more screen accurate and the AM chest/back are just too great. By the time you trim the heck out of your chest, you are better off just replacing it rather than risking a mistake, and the back is just too far off to save with any amount of trimming. Moving on, flexible/latex hand plates will be needed. You will need to incorporate the square notches in lower front corners of your kidney. Congratulations again on EIB! Well done, Sir!! -

AM Thighs..Keep or remove return edges
gazmosis replied to Petros's topic in Build Threads Requireing Maintenance
The return edges on the armor parts were there to give the appearance of thickness. The tops of the thighs should have return edges. The bottoms by the boots, no. -

TK-55239 Requesting ANH Stunt EIB Status [NE][432]
gazmosis replied to Pencap510's topic in Request Expert Infantry Status
Thanks for the update, Ty! -

TK-11721 Requesting ANH-Stunt EIB Status [MC][428]
gazmosis replied to Robo Tarot's topic in Request Expert Infantry Status
Standing and applauding, Pete!! Well done! Those ab buttons are exactly the way they should look. And your frown has been corrected leaving paint on the tooth only. Now I can officially congratulate and welcome you to EIB!! If you plan on applying for Centurion, make sure that these corrections show up in your pictures on your application. -
The only reason a wider cover strip should be considered is if the gap between your parts requires it. If the halves come together, nothing wider than the 25mm strip on the backs should be used. Just make sure that you are consistent so your armor doesn;t look unbalanced. You don;t want 25mm strips on the thigh backs and different sizes on your calf closures. Make everything even.
-

fabric and supply shopping yay
gazmosis replied to shamankid's topic in Getting Started - Read this First!
Sometimes it is just easier to buy something. We all understand the sense of ownership when it comes to actually making something from concept to completion, but if you don;t have a sewing machine, hand sewing these items is just very impractical. Find someone close to you who has one and knows how to use it. E6000 is definitely the adhesive of choice. I always like to have a bottle of CA (superglue) around for gluing certain straps in place. I still go over them with E6000. Gloves....buy them. Don't even waste your time. There seem to be many ways to make belts. There are some very serious guys with serious talent at the sewing machine. The originals were actually very uncomplicated. IT was a 5 layer construction with cotton twill outside, satin on the inside a 3 layers of a material I am not certain of. I have used duckcloth and have held everything together with interfacing. This gives a nice rigid body to the belt. A single stitch line all around with velcro at the ends...done. In my experience, the suits aren't nearly as hot as the helmets. Fans are always something you can add later. -

fabric and supply shopping yay
gazmosis replied to shamankid's topic in Getting Started - Read this First!
Aaaaaaaaahhhhhhhhhhhhhhhh. Question overload! -

TK-11721 Requesting ANH-Stunt EIB Status [MC][428]
gazmosis replied to Robo Tarot's topic in Request Expert Infantry Status
It sounds like a solid plan in place. Mineral spirits is the safest route to take with your frown. Great insight on that! Take your time and tackle one thing at a time and you will get there! Let us know when you have addressed the first two points and I can get your EIB badge put through!


