-
Posts
4,043 -
Joined
-
Last visited
-
Days Won
23
Content Type
Profiles
Forums
Gallery
Articles
Media Demo
Everything posted by gazmosis
-
Mix and matching bucket and armor kit
gazmosis replied to hon143's topic in Hard Armor (General Discussion)
No, there is no issue. MTK and ATA plastics are not that far apart so no one will even know -

First bucket (ATA) need some opinions
gazmosis replied to wonko's topic in Hard Armor (General Discussion)
Fanfriggintastic! -

New member seeking guidance!
gazmosis replied to Laserbrain01's topic in Getting Started - Read this First!
Welcome home Sir! -

Is this helmet fixable?
gazmosis replied to Harrt046's topic in Build Threads Requireing Maintenance
It actually looks like you have the cap a little high and angled downward. The end of the brow trim seems to be sitting a bit higher than it is between the eyes. Keep the location between the eyes and lower the seam line and you will see that gap go away a bit. -
Well well, Michael! All I can say is...impressive! Such good work and attention to detail has brought the Legion another incredible incinerator trooper. Let's take a look. CRL and EIB Application Requirements: All required photos have been posted and your armor contains all elements required for EIB. Congratulations!!! Other-Armor Fit/Assembly: This section is to summarize observations made by myself and your fellow troopers. Suggestions made here do not affect any application unless specifically stated. The amount of detail and points to keep track of on a build of this character are enormous. ANH details mixed with ROTJ with added Incinerator details means a person can get lost very quickly. You kept track of everything! I also feel it was a good decision to go with the TE helmet, I would recommend investing in an undersuit that fits a little tighter. I am a little undecided as to the amount of weathering you have. The weathering should be limited and the armor shouldn't have a dirty feel to it. But in re-visiting dozens of photo references, some are definitely dirtier than others. This guy here....not so muchI saw where you were going but aside from specific spots would like to have seen the weathering a bit lighter But a great job overall. I will mention one additional point regarding this down below. I do need to clarify one thing. Like I mentioned before, the general armor base for this is ROTJ armor. One major difference is the thermal detonator. This issue is being worked on now and the CRL will be adjusted accordingly. The ROTJ TD belt clips in no way resemble the ANH/ESB ones and are not only thinner, but positioned farther inward than the others like Micheal has them. Centurion Suggestions: A specialized character like this is about its details. One detail I would like you to strongly consider is to feather out the edges of the red paint in areas to appear more weathered. Although the CRL photos show this mostly unweathered, I believe this was for paint pattern clarification. According to all images, the red paint has significant wear at the edges and with the amount of weathering you have on your armor, I believe this would create a needed balance. Although this example may be a bit extreme:You get my general point. Sometimes less is more. Thank you again for your fine work and congratulations again!!!
-

Not sure where to start!
gazmosis replied to MattRob89's topic in Getting Started - Read this First!
Welcome, young man!! The only bad question us the one you don't ask! -

Narrow Shoulder Bells Issue
gazmosis replied to A Master Builder's topic in Assembly, Mods, and Painting
You could order other bells but it's always a risk to match colors. -
The shins also had a Sandtrooper diamond sniper on each one.
-
Keep in mind. The armor was far from ESB. In fact, the ab armor was actually from a Sandtrooper. No main center ab button plate and 3 buttons on the side one.
-
I would also use the tip of an exacto knife to gently scrape out between the bolt and the receiver wall. This gives a 3D depth look.
-
I think a lot of people like to build their own. It might just be something to think about as an option.
-

ATA Armor Build_My First TK
gazmosis replied to russellr2d2's topic in Build Threads Requireing Maintenance
Nice work!!! -

Just what the world needs now. Another Doopy
gazmosis replied to syllander's topic in ESB BlasTech E11
And big blurry ones! FOCUS! -

TK-10116 Requesting ANH Stunt EIB Status [ATA][435]
gazmosis replied to ukswrath's topic in Request Expert Infantry Status
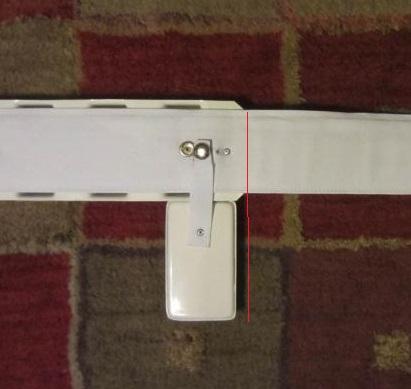
Mr. Tony!!! Thank you so much for your EIB application!! Your armor was a pleasure to look over. So let's get to it! CRL and EIB Application Requirements: All required submission photos have been posted. I am pleased to say that your armor hits all points as required for EIB. Congratulations and welcome to Expert Infantry!! Other-Armor Fit/Assembly: In this section, I summarize observations made by myself and your fellow troopers that go towards the overall look of your armor. Unless specifically stated, these will not influence any application. You did your homework, Sir and this is evident in a beautiful, clean build. Credit your friend Jesse for his paintwork on your helmet. The only thing I have in regards to your fit is that your thighs could come up a tad but that is so minor. Overall great work! Something that is worth mentioning is your Thermal Detonator. Why we still have undersized thermal detonators is beyond me but until that change is made it is what it is. A smaller diameter "TD" will make it look longer than it really is. However, that is not my concern as much as your belt clips. You did well in the adjustment to make them better align with the bottom of the control panel, but the width compared to the size of the screw heads just throws me off. The original TD clips were just about 1 1/8 inches (28 mm) wide. Yours look so much smaller than that. I just think it would be a shame to not make this simple upgrade that would greatly improve the look of yours. Nice work again!!! Centurion Suggestions: I see one issue that might affect this and that is your drop box location. If it was just a matter of sliding the loop over...no problem. However, you have your straps directly attached to the belt which is not allowing your drop boxes to align properly with the end of the belt. Congratulations again on a fine set of ATA!! -

TK-96007 Requesting ANH Hero EIB Status [ RT-Mod ][434]
gazmosis replied to Bierzo's topic in Request Expert Infantry Status
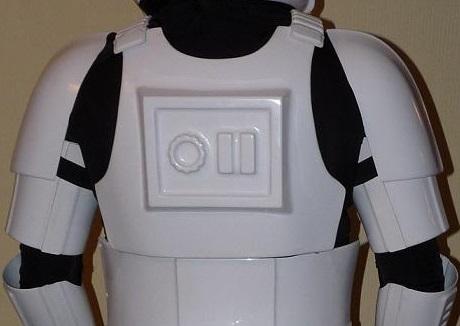
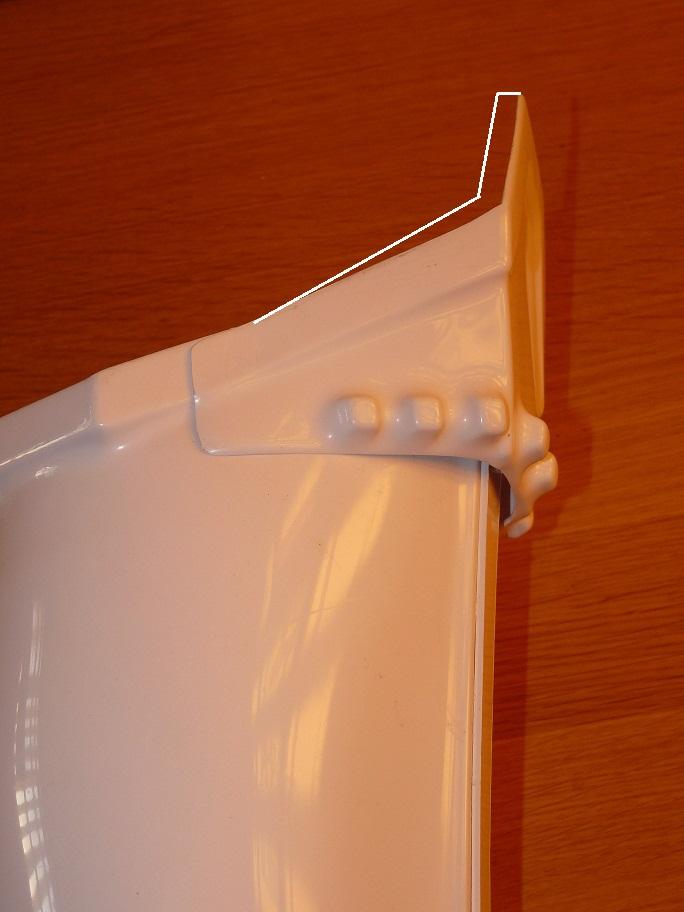
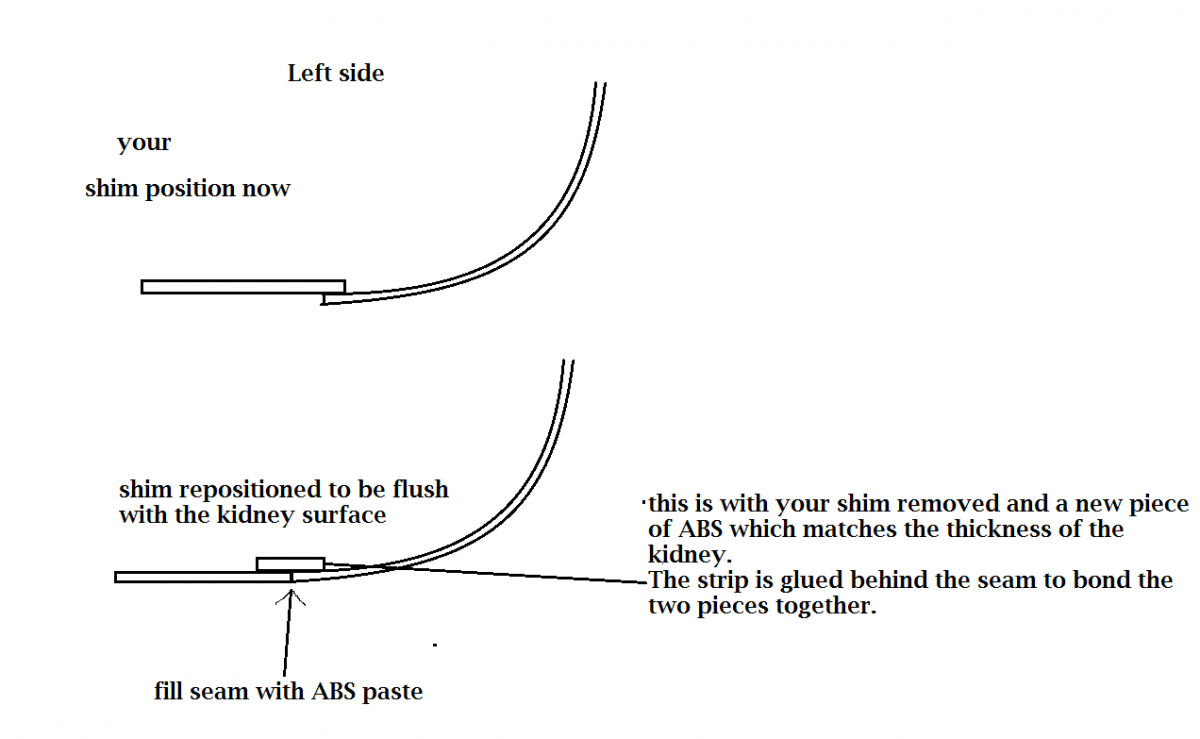
Hey there, Pelayo! Thank you for your application for EIB. It's a pleasure to see a set of armor we don;t get a chance to look over too often. Thank you for letting us. Now let's look over YOURS!!! CRL and EIB Application Requirements: Originally, there were a few missing pictures that you were nice enough to post. Now, all required photos have been submitted and with pleasure I can say that you armor has all the requirements to pass EIB. Congratulations!! Other-Armor Fit/Assembly: In this section, I will summarize observations made by your fellow troopers and discuss things that I note that are suggestions for improving the overall look of your armor. Unless specifically noted, these suggestions will not affect any applications. There was mention regarding your sniper plate. This is something I would look into correcting. You got a bit enthusiastic in trimming out the plate by removing all the return edge off the top. As you can see below, this is what the screen snipers looked like. Thank goodness there isn't too much gluing surface and a new one will easily correct this. There was a mention to improve the "Hero" look of your helmet and I would strongly suggest this improvement. On the originals, the hero face plates were not just a differently painted version of the Stunt helmets. They were different molds all together. As you can see here, the frown was clearly molded with only three tooth indents per side. By gently massaging that 4th tooth indent out of your helmet with a heat iron or a different GENTLE heat source, it will greatly improve the "hero" look. Pelayo was kind enough to work with me on an observation I had. I needed to make sure that his biceps were constructed using the butt joint method and not overlap. In this shot they look like they are But after receiving close-ups of his arms, they indeed are built correctly. I do question why the big difference in width between the forearm cover strips and the bicep ones? They should all be the same. Centurion Suggestions: I love the "beefy trooper"! IT would be great to have another set of muscle in the Centurion ranks! There is a little work that will need to be done before that happens, though. Some are easy fixes and some are a little more involved. First is the correction to your sniper knee plate. Easy Next is to remove the paint from your male snap on the upper right of your ab plate. Easy Nest is to replace the male snap you have on the cod portion of your crotch with the proper split rivet like Steve's here: Next are the straps on your holster. There should only be 1 inch (25MM) of strap between the belt and the holster. You will need to integrate the square cutouts and the bottom, front of your kidney. In your Centurion photos, make sure the outer edge of your belt boxes align with the outer edge of your waist belt. I would strongly consider looking into a way to fill in the hinge points of the folding stock on your blaster. These were raised rivets. I'd really like to see them more closely resemble that. It's a nice Blaster!! The last one will be a challenge. Some troopers require side shims to eliminate the gaps between your kidney and ab plate. For Centurion, this needs to be done properly. Your shim should be attached flush with the surface of your kidney and glued with a strip from behind. If done carefully, the seam between the two will be a SLIGHT gap at best. You then can mix up ABS paste and fill in that gap and when dry, sand it down and polish it out. You may need to do this a couple times to get it filled in perfectly, but as you can see with Scott's, this can be done with terrific results: In that last picture, you can see the proper position of his split rivets. They need to be attached to the shim to sit next to each other. Lastly, you will need to change out the black straps that connect your back and chest for white elastic or webbing that is about the width of your ribbed shoulder straps. Congratulations on a great set of armor!! You did a great, clean build so these small changes shouldn't be too much of a challenge and will greatly improve and already awesome set of RT! Welcome to EIB!! -

ATA bucket: Paint it or not
gazmosis replied to shadowtrooper760's topic in Assembly, Mods, and Painting
I have always used auto rubbing and polishing compound. Whatever you gave left, you use on your car -
I would just rock it as it is, brother. RS typically uses CA or another superglue to assemble their armor. Good luck getting that apart
-

ATA bucket first timer
gazmosis replied to charlesnarles's topic in Build Threads Requireing Maintenance
You have your shaping done well. They are still a bit thick, though. I'd take a bit more off -
What did you use for the neck! Is it one or two pieces? Can you show a pic of the neck piece by itself??
-
He has since fixed that.
-
I hate to seem like I am hijacking a thread here...but Brian (Polartrooper), did you realize you glued the inner thigh halves together???? No one caught this??? And the button plate is upside down.
-
YOu don;t have to fill and paint the last two tooth indents. If you can get yourself a hold of a hobby iron, you can heat massage the teeth back into their original position from the inside of the face plate. If you are going to do this with RS, you won;t have to wait long because the face plastic is really thin. Just don;t have the heat setting up too high.
-

Red_2's NE ANH TK build ...
gazmosis replied to Red_2's topic in Build Threads Requireing Maintenance
Wow...you look fantastic!


