-
Posts
4,043 -
Joined
-
Last visited
-
Days Won
23
Content Type
Profiles
Forums
Gallery
Articles
Media Demo
Everything posted by gazmosis
-
TK-69770 Requesting ANH Stunt Centurion Status [ATA][160]
gazmosis replied to DarkOrder66's topic in Request Centurion Status
THAT'S the way those parts should look!!! That belt is fantastic and thank you for making these upgrades so quickly, Chris. Troop proud in your newly upgraded CENTURION armor! -

TK-44228 Requesting ANH Stunt EIB Status (RS)[450]
gazmosis replied to Lidocaine's topic in Request Expert Infantry Status
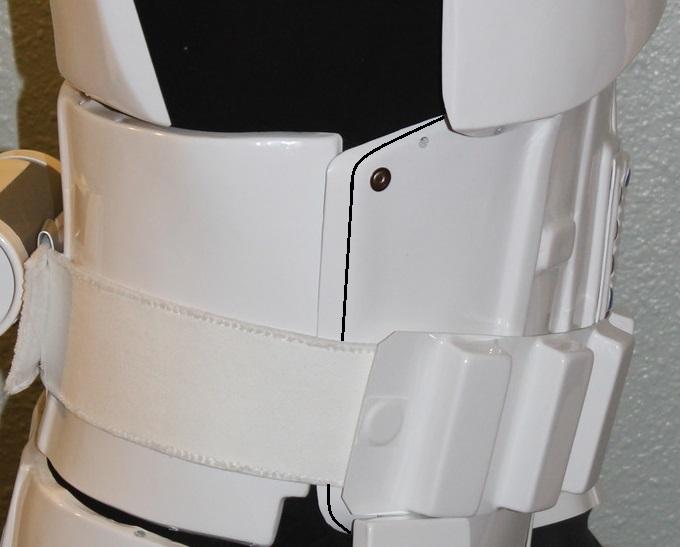
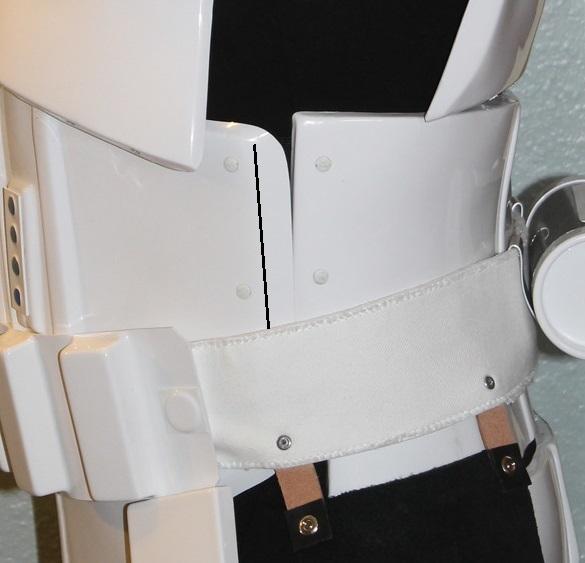
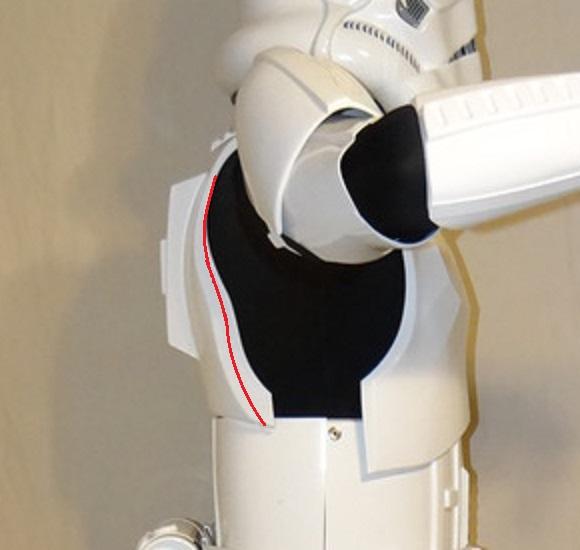
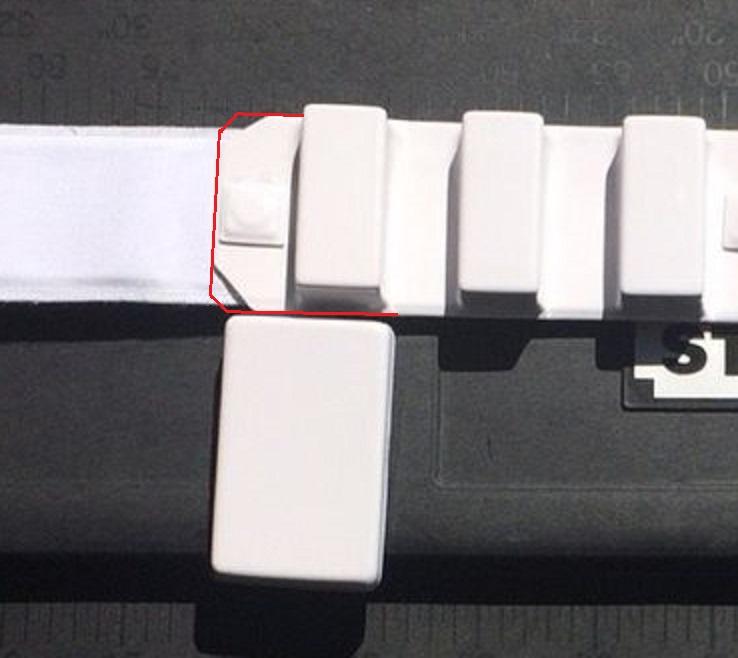
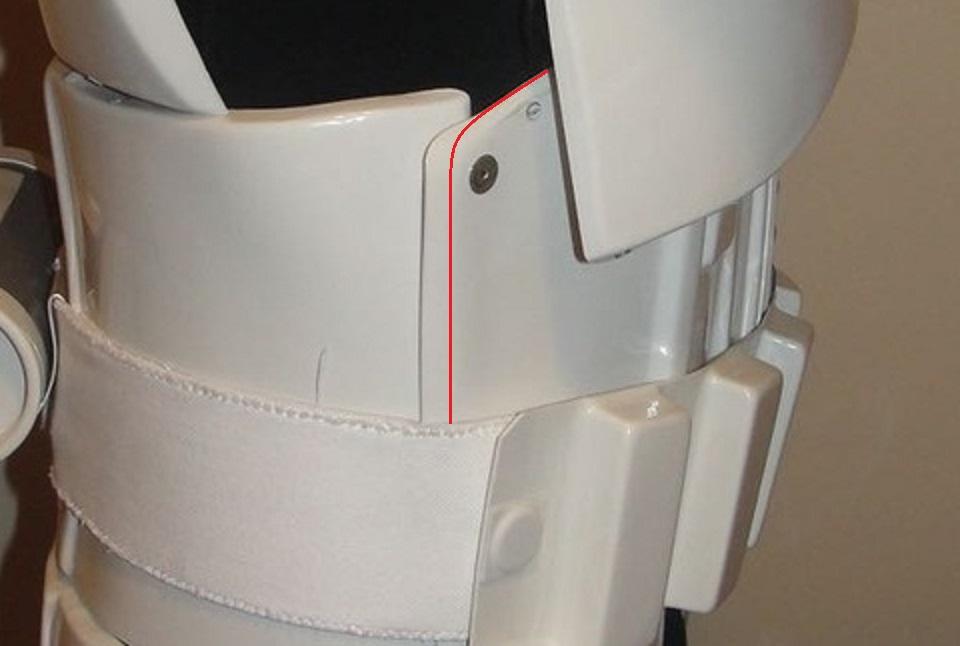
LUKE!!! LUKE!!!!! I'm shutting the power down!! I'm sure you've never heard that one before!! Anyway, thank you for you EIB application and another great set of RS! CRL and EIB Application Requirements: Awesome application. Thank you! All pics present and in order. YOur armor contains all required elements to qualify for Expert Infantry. With that, I would like to congratulate and welcome you to EIB!! Other-Armor Fit/Assembly: Normally, this section is to make suggestions towards an overall improvement in the final look of your armor. The only think I can suggest here is to tone down the gold paint on your scope. Acrylic paint works really good for this. Centurion Suggestions: I am not sure if you or RS constructed this suit. Either way, I understand the luxury of being able to "grow" a little in your armor which is typically why the extra material is left on the sides. However, the hardware in these locations should still represent their proper positions. I am not sure if you truly need this extra material. I see overlap on your one side. If you are able to tighten the belt and have your kidney sides meet the suggested trim lines I painted on your pics, I would strongly consider making this adjustment.. This is an example of the positioning I am looking for: Congratulations, Luke!! Great to see another one of these sets making the Legion look great!!! -

TK-24218 Requesting ANH-Stunt Centurion Status[AM][159]
gazmosis replied to fuumantroop's topic in Request Centurion Status
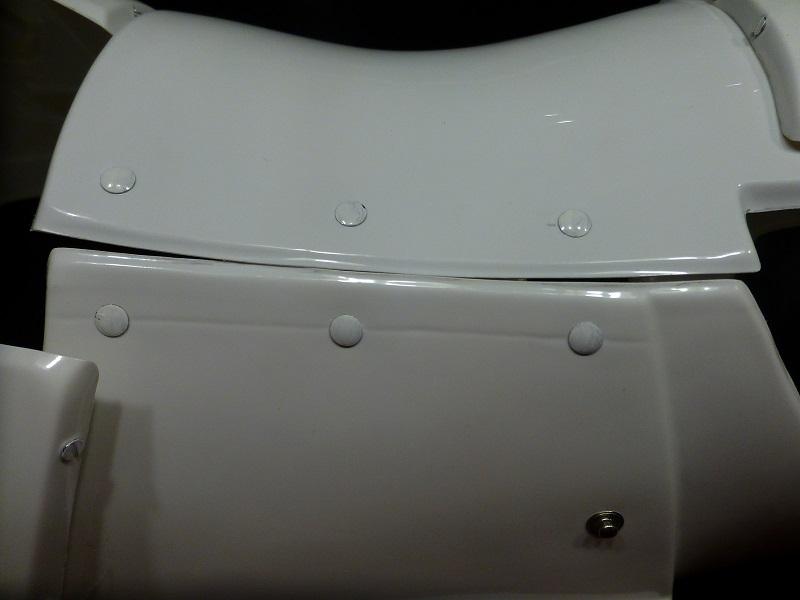
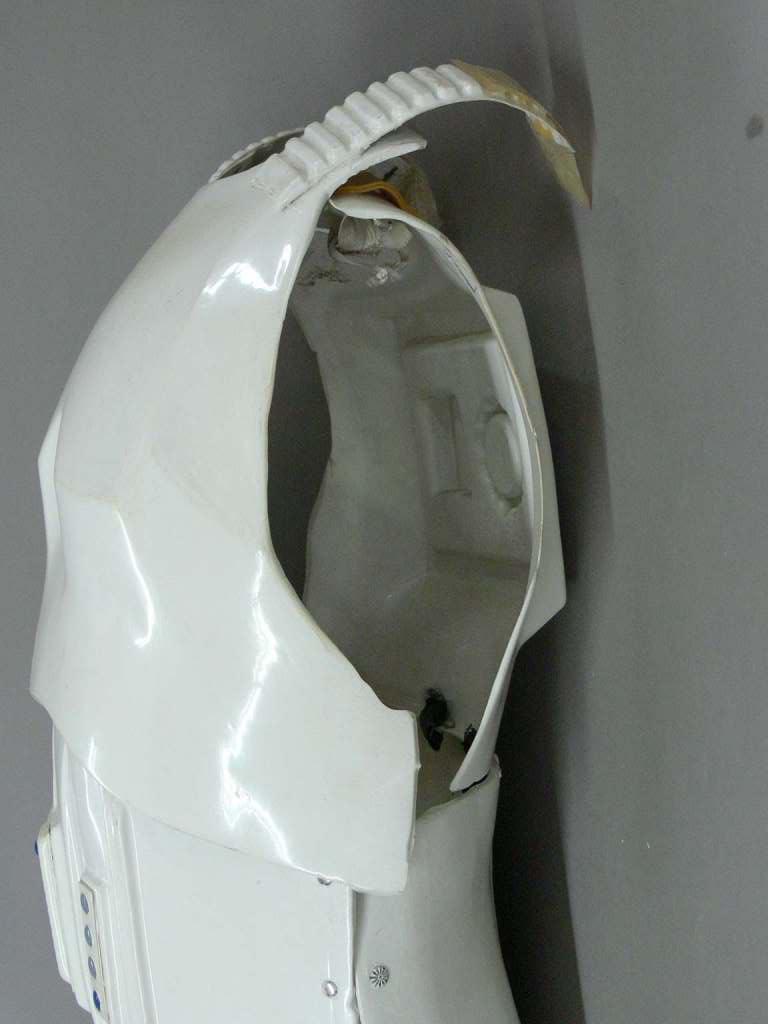
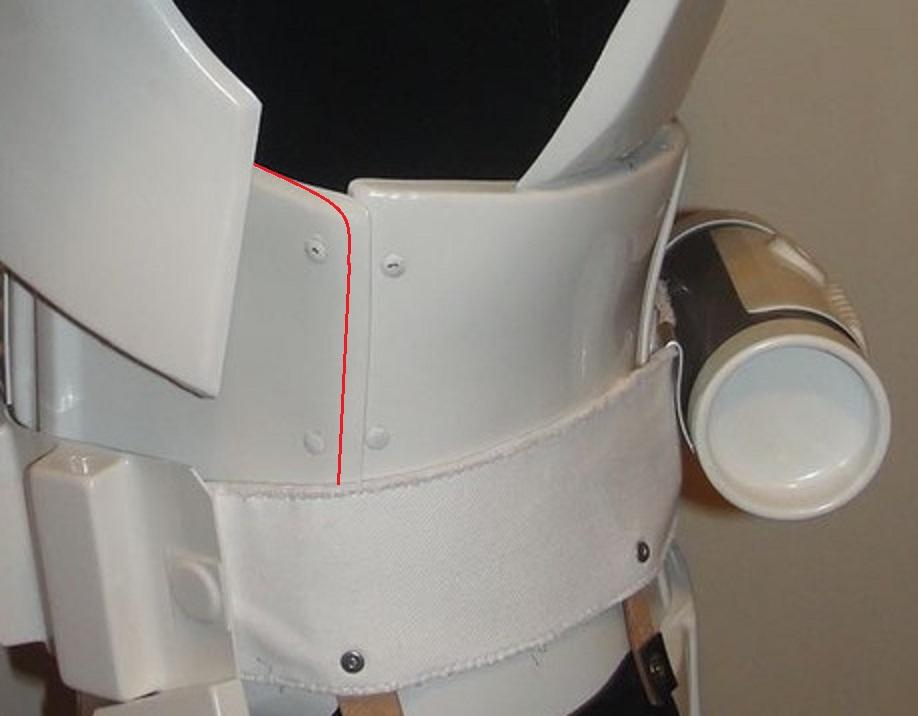
ANDREW!!!! Thank you for your Centurion application! Having shared most of your upgrades with me, I knew this day was coming soon. Let's look at your final product! CRL and Centurion Application Requirements: All required photos have been posted. The original AM back and chest were replaced by upgraded accurate parts received through AM. With this upgrade, your blaster upgrade and your rubber glove/flexible handplate upgrade, your armor now contains all necessary requirements to meet Centurion. Congratulations on the well earned badge!! Other Armor Fit/Assembly: Your build is outstanding. Tight seams, clean lines make the difference. I like that you went with the upgraded shoulders, too! The black on the thermal detonator clip screws are a great detail. I know there was mention of your drop box straps and the minimal gap you have is just about the limit to what I would allow. I would consider knocking back the overlap on your canvas belt. You have what looks to be 14 inches of overlap which is WAY overkill. The max you need is the width of the square molded section on your kidney and butt. There is more than enough to be secure and the overlap is hidden by the thermal detonator. I would put it in your schedule to knock back the return edge on the sides of your new back plate. Although perhaps it's a bit enthusiastic in this pic: and doesn;t need to be brought down THAT far, yours could stand a little trim. . Carry on, Trooper! You are now a brighter star in your Star Garrison!! -

Zarlon's First ANH Build Thread (ATA)
gazmosis replied to Zarlon's topic in Build Threads Requireing Maintenance
You could use to remove a bit from the eyes and teeth. Ears look great!! As for that rivet, wet a rag and place it on the backside of the rivet while drilling. This will keep everything cool. -
YOu can even take it closer to the edge for more secure gluing surface. Just do not exceed the rounded portion of the edge.
-
The back is OK. Although the chest has softened details in front, the overall shape has not changed so that is what is going to need upgrading
-

TK-69770 Requesting ANH Stunt Centurion Status [ATA][160]
gazmosis replied to DarkOrder66's topic in Request Centurion Status
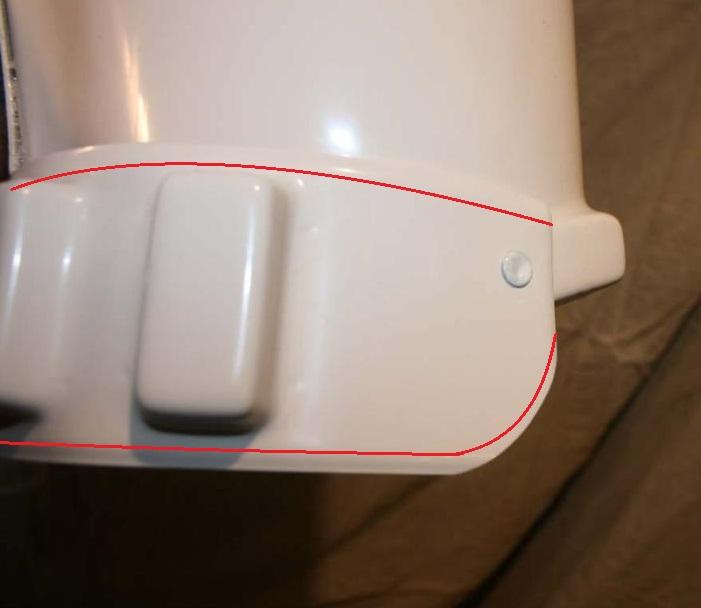
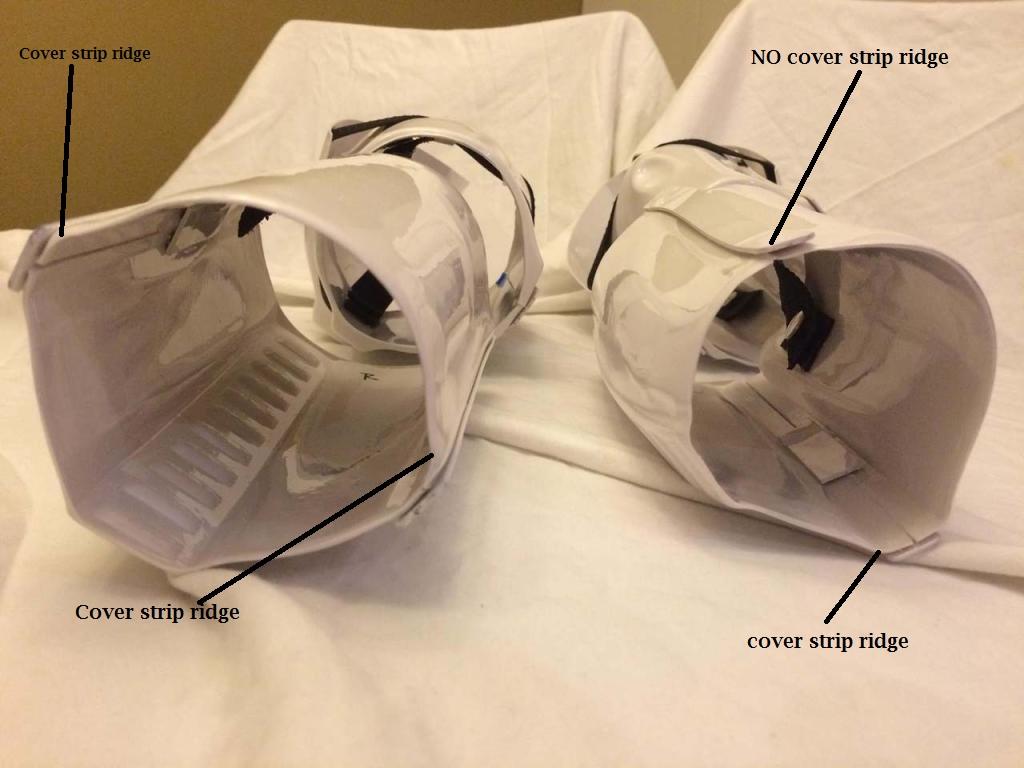
Alright Chris: I want to apologize again for the response delay. But here we are so let's get to it. By the way, I LOVE those pics! Really striking. Great for the cover of any card. CRL and Centurion Application Requirements: The only picture I do not see posted is a close up of your sniper knee. I didn't see one to pull out of your EIB either, but it shows clearly no rivet attachment and good alignment. I want to a talk about two issues that, if repairs are done, will make a big impact on your armor's overall appearance. The first is the pack on your lower, right thigh. There are several MM that can be taken off both the top and bottom. In the pic, you can see the rounded mold edge you left. On the originals, this was almost taken down to the boxes themselves which is NOT necessary. Not only will this improve the oversided look, but it will bring your rivet location (which is slightly low) into a better position. The next is your waist belt. The trimming on the corners of your belt ended up to be a bit enthusiastic. The corners should be knocked down just enough so that the outer vertical edge is roughly the same width as your canvas belt. Although the CRL makes no references to specific measurements in regards to these two areas, I feel your armor is worth having these repairs made to it to improve its final appearance. Other-Armor Fit/Assembly: First I want to thank you for the upgrades you have already made with trimming out the side button plate to become indeed a "plate".The correct "U" trim on your helmet only improved that to epic status! Nice. You have a solid overall build here. I Noticed the raised ridge on the underside of your left forearm is gone. Did you trim this off then compress it? Hot water bath?? This is important because it other troopers know that this is indeed possible, we may see the end of oversized forearms.. There were a couple other minor tidbits that I thought to mention. You have two different sized cover strips for your biceps and your forearms. These should be the same but since they are not that different or too oversized I didn;t find them too distracting. The same with the extra meat left on the outer edge of your ribbed shoulder bridges. No big deal there, either. This is beautiful armor to look at and will be more so with that red and gold badge above it. Your talents assure me these will be simple repairs to that thigh pack and waist belt. Look forward to seeing them and assigning your badge! -
Can I ask why such the huge cover strips on the back of the thighs? You are missing an ab button
-

PlastiMake Re usable plastic molding material
gazmosis replied to Quadan's topic in Assembly, Mods, and Painting
I couldn;t hear the video...what does it say the softening temp is? I can see trooping a hot summer parade and your blaster suddenly starts to slllllllooooooooowwwwwllllyyyyyyyyyy dddrrroooooooooopppppp -
Well, I you can chalk this up to good practice. Your ATA kit that you will receive will be similar in many respects. The face will be different with more tooth dents and your dome will be a bit more bumpy but the construction will be similar. I suggest for your next build, that you get yourself a Dremel tool with a sanding drum. This will help you micro tune the fit of the ears with control. You will need to trim out more details but they will be better defined and outlined. There will be mold lines present on the ears, but don't follow those as they might differ slightly from the final position of your helmet. Sneak UP TO those mold lines according to the fit on your helmet.
-

SDS Battle Spec Armour
gazmosis replied to tomnewdelhi's topic in FISD Expert Infantry Badge (EIB) Requirements
The problem with the SDS armor is that EIB is as high of a level as you can achieve due to the methods of construction. The adhesive is a plastic Insta weld so taking it apart to correct it will only do damage -

Application EI, where is the place ?
gazmosis replied to Draco's topic in FISD Expert Infantry Badge (EIB) Requirements
http://www.whitearmor.net/forum/forum/19-request-expert-infantryman-status/ -

aluminum form dies for vacuum forming.
gazmosis replied to roadblock's topic in The Foundry - Armor and Prop Making
AM and supposedly AP use them too $$$$$$$$$$$$$$$$$$$$$$$$$$$$$$$$$$$$$$$$$$$$$$$$$$$$$$$$$ -

TK-51325 Requesting ANH Stunt Centurion (RS Props)[158]
gazmosis replied to tckoolaid125's topic in Request Centurion Status
OUT FREAKING STANDING!!! Please come back and post pics of you suited up so we can see the final product!! In the mean time, Congratulations and welcome to Centurion!!!! -

First pic of my completed MTK build
gazmosis replied to hon143's topic in Build Threads Requireing Maintenance
Does MTK sell younglings now???? He's a busy man! You look great!!! -

First pic of my completed MTK build
gazmosis replied to hon143's topic in Build Threads Requireing Maintenance
I'd love to tell you "great job" but.....unless you fell in a snow bank, I don;t see anything -
Looking good, Trooper!!
-
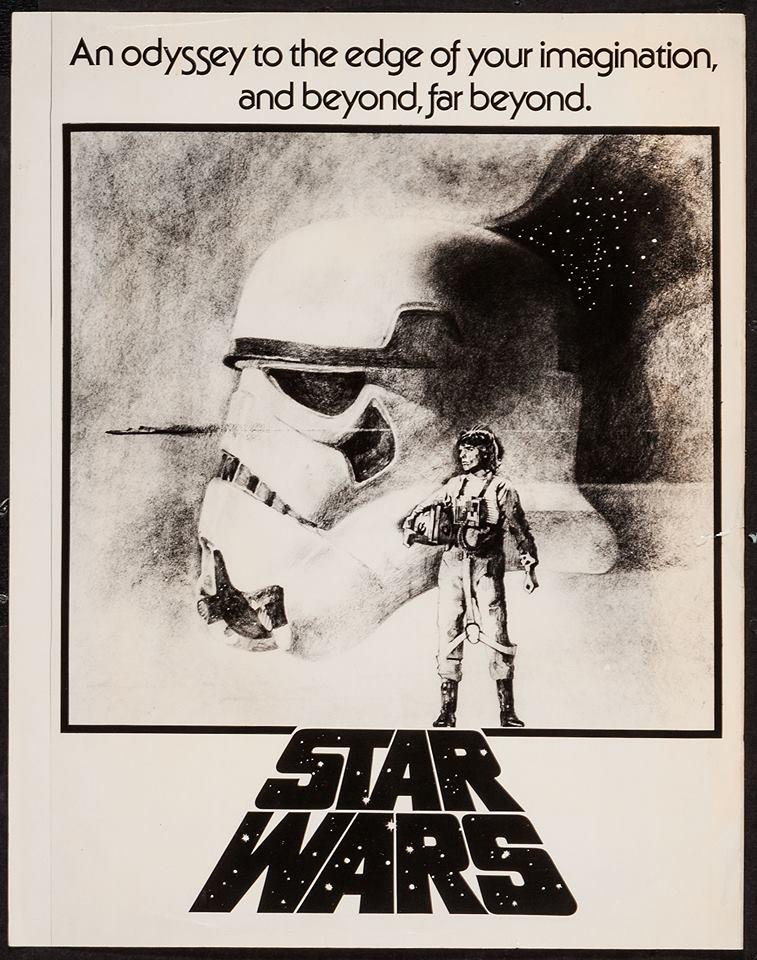
It was on Facebook. I went back to see if anyone posted the source and it's gone.
-
-

TK-51325 Requesting ANH Stunt Centurion (RS Props)[158]
gazmosis replied to tckoolaid125's topic in Request Centurion Status
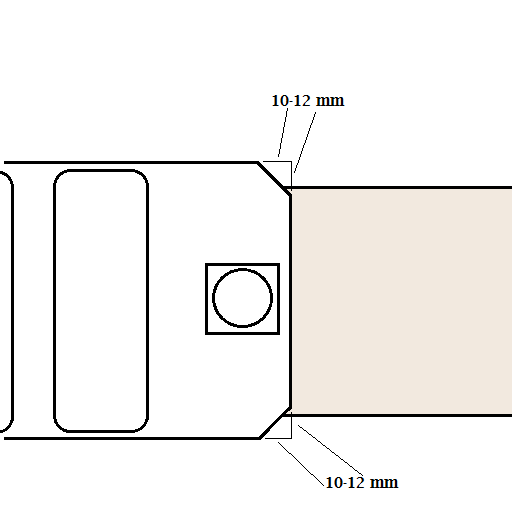
Hey there Tyler! Thank you so much for your Centurion Application! Let's have a look! CRL and Centurion Application Requirements: All required photos have been posted. This is yet another case where Centurion photos revealed a concern that could not be seen in the EIB photos. You had noted that RS built your suit which is fine. However, I think that it is just in their protocol to build their suits with extra plastic extending from the sides of the ab plate. This is so if you "grow" you'll still fit. The intention is fine if it doesn't affect the overall look of the armor by causing hardware to be out of place or an improper fit. In this case, it is causing you extra overlap on both sides. On the one side, it almost overlaps a full inch. Anyway, I feel it would really benefit the overall look of your armor, perhaps even improve comfort , and get the left side rivets to the 10 mm (approximately) distance from the seam, if you trimmed that extra material. I drew some approximate trim lines: Other-Armor Fit/Assembly: Normally suggestions go here. These are usually for small, general improvements. I mentioned the adjustment above for it's impact potential on the fit/look of your armor. Aside from the point above, I see no other issues. Your badge awaits!!! Overall, it's just an incredible set of armor ANYONE would be proud to own. -

TK-12001 Requesting ESB EIB Status (RS Props)
gazmosis replied to brandontrueblue's topic in Request Expert Infantry Status
So there is no way that these pics can be transferred onto this post? There are several pictures missing. It is just easier on everyone to grab the "EIB" photo checklist and re-edit your application by posting the pics in the order that they are on the list. That way all required pics get posted and it is easier for me to properly assess your build. -

TK-61972 Requesting ANH Hero Centurion Status [NE][157]
gazmosis replied to Haribon72's topic in Request Centurion Status
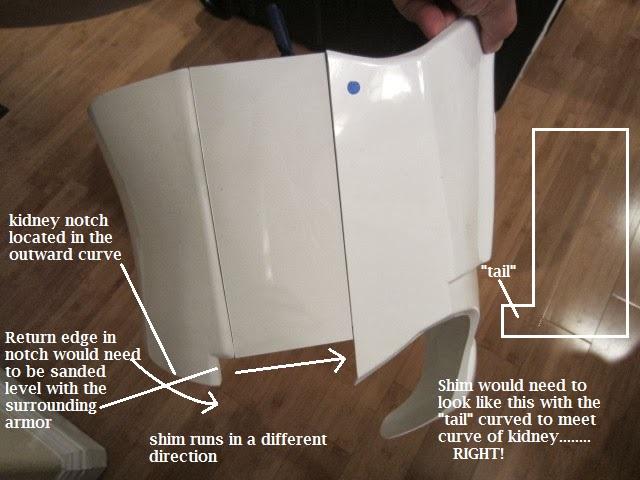
Alright, Walt! Thank you for your application to Centurion. All I can say, is Wow! You have had an incredible adventure and deserve an ovation for your ABS paste work as well as adapting this suit to your body type. Fantastic! Anyway, we have some things to cover so let's get to it!! CRL and Centurion Application Requirements: Thank you for sharing your library of photos with us. All posted photos are present that the application requires. I am pleased to say that your armor displays all necessary elements for Centurion. Congratulations!!! Other-Armor Fit/Assembly: I agree that your belt could be brought up a tad to rest directly against the bottom edge of the button plates. Your blaster looks so much better now that you knocked the gold on the scope down and LOOK AT YOU adding silver down by the trigger group! You maniac! As for your holster, it is definitely better. You must have received that as an ESB holster at first? Now, the delay in this response was due to a situation that, up until now, has not been discussed. Since the addition of the Kidney notch to the CRL, it was always seen as an easy addition to armors that didn't have it already incorporated into their molds like AP, ATA, AM, and RT Mod. However, if a shim was required for the previously mentioned armor, the shim would be installed then the notch cut into the ab side of the new shim. Well, in cases like NE, RS, TM, and now MTK, the notch is already molded into the kidney. If a shim would need to be added in these cases, it would be EXTREMELY challenging. I pulled a picture from Walt's build thread and pointed out the many obstacles: The other issue is a moral one. I didn't have the pleasure of offering assistance on Walt's build thread. In that section of the build, Walt asked a number of times if things looked good as the progress went on and it was always agreed that it was fine by some very experienced members. How can it be supported as ok there, and not here?? This kind of issue does not arise too often so I feel no remorse in categorizing this situation as a special exemption. Congratulations, Walt. Your Garrison should be proud to troop beside you!! -
Acrylic paints are also good. The gold on the scope is always a bit enthusiastic. Knock that down a bit and you are.......golden!
-

TK-61972 Requesting ANH Hero Centurion Status [NE][157]
gazmosis replied to Haribon72's topic in Request Centurion Status
Just so everyone knows, I have not been ignoring this. I have a good idea how this is going to go regarding the kidney notch/shim relationship, but a decision like this should be followed by an explanation for future reference. This is being discussed. Hang in there, Walt!!


