-
Posts
4,043 -
Joined
-
Last visited
-
Days Won
23
Content Type
Profiles
Forums
Gallery
Articles
Media Demo
Everything posted by gazmosis
-
TK 15359 requesting ANH Stunt Centurion status (AP)[175]
gazmosis replied to Somatophylax's topic in Request Centurion Status
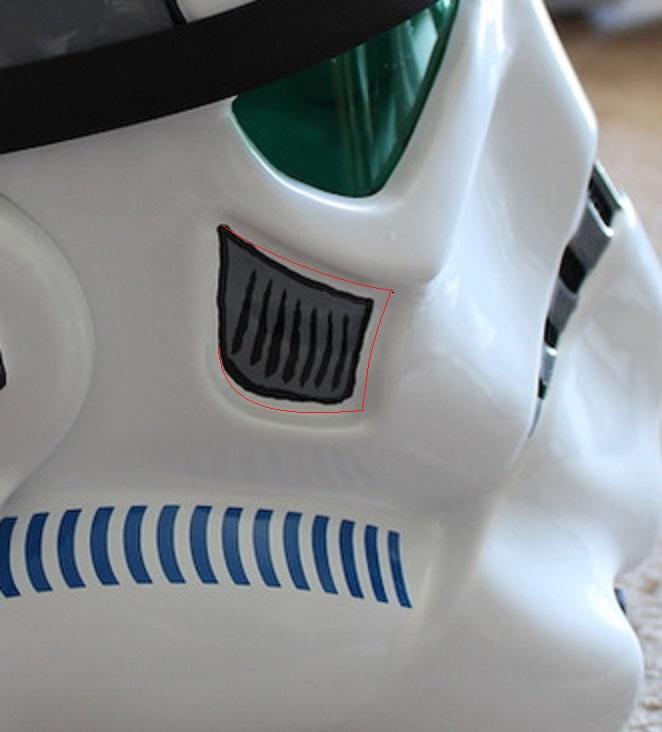
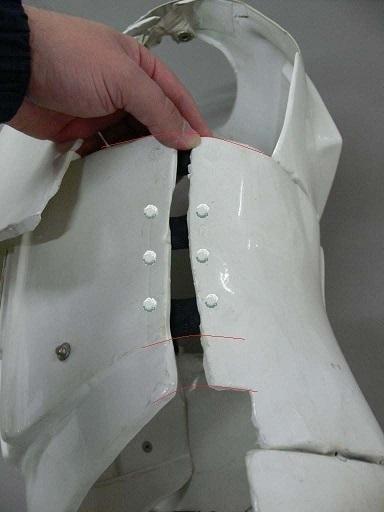
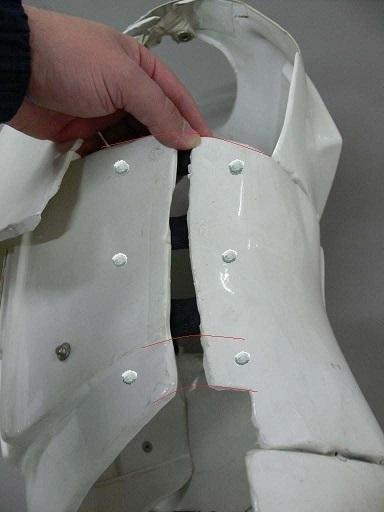
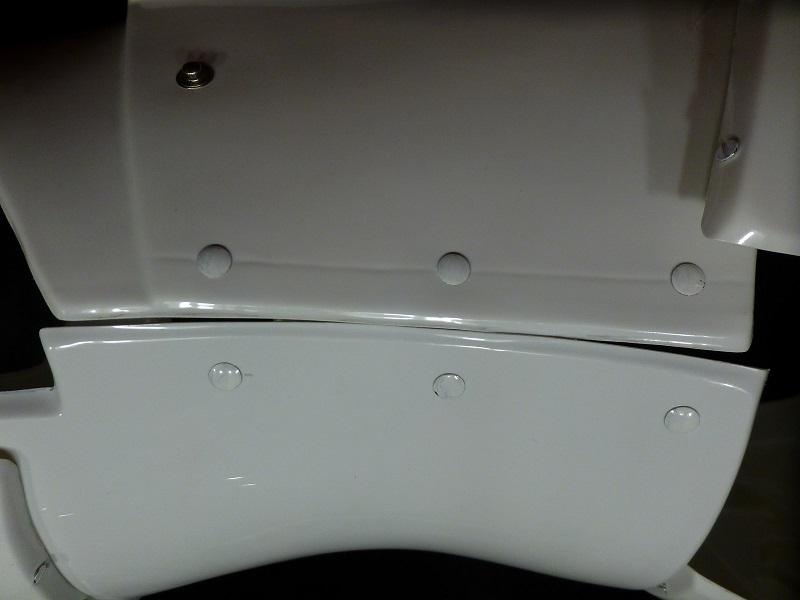
Hey Stephane! I know about the suspense. I was on a family vacation this weekend and not at my "station" as I like to call it. Anyway, thank you for your Centurion application. Complete and thorough. Thank you. Let's look at everything! CRL and Centurion Application Requirements: It was noted in the EIB application the excessive gaps between the back and kidney plates as well as both side seams needed to be addressed. Although the back gap was not eliminated, I do consider this gap to be minimal and acceptable. The side gaps have been sufficiently addressed. All other aspect of your armor meet the requirements to qualify for Centurion. That said, I would like to congratulate you on earning your Centurion badge! Other-Armor Fit/Assembly: Usually, there isn't too much to go over here except to summarize any observations I or your fellow troopers might have. Not too much going on here! Great overall work! Very nice!! I noticed that you got your blaster from the same guy Spycee did, Your rear sight is on backwards as well. The serrated edges should face the rear of the blaster. I did notify Mark from AP to let his guy know. Hopefully his next round will be facing the right way. I will usually make a "put a gun to my head" comment as well. If there was one thing I'd like to see you do at sometime in the future is to re-paint the tear areas under your eyes. As they are, they hold the shape and detail typically seen and that is fine. They are a bit small, though. On any helmet, there is a valley between the walls of the tears and the bottom of this recessed area. Using a pencil, the shape will just appear by itself as a pencil guides its way in this valley. I highlighted the area I am referring to. This is just so you can see but your pencil will show you the REAL lines. Great job again.Your Garrison should be proud to troop beside you!!! -
Kit's are from Mike at Trooperbay. However, he prefers for people to contact him at: mtk_armor@cox.net
-

Helmet mold mods to achieve Centurion
gazmosis replied to Elumusic's topic in The Foundry - Armor and Prop Making
Hey Jeff: You are on the right track here. What is most important that you are doing is side by side comparisons with the acrual helmets because that is what you are trying to duplicate. You have an artist's eye. I can see that in the details you already had in the pre-adjustment shots of the helmet. What I always fall back on as a way of determining how close something is to the original, is rapidly looking back and forth between what you have and what you are trying to achieve. Your eye will pick up any differences however subtle. This is how I came to the determinations about your rank bar areas being over sized and the tears below the eyes being a bit out of shape. With what you have done already, especially by adjusting the frown and adding the 5th tooth indent, you are very close. Everyone realizes the effort, skill and money it takes to prepare molds for pulling. I can't wait to see your final products as it comes out of this. -

TK-51114 Requesting ANH Stunt Centurion Status [TM][174]
gazmosis replied to Chills's topic in Request Centurion Status
How ironic, Mr. Chills that your armor gives me chills. Thank you so much for your Centurion application!! So many good things going on here so let's get to it! CRL and Centurion Application Requirements: All submission photos required have been posted. This armor possesses all the necessary elements to qualify for the Centurion badge. With that, I congratulate you on this gorgeous Centurion armor!! Other-Armor Fit/Assembly: Chills? Why not? It's Troopermaster armor and it doesn't get much better than that. UNLESS you take your pics in a Deathstar inspired Star Wars room with the reflections from the windows dancing all over it!!!! Anyway, this section is for us to look at and discuss observations regarding improvements to the final look of your armor. Well, not too much to discuss here and that is a great thing!! Well done on the construction and the adjustments you have made. Although you are a shorter trooper, you'd never know it. Aside from the sniper plate being slightly overlapped, that is the only thing that suggests your height. A couple adjustments that were made from the EIB application worth noting. First is the removal of the overlap of the back onto the kidney. And second was the re-positioning of the cover strips on the thigh backs to be more centered. Chris needed to shim his tree trunk thighs and the cover strip was mounted just off center making things look unbalanced. Nice work!!! Yes, Scott, you are correct. The chest, back and arms are worn here like a shirt. Looking back in his "arms up" shot, you can see the strap connecting the chest and back under the arms mounted high enough to be invisible. His height uses this to an advantage because there is close to nothing that can make the ab pop over the chest. Now get out there and make your Garrison proud!!! I know you are making them jealous because this is the first set of assembled and active TM armor in the Midwest. Congrats again!!! -
A good judge for what you are going to need is the final position of your seam. It should be centered on your side...not too far forward or back
-

TK 15359 requesting ANH Stunt EIB status [AP][482]
gazmosis replied to Somatophylax's topic in Request Expert Infantry Status
Hey there, Stephane!! Thank you for Applying to join the ranks of the EIB's! Let's look at your armor! CRL and EIB Application Requirements: All required submission photos have been posted. Your armor possesses all the requirements for EIB. With that, I welcome you to Expert Infantry!! Other-Armor Fit/Assembly: In this section I will go over observations made by your fellow troopers and myself. Sometimes these observations may lead to suggestions for adjustments or repairs that go to improve the final look of your armor. Should any suggestion affect an application, that will be listed in the above or below sections. Your fellow troopers have their detail goggles on!! Your shoulder bridges look much better with that curve on there. They were sticking straight out and now they will lay properly. Nice work. Overall, your build is straight forward and very well done. You were correct regarding the decals for the helmet looking a little too perfect. They are. You would have needed to switch them out should you have used them and decided to shoot for Centurion. Now you have nothing to worry about! Great work tackling that hand painting. Centurion Suggestions: Ultimately, the Centurion level accuracy is the responsibility of the trooper. I do try to spot as much as I can, though. I would REALLY be surprised to NOT see an application from you. Before you apply, though, there are two things I would like you to adjust. First, the gap between your back and kidney should be reduced a bit. You may need to install another snap that would allow you to drop that until they rest on each other. Next are the gaps on your sides. These need to be removed. Prior to taking your Centurion pictures, don't eat breakfast, breathe out, and tighten your belt. Congratulations, good Sir! Your Garrison should be proud!!! -

TK-20017 Requesting ANH Stunt EIB Status [ATA][481]
gazmosis replied to russellr2d2's topic in Request Expert Infantry Status
Well, well, Mr. Rucker! This is a gem. Thank you for your EIB application. Let's look at this set of armor! CRL and EIB Application Requirements: All submission photos have been posted. Your armor displays all the necessary elements to qualify for EIB. With that, I would like to welcome you to Expert Infantry!! Other-Armor Fit/Assembly: In this section, I will review suggestions made by your fellow troopers and myself that go towards improving the final look of your armor. If any suggestions require changes, I will list those in the above section or the Centurion Suggestions section. This is yet another example of close to perfect armor building. I can only say well done so many times. Your blaster is a marvel. Your body type was made perfect for this armor, and your build is on point. If someone forced me to comment on something...... It would be to first get some matching paint for your house so the repairs match.......the only thing I could come up with are your tears below the eyes could extend a little larger and go up to the "walls" of the tears. All your details painted are outstanding. Centurion Suggestions: The ultimate accuracy required for Centurion is up to the trooper. I wish I could comment on something here. Great work!!!! -
Goin' for the gold! Way to go, Joseph!!! Thank you for your Centurion application. Let's look at this HWT armor!! CRL and Centurion Application Requirements: All required photos accounted for. All details required for Centurion are present on your armor, backpack, and weapon. Congratulations and welcome to Centurion HWT!! Other-Armor Fit/Assembly: In this section I will go over observations by both myself and your fellow troopers. Should any observations lead to suggestions for adjustments or change, I will let you know if any of these would be required. These would be listed in the first section. The new chest looks great!!! The upgrade fits your suit like it was made for it and your fit makes your suit look like it was made for you. Well done!! What pops for me is the subtle yet effective amount of weathering on everything. Just as it should be! Nice work again on your helmet painting. Brilliant. If I was to make an actual comment, it would be to raise up your belt just a tad to contact the button plate. Just so you know, The newer sets of AM forearms are modeled after screen used ones. Believe it or not, you have yours on backwards. The elbow side of the left forearm is flat and perpendicular to the square indent ridge while the right elbow side is actually angled slightly from the top back towards the elbow. Congratulations again!!!
-

DoopyDoo's + deac. parts = Scott's build
gazmosis replied to charlesnarles's topic in ANH BlasTech E11
Are you going to try to remove the hinge cylinder or use the doopy one? -
you just have your volume too high. Make the adjustment at home. When you get to a volume that is loud enough but doesn't feedback, mark this with a silver marker both on the dial and next to it so you can set it there the same every time
-

TK-42178 Requesting ANH Stunt Centurion Status [AP][173]
gazmosis replied to Spycee's topic in Request Centurion Status
Hi Alex! Thank you so much for your Centurion Application! Let's get right to it! CRL and Centurion Application Requirements: All proper submission pictures have been posted. YOur armor demonstrates all the necessary requirements to earn the Centurion badge. Congratulations and welcome to Centurion!! Other-Armor Fit/Assembly: It is very much worth pointing out again your incredible shim work. I can guarantee that there are many going back in the thread to look after reading that. Well done on that and the rest of the armor. Detail for detail you are right there. Great build, great paintwork! If I was to make a suggestion regarding an upgrade it would be a new holster. While we are mentioning things surrounding your blaster, thank you for correcting the position of your charging handle. Your rear sight is on backwards...just so you know. A little drybrush weathering can really make a nice blaster like yours pop. Your Garrison should be proud! Everyone here is! -

TK 26113 Requesting ANH Stunt EIB Status [ATA][480]
gazmosis replied to Zarlon's topic in Request Expert Infantry Status
Hello Mr. Kyle! Thank you for your EIB application. Let's have a look at your armor CRL and EIB Application Requirements: ​All the required submission photos have been posted. I am pleased to say that your armor exhibits all the necessary details required to achieve the Expert Infantry badge. Congratulations and welcome to EIB!!! Other-Armor Fit/Assembly: In this section I will go over observations made by both myself and your fellow troopers. These observations may lead to suggestions or suggested adjustments to improve the final look of your armor. IF any adjustments are required, these will be listed in the above or below sections. I am a big fan of the "beefy" trooper. You will be the muscle of your Garrison. Awesome. And so is your armor. You have an overall solid and well detailed build. I will disagree with you on a point that you mentioned regarding always tweeking your armor. It is possible to get your armor to the point where no further adjustments are needed unless a weight reduction or gain is in your future. As for comments on your armor, I would perhaps make an adjustment to get the sag out of the front of your belt. I like to see the belt top resting against or slightly overlapping the bottom of the button plates. Jay mentioned that stray strap above your thigh. I wonder what that is even for but as long as it doesn't get any longer and traverse the top of thigh it's fine. I'm sure you will have fun with all the tabs and strap on your sides. Whatever you do there is fine just concentrate on making sure those gaps stay closed especially if you are going to shoot for Centurion. Kudos to you on you taking on the hand painting. I am not so concerned regarding there positioning within the trap itself as long as they aren't too high or low within. The vent line pattern is what is important that it follows the shape of the trapezoid. Well done on the proper conversion of the Hasbro blaster. The correct T-Track on the lower magazine side was removed and the proper holes drilled. As for your chest position. Please don't cut your cod. What I would do is get a strap with a plastic clip that allows the strap to be adjustable.. That way you can micro adjust the length to get the perfect fit as well as keep it from riding up too high and possibly popping over the ab top. Centurion Suggestions: I do try to see as much as I can but the ultimate accuracy is the responsibility of the trooper. You did a fantastic job with your side shims. To put it over the top, I would melt up one last batch of abs paste to eliminate the line between the shim and kidney. Even if it ends up not PERFECTLY smooth, it would show much less than a darker seam. If you do end up applying for Centurion, make sure you take new full body pics. The ones you have here show your side rivets and the thigh pack rivet unpainted. You have them painted now, but in your first set of pics they are not. The crotch strap rivet and male snaps remains unpainted. Lastly, you will need to upgrade your blaster to a Sterling based one. Congrats again!!! -
Thanks again to everyone. Without all of you, there would be a hole in my life.
-

DoopyDoo's + deac. parts = Scott's build
gazmosis replied to charlesnarles's topic in ANH BlasTech E11
Thanks, Scott! Looking forward to your build! -

TK-22237 Requesting ANH Stunt Centurion Status [TM][172]
gazmosis replied to iceman25c's topic in Request Centurion Status
Hey Todd! Thank you for your application to Centurion. This has been a very interesting application as a whole and worthy of discussion. Many good points have been brought up here and you, Sir, have done some incredible work. Right up to the end. Let's look!! CRL and Centurion Application Requirements: All required photos have been posted and your armor contains all the necessary elements to earn the Centurion badge. Congratulations, Todd! Other-Armor Fit/Assembly: By this point, there really shouldn't be too much to discuss. however, some very good observations and points have surfaced and are worth reviewing. First, let's go right your side rivets. Although I agree that your lower rivet was installed a little low, with the ensemble together, this isn't something that jumped out at me. That lower most rivet didn't throw the armor out of balance or make it look like something was installed incorrectly. This is what I consider the perfect side rivet installation: Some other rivet locations that I might consider bringing up are ones that are gathered too close together like this: or too far from the seam: I agree that this is not costume replication, but I do believe there are certain things that, although not listed on the CRL, should be maintained as close to the original costume as possible. Especially when the photo references are there and readily available. If the CRL was updated to list all of these points, it would be a huge and very annoying manuscript. Specifically in Todd's case, I made mention of the thermal detonator attachment hardware. Many troopers encourage the slotted, pan head screws to be used here. Yes, that is accurate, but that is something I have never harped too much on. I mentioned it in Todd's case, not because he originally used rivets, but that I only noted two. When we always refer to the 4 commonly seen here Todd made the upgradeWell done! Obviously, his side rivet relocation was amazing. This level of attention and Centurion pride as Todd mentioned is admirable!! Todd also upgraded his rear trap vent lines to closer follow the trapezoid shape and not all be parallel to each other. If I was to make on comment about something for future adjustment, it would be to shorten the strap on your right side drop box. Thank you, good Sir, for all your hard work. You have been saluted. Congratulations!! -

Alex' 1st Journey [RS Stunt Build]
gazmosis replied to FutureAlexx's topic in Build Threads Requireing Maintenance
20 mm is perfect for the end caps. Your control panel will be around 120 mm and your gap between the control panel and end caps should be about 12. I hope my conversions are correct. -

How to: Make your own M40/M39 E-11 Blaster Scope
gazmosis replied to aliens8us's topic in Tutorials, Tips and HOWTOs
I am trying not to be negative, but I would finish this off into something a little closer. It's a great scope option for someone who is a real go getter, People nowadays are leaning towards more realism. Projects seem to always be in development. Keep up the great work!! -

TK 51114 Requesting ANH Stunt EIB Status [TM][479]
gazmosis replied to Chills's topic in Request Expert Infantry Status
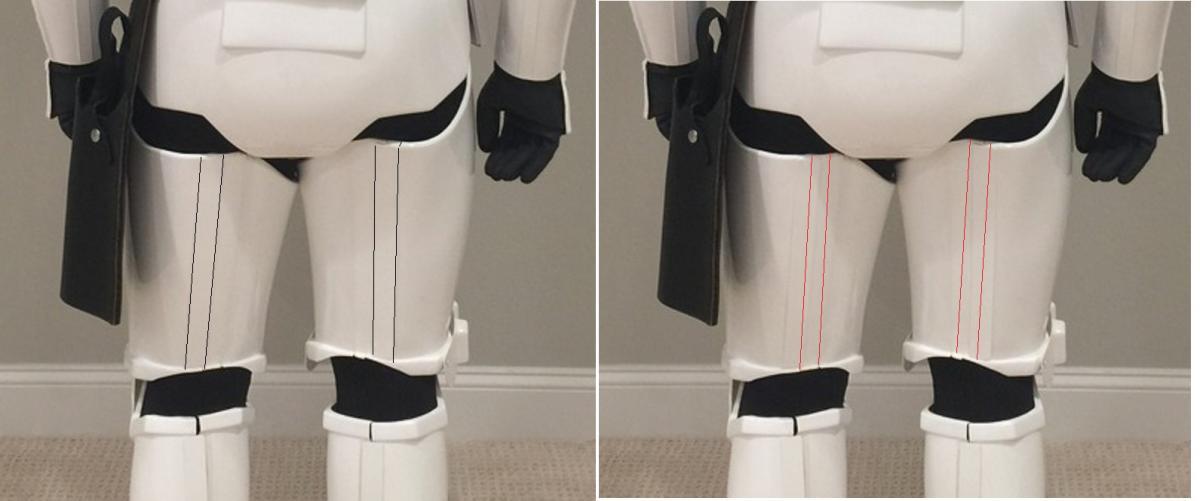
Hey there, Chris!! Thank you so much for your EIB application. Yet another shining (literally) set of TM armor for us to gawk at!!! Let's gawk some more!! CRL and EIB Application Requirements: All required photos have been posted. I am pleased to say that your armor meets all necessary requirements to qualify for EIB. I would like to congratulate and welcome you to EIB!! Other-Armor Fit/Assembly: In this section I will discuss observations made by myself and your fellow troopers. At times, these observations may lead to suggested changes or adjustments to improve the final look of your armor. If any changes are required, they will be listed in the above section or the Centurion section. Yes, Tony. I agree. Space aged shiny stuff!! It is even more impressive in person. Acrylic capped ABS is just stunning. Makes TM armor even a bigger pleasure to work with. The subject of your sniper plate was brought up. I think it might just be the camera angle but the sniper does clear the bottom of the thigh. For the first time I saw someone who needed to shim the back of Troopermaster thighs. Because of Chris's active lifestyle, the man has thighs and calves that can crack coconuts. All the leg parts are stretched to their absolute limits in regards to fit and as previously mentioned, the thighs needed to be shimmed . (See mention of this below). I doubt the thighs can be pulled up further. Can you fill us in on what exactly the strand of elastic going across this inside of your butt plate is for? Great paintwork on your helmet, by the way! Centurion Suggestions: It would be shocking if we didn't see an application from you. A couple of adjustments are needed before you can do that. First, as Scott had mentioned, the overlap of your back onto your kidney is more than what I would consider "little to no overlap". This will need to be adjusted. From your side shot, it looks like you have room to lift your back up by installing an extra snap higher. Second, I will need you to remove the white paint from your cod split rivet. Lastly, I want to follow up on your thigh backs. The only thing that seems off about your shim work (which I challenge ANYONE to notice.......fantastic work here, Chris) is the cover strip seems to be replaced off center. In this side by side, I marked the current path in black and what I believe the path should be in red. Congratulations again!!! -
Hello Lucho! No problems in your posting. Life just has just given many more things to accomplish both here and personally. But thank you for your EIB application. It seems you missed out on the SDS run of your country mates Anyway, let's look at your armor!! CRL and EIB Application Requirements: All the required photos have been submitted and with pleasure I can say that your armor contains all the necessary elements to achieve Expert Infantry status. Congratulations and welcome to EIB!!! Other-Armor Fit/Assembly: In this section, I usually discuss observations made by both myself and your fellow troopers. Sometimes these observations may lead to suggestions to improve the final look of your armor. If any suggestions are required, it will be listed in the sections above and below this one. Some very nice work, here, Lucho!! Your body type and the way it fits you almost makes it seem like the armor was made for you. Just perfect. All the parts are trimmed and fitted to eliminate the raised ridges on the biceps and leg backs. Very nice work! You mentioned that your handplates are ATA. Aren't yours in the picture rubber?? Is Terrell making handplates now? Very nice work on the hand painted details. If someone would force me to comment on that, it would be that your tube stripes are a BIT thick. They are acceptable, though. The only other thing that jumped out at me was the thermal detonator control panel. I like to see it installed so that it sits right up against the belt clips with no space between them. Centurion Suggestions: Although I try to point out what I can see here, the ultimate responsibility for Centurion accuracy is up to the trooper! First, I'd like to see the thickness of your belt's drop boxes reduced just a little. The ones on the original armor were very thin so to shoot for around a 12 mm (1/2 inch) thickness here is more desirable. Please make sure you eliminate ALL return edge from the wrist openings of your forearms I will mention it just because I can;t see it, but you need to have the 7 mm white elastic around your shoulder bridges. Congratulations again, Lucho!!!
-

It begins..... AP ANH Stunt
gazmosis replied to Feedback's topic in Build Threads Requireing Maintenance
Build pics! We love them!!M -
Oh, you will not be disappointed!
-

TK 31689 Requesting ANH Stunt EIB Status [AP][478]
gazmosis replied to JoblessPunk's topic in Request Expert Infantry Status
Well it sounds like you are all over this! Truthfully, I wasn't too worried. An entire new ab seems a stretch to me but you are the perfectionist! Go for it!! Stay affordable on the paint for the scope. Any acrylic paint in a tube will apply well and be durable. I truthfully have no idea what the paint Vern suggested costs. I'm sure its a good quality paint, though. Carry on, Trooper! -
Pretty dang cool work!!!
-
Only a side by side will be able to tell if it's truly recasted. Think about it. How many different molds were used to create the original TKs for ANH? Not many. If most of RS molds were from screen used suits and Anovos's molds were formed from scans of screen used parts, and they both used similar materials to pull suits, wouldn't the possibility exist that the kits would look remarkably similar???? Nothing can be assumed here until the two suits are sitting next to each other. I'm sure they know we are gonna do that
-
All our answers will come here very soon. I'm sure the pics will come at an astronomical rate after SDCC.


