Leaderboard
Popular Content
Showing content with the highest reputation on 02/04/2024 in all areas
-
Time to set the helmet aside. We have a troop in 6 days. So I can always use my ATA bucket. Today is Thigh day. As I have already completed the shins, I need to get the Thighs done so that The lower half is complete and I can give my son back his RS Props Thighs for his ESB. I found a post that @MaskedVengeance linked that said the cover strips for the thighs were 20mm, so that is what we went with (hopefully this is will meet EI requirements). Here are some pictures of progress.3 points
-
I was not particularly happy with the 127mm length of the control panel. So I tore off the tape at the ends and affixed the caps more tightly this time. I then remeasured and gave myself ~12.7mm spacing (half the 1” bar I have) on each side, and got a little closer to 124mm. I drew suitable cut lines with some margin so I could rough cut it with my bandsaw. I bought some more 2” PVC and used it sacrificially to get the trimming as close to square as possible. The factory end of the pipe was pretty close to square with some light sanding. I used @MaskedVengeance's method of marking/sanding the edges. This is the before shot: As I mentioned in my last post, the button protrusion behind the control panel got in the way of getting the panel flat onto the tube. I drilled a hole on the sacrificial PVC to get this lined up, but was afraid to do this with the actual pipe. But I took @gmrhodes13's advice to go ahead and drill the hole, rather than mess with the plastic. So I had some room to make fine adjustments, I drilled the hole a bit large. It will be covered anyway (those photos later in this post). (ignore the black markings) This went only kinda OK. I had one stray knife cut, and now there’s the cut going into the panel, with some China marker sunk into it! No photo, too embarrassing! I then tried cutting the other side using the jig, but that was impossible (at least to me). I ended up not using the jig, and free cutting the curled edge first, then adjusting and sanding. Frustratingly so, I did not have enough good plastic to achieve the 95mm arc. Backing off as little as I could from the plastic that was lumpy due to forming, it came to about 92mm. I then refitted all the tape and cut the mask out for the control panel. Ready to paint now, but it’s too cold in my garage for the paint to dry properly. Will wait. Paint mask, and hole marked for button clearance: Yea Forstner bits!3 points
-
2 points
-
Please everyone join me in congratulating Joseph as the incoming DL of our fine Detachment. Congratulations, Joseph, I look forward to seeing what the next chapter for FISD will be under your direction. The membership is in good hands, and I am here to support you with what ever you need, as I am positive any of the staff existing and new into the future will. Once again, congratulations1 point
-
1 point
-
Troop #39 We returned to Cumbernauld comic con for day 2 in the centre. Had a blast this weekend with Lottsa love from the public, loads of photo ops, high fives and fistbumps.1 point
-
20mm is good for the front. The backs should be the same but can be a little wider if needed.1 point
-
I just don't wanna pick between my friends is all. That's all. So pleased we didn't have that here this year.1 point
-
Sometimes progress forward needs a step backwards. I think your eye will tell you when the layout feels right. BTW, as a woodworker, I love all your tools and jigs! Your skills will be very helpful for this whole TK build. You will get to your comfort zone before too long.1 point
-
I did quite a bit to my BS bucket. The beginning of my build thread shows most...getting rid of the battery box and speaker are the most important! My stock lenses do just fine, I blacked out the inside of my bucket...brow lowering and chin extension is a bigger job...up to you...definitely paint to match armor! Have fun...Good luck!!!1 point
-
Good idea! I’ll try and find out how to reach out to them. is that someone who would be in your local garrison?1 point
-
Troop #3 This troop was an appearance at a birthday party (for the child of a member's friend), and this was a quick appearance of about 20 minutes given the short attention span of children. We were a hit with both the children and the adults present, with ample photos taken among all! I made sure to snag a selfie of us just after we returned to the changing room (it seems I have a trampoline as a halo...): The trooper on my right was the only one of us with a voice amp, which really came in handy for interacting with the group! Looks like I need to prioritize getting my own voice amp as that will certainly help with interacting with others when I am wearing my bucket!1 point
-
Troop #2 I live far enough west in Indiana that many sizable towns in Illinois are within a reasonable driving distance. Knowing this, I reached out to the Midwest Garrison to see if I could occasionally troop with them (in addition to my trooping with Bloodfin). They welcomed me aboard their forum and Facebook chat just a few days ago, and I was in luck as they had a troop coming up soon! That troop was today, and it was the Quadcon Comic & Toy Expo in Champaign, Illinois. This expo was mainly used as an opportunity to recruit new members into the garrison and Legion, so I was happy to help by talking with individuals interested in joining! We met someone who has built a complete Anovos ANH Stunt kit, and his partner who has a complete TIE pilot costume, but have yet to take the next step of applying for membership! Needless to say, we gave both all details about the CRLs and the application process, which they were very receptive to. Hopefully we convinced them to apply! I didn't have much time for photos, but I made sure to get a photo of me under the Midwest Garrison's banner, and next to the mannequin we dressed as a Mandalorian: Interestingly enough, the venue was not open to masks or head coverings (strange for a place hosting a convention where may people were in cosplay), so I was only able to wear my bucket when in the immediate confines of our booth, and I had to be bucket-less when venturing anywhere outside our booth. Venturing around bucket-less seemed to be very helpful in that I could invite anyone who showed interest in my armor over to our booth! This especially happened when I made my way to and from the food court. I was able to get many people interested enough to visit our booth, and sure enough, just about everyone I had talked to came by at some point! I went to this troop thinking it would be the only one of the day, but during the troop I was told another TK was needed for a birthday party later in the day. It didn't take much for me to say yes, so soon enough I was off to the next troop!1 point
-
I had thought of doing exactly that, but was worried about not getting it registered accurately enough. But I guess a bigger hole is not a problem, since it's covered anyway. So yeah, sounds like a plan! Thanks!1 point
-
I was at the RS studio a week or so ago when they were working on the DLT-19 and it’s impressive [emoji108] Sent from my iPhone using Tapatalk1 point
-
Congratulations Joseph, we hope that this new adventure goes as well as possible for you, the better it goes for you, the more we will enjoy it as members of this detachment...1 point
-
Mine is standard aircraft safety wire. Not sure if that's accurate but it looks pretty close. It gets twisted together, cut so that about 4-5 twists are left, and then bent up and out of the way. There's dedicated tools to twist and cut it, but needle nose pliers work very well. Safety wire CAN be horrible stuff if you've never worked with it. It's rather springy and bounces everywhere. It loves to create puncture wounds. Wear eye protection any time you're handling it.1 point
-
A well deserved honor for both of you! Now that you will be on Staff in the new term, we will be expecting even MORE from you.. Thanks for all you do for us, my brothers. It doesn't go unnoticed or unappreciated!1 point
-
Congratulations Joseph!![emoji1320][emoji1320]1 point
-
Oh wow, I didn't realize that was an L2 thing. Very cool! That makes the BS bucket much more accessible. One thing I would highly, HIGHLY recommend is fully painting the bucket so that it matches your armor instead of just spot painting the repair area around the speaker. If it's a different shade of white, the GMLs will likely notice and then start looking more closely at it. They may require more fixes like the brow trim.1 point
-
1 point
-
You should be ok if you fulfil the base requirements The Black Series helmet is approvable if modified to meet the level 1 CRLs At the end of the day your GML makes the final call so you could check with him/her/them/they. Here is another great build1 point
-
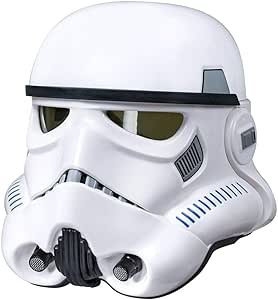
As I await the printing of the cover strips (I hope to get those done this weekend) and completing the 850 build, I'm starting to think about a helmet. I own a Black Series helmet and I'm wondering what I need to alter in order to meet Basic approval and get closer to trooping. I've read the HOWTO: Make Black Series R1 bucket more accurate thread and the CRL. Here are the three things I think I need to do for Basic approval. #1: fill in, smooth, and paint the speaker and battery pack seams. #2: change the lenses so they are sufficiently dark enough to obscure my eyes (you can see the inside of the helmet in the image below) #3: back the teeth hollows with black or dark gray wire screen mesh I think everything else meets the CRL, although I recognize that more can be done to make the helmet more accurate. Let me know your thoughts about Basic approval. Thanks.1 point
-
Although this comes with the caveat that I have never built beyond basic approval, I have had success with hand painting the black lines in the tears and trapezoids of the helmet using a paint marker. I did so because I had difficulty controlling paint on a paint brush for this fine of a detail. Although, I know different paints are discussed in reference to L3, so someone may have to correct me if this is not acceptable beyond basic. I am not sure where you are located, but if in the U.S. you should be able to find the paint marker below in the craft supplies section of Walmart.1 point
-
So next up. The Helmet. As I said, my ATA helmet is great, but it seems a bit small compared to others. I have not been able to install the fans and the battery pack in it without feeling like I couldn't get the helmet on or off. So Let's get this going. Starting out like I did with my son's taking the Dremel and sanding out the teeth. And then I'll use the X-acto knife to clean them up.1 point
-
Well other than painting the screw heads black, I'm calling the TD done. Roughly - 20 mm edge caps 13mm between the edges 121mm control/button board 184mm in total length Next up I think will be the Bucket. I'm read to replace my ATA helmet. The interior is to small to install fans and the last two troops I really could have used them.1 point
-
So after a super busy year, and my old ATA kit holding up (with a few part swaps), I'm back on the build. Next up, the TD. Something simple that I can do while watch playoff football. Plus Dave basically builds them for you. Some slight trimming, some light sanding, and a bit of gluing. Since I was in a rush to get my first one built and I didn't know about EI or Centurion, This time I'm going to try for Centurion, but at a minimum EI. So at @MaskedVengeance suggestion, I'm following @DTKC and @A.J. Hamler build guides. So one with the pictures.... Need to let it cure and then adding the ends and clips.1 point


