Leaderboard
Popular Content
Showing content with the highest reputation on 02/02/2024 in all areas
-
Thank you for this award, it is a true honor. I certainly have no idea why on the Death Star I deserved this, but I will take this as an encouragement and continue to server our community with pride. One thing I like to report on a project I am currently working on; I am making a series of video guide, localized in Cantonese about DIY a Stromtrooper. This project is inspired by our late FISD member CableGuy (Dan), I hope to follow his footsteps on documenting the building process and introduce the collective wisdom of FISD to Cantonese speaking Star Wars fans in Hong Kong, UK, Canada and other countries (yes, we are now scattered all over the world), hoping to make a connection and keep the Cantonese language alive at the same time. I planned six 25mins episodes of A-Z introduction and will move on to do a new kit TK/TD after that, the series is now into its 2nd episode and I am currently making the 3rd one. I will make a thread and report on the progress in the Chinese section under "Imperial Embassies".11 points
-
5 points
-
2 points
-
2 points
-
(we had spoken before, but it's always wonderful) My second choice for TK ID was the national dex number for Whimsicott with some extra zeroes.2 points
-
(edit to include the info that...) The right one is the Discord icon just to explain the joke2 points
-
2 points
-
Besides Star Wars my other hobbies include photography. This year I decided to combine the two. Giving me an accuse to take costumes out of storage and share some observations in character. All from a satirical pro-Imperial point of view. I was planning on sharing the first video later this year but felt with it being May the 4th I should release it today. Give it watch if you can. https://www.youtube.com/watch?v=Q8iRhyUnPTw1 point
-
Ok, so I built Nico's helmet shortly after he released his files around 4 years ago, and I have a build thread that I started back then, and that I only recently updated to show how it ended up turning out. Here's a couple pics of that build. I love that helmet and the sculpt that Nico created. But over the years and with so much new reference material from Solo to Andor and everything in between, I've been wanting to modify a few things to make the helmet a bit closer to what I've been seeing on the screen as well as make it easier to assemble along the way. I started about 6 months ago with wanting to try my hand at modifying the files and make the cheek tubes penetrate into the chin area. That was the beginning of a long journey, ha! I didn't really have any experience with 3D software, other than tinkering with minor modifications on files before. I've been working on a mod in my spare time, with some insight and plenty of reference from Ryder Kinion I've finally got it to where I'm ready to start a build. I ended up lightly to moderately modifying every part, as well as utilizing and slightly modifying David Os's ear and temple trap pieces. The list is pretty extensive, I won't go into every little detail I modified but here's an overview of some of the main changes I made: 1. I slightly narrowed the overall sculpt side to side as well as slightly reduced the height of the dome. 2. Added alignment pegs and holes between almost every piece that attaches together. 3. Like I mentioned, I made the cheek tubes penetrate into the chin and added attachment plates between the end of the tubes and inside the chin piece. 4. Modified the teeth to add the last tooth and added attachment plates to secure them better to the inside of the helmet. 5. Added a slight recess to the regions where the tears, temple traps and back traps sit. As well as cut out a hole behind the tears and back traps for ventilation. I plan on adding a black, breathable fabric backing similar to what has been reported by those familiar with the screen used helmets. 6. Modified the brow trim to look similar to the rubber trim used on screen-used helmets. I may end up trying to use actual rubber trim. We'll see what works best. At this angle you can really see not only the brow trim difference, but also the reduction in height of the dome, the angle of the vocoder and the modification of the point where the cheek tubes penetrate into the chin. 7. Modified vocoder angle and length of some tubes and added additional alignment and attachment points. 8. And for all the fans of the Mimban trooper, I modified the Mimban shield and pins to be more narrow and sit closer to the width of the helmet and increased the height of the brow trim feature on the shield I made a couple miniature test prints along the way which helped me see if my mods were working the way they were supposed to. They also helped me see other modifications that needed to be made. These are the first two I made. They were printed at 35% scale, the one on the left was the my first test print to see if the alignment pegs and keyholes worked properly as well as seeing how the tubes to chin connection looked and worked in real life. Then after comparing to reference and talking to Ryder we both agreed it needed to be narrower side-to-side which made the dome too tall and square. So I slimmed the whole thing down by 3% and reduced the height of the dome. But then after seeing it in real life we felt it was a bit too narrow. So I decided to try it closer to 2% narrower from the original and it finally looked right. So after a few more tweaks to a few details (and after getting a larger resin printer, that I picked up at a great deal), I decided to give it another go at a test print. This time at 50% scale. I finally feel that this is the one! And now I think I'm ready to start my build. I think I'm going to avoid all the heavy post processing work this time around and get the big pieces resin printed with a strong resin, probably from Corellia Creations and resin print all the smaller pieces myself. As I've found from doing miniatures, resin is so much easier to get to paint ready than an FDM print. This may be slow go on my part, as I try to work on it in my spare time when I've got the motivation and energy, ha! But I'm hoping my excitement to see the finished piece will provide me with enough. Wish me luck, I'll post updates as it's coming along!1 point
-
1 point
-
A short video on Left-handed Stormtroopers. With a special appearance by Luke and Leia at the end. https://youtu.be/HaTnLl7SRP41 point
-
The paid service Legion use is similar to ours and has its limits and anti spam detection systems which can trigger in events of sudden mass emails. the more bulk emails you wish to send the more dollars it costs to get on a higher plan so to speak. I think with legions current case it is being flagged as spam when over limit. As to the noms, they are small value emails when it comes to quantity needing to be sent per email, and happen across a broad time span. The mass send outs hit huge numbers in the 10,000 plus region, so perhaps legion require an upgrade or different provider. The spam filters have probably changed over the last year too, so this may have popped up unexpectedly. Either way it isn’t ideal, and hopefully they have a better solution moving forward.1 point
-
Oh, I will certainly take advantage of this wording! . You are right about the CRL image not having the 12mm spacing. Thank you.1 point
-
I can attest to my gmail account only receiving some nomination notifications, while others were not delivered. I also know of at least one other trooper using gmail who has experienced the same. Sent from my iPhone using Tapatalk1 point
-
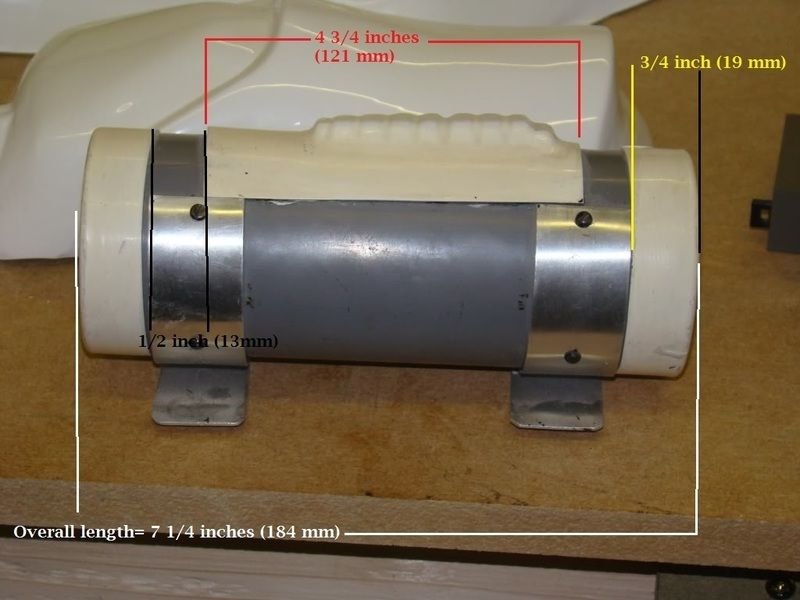
Here's my painted detonator, grey primer and clear coat, I couldn't find a grey I liked locally No actual dimensions only screen references. You may find with some makes that if you trim just before mold lines you should be close. There is that "approximately" word again From the CRL Thermal Detonator (A.K.A. O2 canister) attaches to the center back of the belt. Detonator consists of an all grey cylinder, without silver stickers or silver paint. The cylinder is between 2” (50mm) and 2.68"(68mm) in diameter with white end caps on each end. The white control panel raised ribbed pad faces the rear, with the controls/round washer style detail closest to the right end cap. The total length is approximately 7.50" (190.5mm). End caps are approximately .78" (20mm)in width. The thermal detonator is attached via metal or metallic-appearing clips, approximately 1" (25mm) wide. OPTIONAL Level two certification (if applicable): Clips shall be attached with slotted type, flat or dome top style screws, and be black (two per clip). V head screws are not permitted. Thermal detonator belt clips are positioned with little to no gap between the clips and the end caps. The verticle (straight)section of the clips do not extend past the bottom of the canvas belt Even the CRL image is not 100% correct to references (Gap between control panel and endcaps)1 point
-
1 point
-
Not to worry! Because I'd love a Discord chat with all of you, here's my suggestion: I'm currently aiming for the 10th of February '24, at around 15:00 GMT (16:00 German Time), but will post final Infos a day or two in advance on the Discord Server. I'd love to have lots of troopers join me on Saturday!1 point
-
1 point
-
1 point
-
Congratulations both of you. Thank you for your contribution to the detachment.1 point
-
Thank you for this award. I am truly humbled and honoured. The FISD is like extended family for me and I look forward to many years to follow.1 point
-
1 point
-
For some unfathomable reason, it's been suggested that I have an addiction. To clarify: I do not. Probably. Maybe. As January is ending, I want to thank you all for participating in the second annual meme war! Even though we had fewer memes than last year I had a lot of fun and want to congratulate all who made it through, who shared memes and who made this another fantastic, fabulous and fun January! And for old time's sake, here's a tiny throwback to last year's meme war: And even though I hope we can continue this tradition of having a meme war during Meme-uary (too much? Sorry...) please don't forget that you can and should meme all year round. It's been a pleasure, troopers, please continue being amazing!1 point
-
Sadly, the Meme Squad will be declining, but are honored by the nomination. Perhaps one year in the future...1 point
-
Live-blogging the start of the election period... kinda If you know, you know Until finally... All the relevant information can be found for approved TK's over here: https://www.whitearmor.net/forum/forum/35-detachment-only-general-discussion/ Good luck to everyone who's running this year!1 point
-
My squad hosts GalaxyCon in Richmond every year. I missed the sign ups today. [emoji20] Sent from my SM-N981U1 using Tapatalk1 point
-
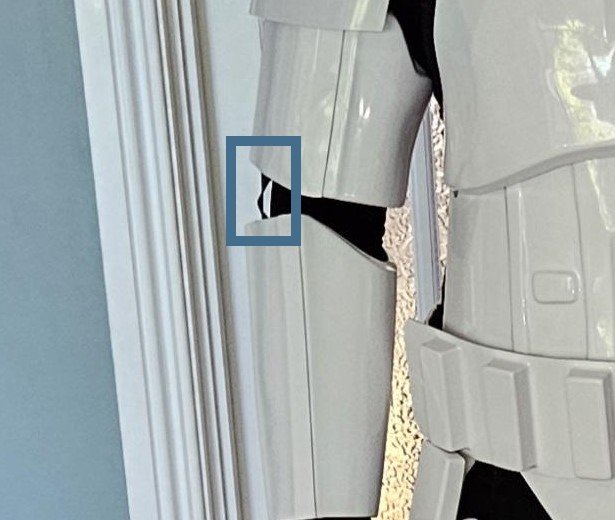
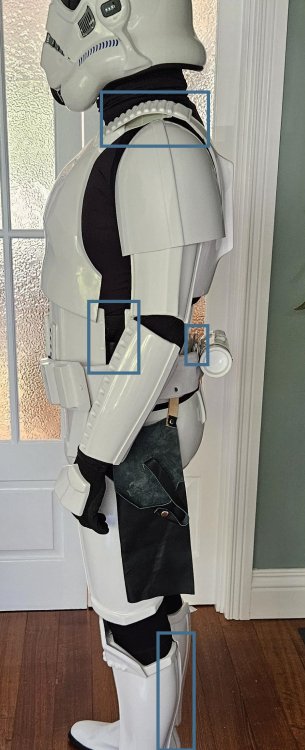
Hello and welcome to the forum from the West. First off your GML (garrison membership liaison) has final say on your costume. One thing that stands out is your bicep cover strips and raised ridges, generally we try to keep any front sizing as close to screen used, the raised ridges should be just outside the cover strips, yours have a big gap. Larger cover strips may be used on the rear to achieve a larger size if needed. Back of shins should close outside over the inside, this is so the don't appear open from the sides, yours are opposite. Cold also rotate your detonator so the O can be seen Left Right Small ab plate could be trimmed flat, should not have excess material on sides. Large ab plate is missing a base, it's been overtrimmed. You could also apply some heat to the belt (hot water bath) to help it conform to your armor better, your arms will catch the belt as they are. Elastic on your bicep to forearm appears on the sides (right arm) should be on the inner top Right arm You helmet sits a little high, could try reducing the padding. Detonator clips not completely down on belt. Shoulder elastic appears it may be a little loose, straps only just reaching the backplate. You may also want to add side shims to reduce the black seen between the abdomen and kidney (although this is for higher levels) OPTIONAL Level two certification (if applicable): Any gap between the abdomen and kidney armor is no more than 1/2" (12.5mm) wide. Any shims used to achieve this effect are of a similar material and color as the abdomen and kidney armor. Shims fit flush and seams are allowed.1 point
-
Life got busy and I neglected the meme thread... dang it. and now it's back to work!!! No force chokes! and lastly...1 point
-
It's... probably not an obsession. I think. Maybe. This one's for all of you: Squad, Outpost, Garrison, Detachment, Legion. Extended Staff or Staff. Thank you so much for all that you do! I've had the honor of being responsible for our Detachment Social Media accounts this past year and it's been so much fun! And it's given me a whole new level of appreciation for everything that people on Staff do to keep our beloved forum and club running. The time, the effort, the love and care that goes into this. Truly, shout-out to everyone who's ever done this or does this, you're awesome!1 point
-
1 point
-
Thank you so, so much for making this Detachment a fantastic, safe and wonderful space for all us Stormtrooper enthusiasts. FISD wouldn't be the same without you, Andrew, and I'm very impressed by not only four years in office, but also by all you did during those four years. Cheers! (You can't.)1 point
-
@Sly11 after 4 years as DL! I'm just a simple man. I'll let the rest of the Meme Squad and others create more descriptive content.1 point
-
Stand is somewhat complete. Still need to sand and paint it, and the vertical support isn't glued in yet. Still looks pretty good...1 point










.thumb.jpg.e41fc1b8fc87426b9f0455438f73c697.jpg)
