Leaderboard
Popular Content
Showing content with the highest reputation on 01/29/2024 in all areas
-
My squad hosts GalaxyCon in Richmond every year. I missed the sign ups today. [emoji20] Sent from my SM-N981U1 using Tapatalk5 points
-
Live-blogging the start of the election period... kinda If you know, you know Until finally... All the relevant information can be found for approved TK's over here: https://www.whitearmor.net/forum/forum/35-detachment-only-general-discussion/ Good luck to everyone who's running this year!4 points
-
It's... probably not an obsession. I think. Maybe. This one's for all of you: Squad, Outpost, Garrison, Detachment, Legion. Extended Staff or Staff. Thank you so much for all that you do! I've had the honor of being responsible for our Detachment Social Media accounts this past year and it's been so much fun! And it's given me a whole new level of appreciation for everything that people on Staff do to keep our beloved forum and club running. The time, the effort, the love and care that goes into this. Truly, shout-out to everyone who's ever done this or does this, you're awesome!3 points
-
Thanks mate! Literally got started as soon as I read Glen's reply. Stripped off the cover strips for the shins and reglued them and made some adjustments to the strapping. I took the padding out of the helmet. I think it's just my long neck making it sit high. I can barely get my head in it as it is, so it might just have to sit a bit high. A balaclava will help his my chin and I've blacked the inside of the helmet out. How do the shims go with the ab rivets? I've already placed them. I could undo and shorten the elastic, but it might make the torso somewhat skewed to the hinged side. Might just be easier to lose a few kgs! The trickiest part is getting my wife to spot things that look out of place when taking the photos as she has zero interest [emoji28] Can't say she's up to speed with the CRL [emoji51]2 points
-
Update: with the help of a mate I ended up getting it back together. He held the catch spring back and kept the buttplate in place, I then held the hook piece in place and hammered in the locking pin. The tension of the spring is what makes this so difficult. The blasterfactory one isn't as strong but it's still a pain. I'm not sure what method Chris uses when assembling his aluminium ones, but man, props to him because this was such a hassle just to swap the catch pieces over. I do not recommend lol.2 points
-
Overall a really nice job on your bucket build, Wil! I would definitely think about taking Glen's advice on the ear trimming, though. It may pass at Basic but would be a ding at Level 2. Just follow the same lines along the back (a little at a time) and you should be golden. Looking forward to seeing the results!2 points
-
Life got busy and I neglected the meme thread... dang it. and now it's back to work!!! No force chokes! and lastly...2 points
-
Thank you so, so much for making this Detachment a fantastic, safe and wonderful space for all us Stormtrooper enthusiasts. FISD wouldn't be the same without you, Andrew, and I'm very impressed by not only four years in office, but also by all you did during those four years. Cheers! (You can't.)2 points
-
My name is Josh... I'm a Star Wars-aholic... I've been with the 501st since 2022 as a Revenge of the Sith Darth Vader. I've currently got 3 costumes in various stages of completion (hence the "aholic" moniker) above... TK, Tank Trooper, and Imperial Officer. I'm finally getting the ability to put together my ANH Stunt starting in February at an armor party. I've got a second hand Walt's kit that never got beyond some very minimal initial trimming, so everything is still mostly in its untrimmed form. I've been following the WTF ANH Stunt Build thread and I've got about everything except for some of the soft parts (strapping, velcro, etc.) that I will be procuring this weekend (my daughter gets an employee discount at JoAnn's... YEAH!). I'm looking forward to another lovely costume that it's difficult to see and sit in !! ...sitting, yeah, that is what the Imperial Officer costume is for... lol!1 point
-
I am starting my first TK build and have a lot of questions.. just trying to find where to ask them! I’m working on LVL 3 for my ANH TK from WTF. I have assembled the helmet but am now looking to start painting it. Here is my progress so far! Also I want to know if I can use https://trooperbay.com/product/dave-m-helmet-hand-painted-look-decals-anh-stormtrooper-star-trooper-wars-cosplay/ for my decals for level 3 since it says “must look hand painted”. I’m fine painting everything else just not the tube stripes or the grilles with the black stripes. Thank you for any help you can provide! Also please let me know if I’m not posting in the right place!1 point
-
I’ll message GeekyPink and see what she can for the suit, this’ll be an interesting one.1 point
-
1 point
-
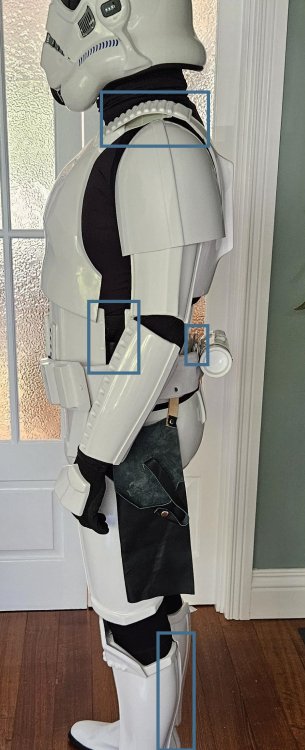
Ribbed undersuit, shoulders, elbows, neck and between backplate and kidney.1 point
-
Hi Danny, Admittedly I have transferred out of Ohio Garrison to Starkiller but I am still in the Columbus area and always happy to provide any assistance as necessary with your build Josh! Danny might need to update the attache list :). I should have met you know earlier1 point
-
1 point
-
1 point
-
Welcome, Chris! Follow Glens suggestions for those adjustments and retake a couple of photos so we can take another look. In general looks good, now is the time for refinement so you can get approved first time. Always good to see another Aussie on our forums.1 point
-
Those stickers are acceptable for L3. I used a permanent marker to straighten some of lines, made life a lot easier. Take note of the length of some lines and spacing if you hand paint. If using humbrol paint you may need 2 or 3 coats, better thin as the paint can wrinkle when drying if it's applied too thick. The fall of the blue tube stripes is important, hence the photo reference, also make sure placing is a pencil width from the sides.1 point
-
Thanks Brian - the tops of the biceps are fine, it's the bottom of the left arm that is VERY snug. We actually heated it a little to reshape it slightly, as it was more of an 0 shape, rather than an O. That helped. I've left about 2mm of return edge on the bottom and perhaps 3-4mm on the top, but will shave some more out. That might let me cut and shut it for a cleaner look. (That's the bottom edge). I've taken the return edges completely out of the forearms and will do the same on the new shoulder bells too - thanks!1 point
-
Although this comes with the caveat that I have never built beyond basic approval, I have had success with hand painting the black lines in the tears and trapezoids of the helmet using a paint marker. I did so because I had difficulty controlling paint on a paint brush for this fine of a detail. Although, I know different paints are discussed in reference to L3, so someone may have to correct me if this is not acceptable beyond basic. I am not sure where you are located, but if in the U.S. you should be able to find the paint marker below in the craft supplies section of Walmart.1 point
-
Thanks so much for the fast reply, Glen. That's exactly the info I need and is incredibly helpful! I've been speaking a lot with our GML, but was trying not to bother him with every little thing until my kit is good to go. I'll have all of these fixed (hopefully) by the time my new parts arrive. I have asked for a new ab plate to be made by WTF. That was one of the first things I felt comfortable trimming/sanding and of course I did it wrong! haha. Great tip about the belt and using the hot water - I had meant to ask that, but forgot. Great solution! I'll move those ammo boxes too. Shin cover plates - will do. Elastics - easy, thanks! The bicep cover strip is a bit of a headache. The left is insanely tight - I'm not exactly a bodybuilder, but can barely get my arm in it. I'll see what I can do to reduce that gap. I'll adjust the TD clips and see if I can rotate that. My wife clipped that on and had no idea what I was asking of her. I'll tighten up those elastics on the shoulder bridges. I only have a tiny thin piece of padding inside the top of the helmet. My head is pretty big and I do have a relatively long neck, so that might be harder to fix. I can see perfectly out of the lenses, but will see if it looks better with no padding - just less comfortable. Again - really appreciate the feedback and advice!1 point
-
1 point
-
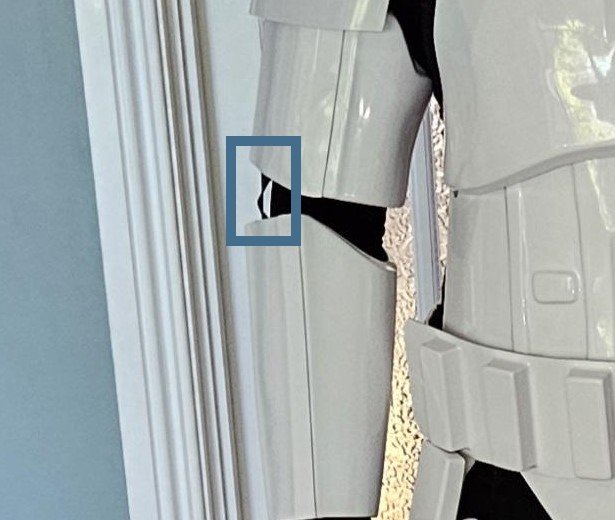
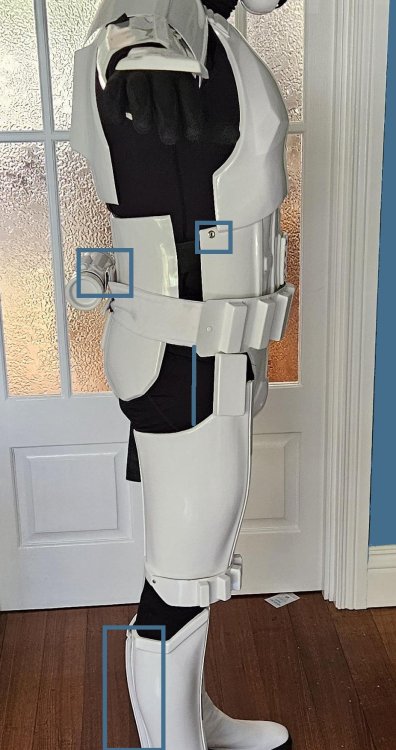
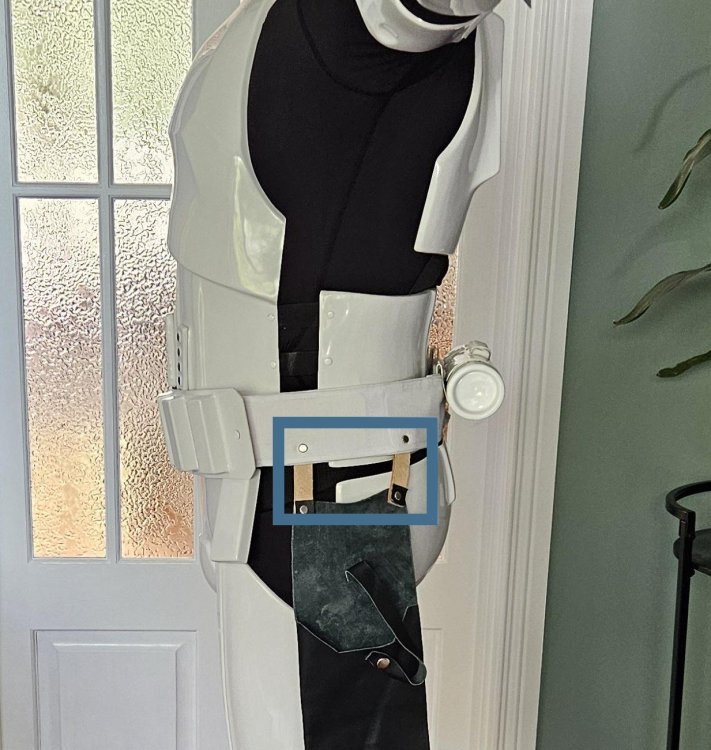
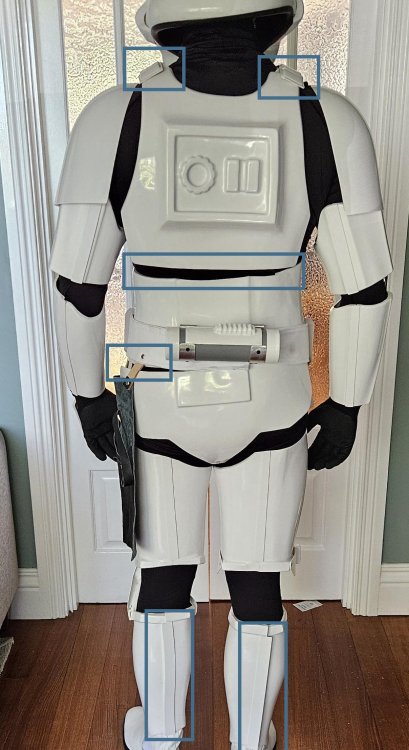
Also Drop boxes should align with the end of the plastic belt section. Han snap not quite in the right spot. Belt attachment points look wider than the holster straps, may just be the image though. Shoulder straps not central to backplate. Gap between backplate and kidney. Gap between kidney and posterior on left) White shoulder strap being pulled sideways, can happen, try doubling over the elastic so it holds a little tighter Most of these are just adjustments and some may be seen ok by GML so check with him/her/them/they Good luck with approval, hope to see you in the ranks soon1 point
-
Hello and welcome to the forum from the West. First off your GML (garrison membership liaison) has final say on your costume. One thing that stands out is your bicep cover strips and raised ridges, generally we try to keep any front sizing as close to screen used, the raised ridges should be just outside the cover strips, yours have a big gap. Larger cover strips may be used on the rear to achieve a larger size if needed. Back of shins should close outside over the inside, this is so the don't appear open from the sides, yours are opposite. Cold also rotate your detonator so the O can be seen Left Right Small ab plate could be trimmed flat, should not have excess material on sides. Large ab plate is missing a base, it's been overtrimmed. You could also apply some heat to the belt (hot water bath) to help it conform to your armor better, your arms will catch the belt as they are. Elastic on your bicep to forearm appears on the sides (right arm) should be on the inner top Right arm You helmet sits a little high, could try reducing the padding. Detonator clips not completely down on belt. Shoulder elastic appears it may be a little loose, straps only just reaching the backplate. You may also want to add side shims to reduce the black seen between the abdomen and kidney (although this is for higher levels) OPTIONAL Level two certification (if applicable): Any gap between the abdomen and kidney armor is no more than 1/2" (12.5mm) wide. Any shims used to achieve this effect are of a similar material and color as the abdomen and kidney armor. Shims fit flush and seams are allowed.1 point
-
Costume Approval Information - Legion Elections 2024 With the Legion election period soon getting under way the legion membership database will be in lock down, during this time new member applications through your local garrison/outpost/squad can not be finalized, you may however still submit them but they won't be processed until the end of this cycle. This does not affect the addition of any new costumes to an active members roster/profile, however it does affect any membership status changes ie: active / reserve / retired and any personal information updates. The period of membership database lockdown for 2024 starts January 29th and ends February 19th More information on the elections can be found on the legion forum here (for those with legion membership access)1 point
-
Troop 43 and 44 Kitchener , Ontario January 20 and 21, 2024 Tricon 2024 This troop was a local “mini con” that was put on at a children’s museum to help revitalize the downtown core. It is a neat venue as the art installations are all in place throughout the 5 story building where the con takes place. We didn’t have a booth, so we would patrol around and interact with guests. This was extra special as it was my son’s first troop with his new biker scout costume. I didn’t get a photo with my son wearing my TK but did with my death trooper. Took advantage of some of the art installations for photo ops. This room has TK written all over it. Oh man! Maybe those were the droids I was looking for! Some pics with other 501st members: Finally, I couldn’t resist a photo with this little guy.1 point
-
1 point
-
@Sly11 after 4 years as DL! I'm just a simple man. I'll let the rest of the Meme Squad and others create more descriptive content.1 point
-
Looking forward to your build thread Matthew. Middle-aged fear not, it is possibly our largest demographic, one of which I and several of the staff here are proud to be part of1 point
-
Looking good! I used supa glue,snaps, and velcro to hold my armor together..just trooped Sinulog in Cebu and spent 10 hours in armor...no problems with my suit at all!! With the forearms...I used a belt sander to remove the back side of the cover strips till I was OK with the thickness...the top and bottom edges are pretty much gone....have fun!!!1 point
-
Consider using Armorsmith to properly size the chest and back armor. It’s a great program for scaling 3D prints to properly fit the wearer. https://www.thearmoredgarage.com It’s worth the investment when you consider the time and expense for multiple reprints or trying to size it yourself.1 point
-
1 point
-
How to: Apply ABS Paste For those of you that are new and have just clicked on this thread because you're curious, you might be wondering what ABS paste even is and why I would be making a guide on how to apply it. The first thing you need to know is that ABS paste is, well, it's basically what the name suggests. It's a slurry made out of ABS scraps and acetone that you can use to fill in holes, thigh ridge gaps and cracks. Because it's made out of scrap material from your armor build you don't even need to paint it after using it, because it's already exactly the right colour. The most you need to do is sand it down and polish it to match the look of the armor. Simple enough, right? So let's get going! First thing you need to do is make the paste! You can find a good tutorial over here: https://www.whitearmor.net/forum/topic/42866-how-to-make-abs-paste/ Because of something that I noticed with my first batch, I would like to suggest that you wash all of your ABS scraps and your jar before putting it all together so you won't have any debris in your final product. So, I scrapped that one and started a new batch, where I washed every piece of scrap before I cut it and put it in the jar. It's looking much better than the other one, if you ask me. In the next step, once you've got your paste ready to go (it should be the consistency of toothpaste) you're going to prepare your armor for applying the it. This means taking a piece of scrap ABS and putting it behind whatever you want to fill, so you can apply the paste onto that area and just use the paste to fill in the gap/hole/crack. Time to apply! I've taken several pictures of my progress, I hope this might be helpful! A quick reminder: please make sure to work in a properly ventilated area since you're going to be working with acetone. First I gathered my materials - several sizes of wooden sticks, the ABS paste and (of course) the armor (the thighs in this case), where I had a piece of ABS with some tape to hold it in place. This keeps the paste from seeping through to the other side. I actually needed two pieces of ABS due to the shape of the ridge -- one inside the ridge and one on top of that to cover the gap between the ridge and the cover strip. Whether you can reach your goal with only one piece of scrap or with several, make sure you've covered all the gaps that you need to have covered! Time to apply the paste. Now you open that jar with the paste, have your wooden stick ready and preferably some tissue paper to the side for cleaning the stick. You can simply apply the paste by scooping some up and putting it into the gap. I've found that if the ABS just covers the tip of a toothpick, it was easy to get in the gap without smearing it all over or getting too much on there. After ~2-3 layers After applying layer I would press down with a clean toothpick to make sure it lays flat and that there would be no bubbles or gaps. I also used this time to push in any of the paste outside of the gap. Because of the fast drying consistency of the paste, it felt like moving around chewing gum that has been chewed on for a few hours already. Remember: every bit of paste outside of where you want it is going to have to be sanded. So go slow, work carefully and you'll be able to save yourself some time. I repeated this process several times until the paste matched up with the armor. The closer I got to the top edge of the armor, the smaller the drop of paste got. I had to clean my toothpick every now and then to make sure that I could still work cleanly. I also had to add a drop or two of acetone every now and then to my paste in the jar and stir it in with a toothpick, to make sure the consistency stayed roughly the same and that it didn't harden in a layer at the top. Once I got to a point where I was happy with the results, I closed the other gaps as well in the same way. Afterwards I went back to this one and closed up a few spots that weren't as clean as they could be and still had some gaps. Once it dried, I took some scissors and cut away the visible part of the tape that wasn't covered with the paste. Next I had to wait until it dried (about 24 hours) then sand the paste smooth and maybe cut the return edge so it looks smoother. Once I've got it sanded down, I'll see if there are any gaps that I've missed that need another bit of paste, fill them up, sand it down and so on until I'm happy. If you worked carefully enough, you might be able to skip sanding because it's already flat and aligns perfectly with your armor. If that isn't the case, here's a great tutorial on how to get things sanded shiny again: https://www.whitearmor.net/forum/topic/45052-howto-wetsand-polish-for-a-great-shine/ I hope this could help you! At this point a huge thank you to @justjoseph63 who inspired this, proof-read and helped with editing the pictures!1 point


.thumb.gif.3133dfe8baa328ad146bfe40afe330f0.gif)



.thumb.jpg.1ee62051534708d9167363a8bd10c300.jpg)
.thumb.jpg.e41fc1b8fc87426b9f0455438f73c697.jpg)
