Leaderboard
Popular Content
Showing content with the highest reputation on 11/23/2023 in all areas
-
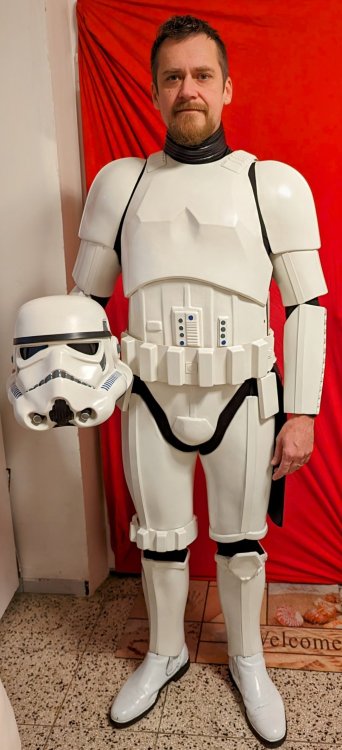
Hello everyone, first of all, thank you very much for letting me join this exclusive club. I would also like to briefly introduce myself here: My name is Markus, I am 44 years old, I have been married to my beloved wife for 11 years (she is currently very stressed out due to my new hobby). I have 2 daughters (12 and 9 years old). , who are in the most relaxed time for parents, puberty... That's probably the one reason why I spent the last 3 months of my free time mainly in my workshop in the basement;-) The second, and actual reason, was and is my "project" and childhood dream Stormtrooper armor. After starting problems (bought a used kit at" Kleinanzeigen" which i was able to return due to the major defects) and a lot of research, I decided to go with a kit from Ross (RWA Creations) . After a very nice contact via Facebook Messenger and the following detailed tips and information from Ross, I ordered an ANH stunt kit made of 2mm ABS... at this point a big thanks again to Ross for the great kit and the support. When package finally arrived about 6 weeks later, the joy was immense; but everyone here knows what followed: a roller coaster ride of emotions ranging from highly motivated, devastated, scared (especially when trimming), extremely annoyed to euphoric... but it was worth it and finally led me here. And because my children are still going through puberty and my wife is already annoyed, my next goal is to reach EIB status and possibly Centurion after that. Which will probably involve a few more hours of work in the basement... because it requires a decent blaster, which I still have to put together (when it arrives). At the end I would like to apologize for the text being a bit long, it wasn't planned that way ;-)2 points
-
Hi Matt. Yes please, you better retake the photo. Regarding the painting of the vocoder, maybe you can touch up the new lines a little bit, (more sharper lines). As we continue with your review, could you add these photos?: -Photo of the helmet (more from the front) where we can see the paint on the teeth. -Left thigh ammo pack rivet close up (inside) -Right thigh ammo pack rivet close up (inside) -Boots (side picture) In addition, the blaster, in the photos, looks brown.... It's probably due to the lighting when you took the photos. If it's not too much trouble, could you post others where we can see the black color well? Thanks Matt!2 points
-
TK-13239 Requesting ANH Stunt EIB Status Name: Matthew Sawa TK-13239 https://www.501st.com/members/displaymemberdetails.php?userID=37125 FISD: Sawanator Garrison: Canadian Height: 6’2” Weight: 225lbs Armor and helmet maker: Dave’s Darkside Depot Blaster maker: QuestDesignCanada Boot Maker: Custom boots made by Jasmine Martins. These boots were based of a pair of Crowprops that did not fit. I have a size 14 wide foot and I could not find a shoe maker. She did a pretty outstanding job IMO. Canvas Belt Maker: ImperialIssue Handguards: Justjoseph63 Holster and Neck Seal Maker: DarmansProps Here are my pictures for submission:1 point
-
OK, folks, as mentioned in the title this will be my final (OT) E-11 build. Before I begin, let me give you a little background: This blaster was gifted to me by a dear friend who actually received it from a fellow trooper who has unfortunately passed on, and it needed some attention. The person who did the mods obviously had great intentions, but there were some issues which I have done my best to address. Keep in mind that during the time it was created it was a work of art, but with the advent of detailed screen caps and such I have tried my best to do it justice. Side note: I have been working on this for over a year off-and-on. Is it 100% screen accurate? Nope. After receiving it I dove into research on Airsoft E-11s, and found more than a few inconsistencies (mentioned later). I'm just doing my best to make it as close to screen accurate as I can, so bear with me.... Now, on with the show. This is how it looked when I started. Great in it's day, but just so many issues. 1. Copper tubing power cylinders 2. Wrong Selector switch 3. Shroud has a piece of black PVC glued inside. 4. Wrong muzzle. 5. Missing pieces on the magazine . I will have to strip it down to bare parts as best as I can. The first thing I had to do was remove the black PVC interior in the shroud, which was blocking all the holes. I drilled them out but it looked terrible. I ended up using a blow-torch to melt the PVC. It removed the interior as well as any chance of grass growing in my future patio area, but I am pleased with the results. Here comes the most difficult part. The previous builder had WELDED some sort of odd muzzle on, Sort of like an ESB, but not quite, so It's gotta' come off and be replaced. Ugh. The end of the shroud was not too pretty either. I cut off the muzzle and was left with this: To Be Continued!1 point
-
Never too late to check in for seeing a good blaster build. As always, great work Joseph.1 point
-
SALUT DES NOUVELLES DE CETTE TRADUCTION ?1 point
-
Hey everyone, I'm Andy (GML) of Garrison Excelsior and (DCA) of the BHG, newly approved with my FO Executioner. A little about me... I love making costumes. The executioner is my 8th approved legion costume. I swore I'd never do a stormtrooper (or any costume I couldn't sit down in lol) but by chance some armor kind of fell into my lap after building the Mando Praetorian Guard and I could have either sold it or built it so I went for it. First outing was this weekend and the troop went well, everything held up fine with no real issues. Only thing was the cod armor really pilled up my pants so I think I'm going to line the edges with EVA to prevent it from chafing through. Mission report coming up!1 point
-
1 point
-
1 point
-
I was looking over my original Nico R1TK build and I noticed that after post-processing, that flat ridge is hardly noticeable, the foothill that extends to touch the ear cap is a bit square at the corners and I'll attempt to round it out as I work on it, but I can't make any guarantees. Here is an image of the the reference compared to the Nico ears on my original build To be honest, I was more concerned about this part of the ear cap. This is my progress on that mod currently1 point
-
I'm with Glen on this, now doing several crack repairs, the ABS backing and CA glue has been the most successful for me. I have also used the T-shirt material and CA glue, but the ABS piece leaves a nice clean look in comparison.1 point
-
Troop 40 Cambridge Santa Clause Parade Cambridge , Ontario November 17, 2023 This was my second time doing the parade and it was slightly warmer this year than last year. I have started wearing a diving suit under my costume for those outdoor cold troops and it really works well to keep me warm. we were joined by the Mando Mercs and the Rebel Legion for this one. Lots of kids and adults to high five along the route.1 point
-
1 point
-
1 point
-
1 point
-
Thanks! I've been a Star Wars fan since ANH, and always wanted a blaster, but never really thought about it until now. I am leaning SO MUCH about them, the quirks different models have, and the whole 501st approval and all that. I can't wait to get my E-11 complete!!!1 point
-
The link you have posted is incorrect, try this one https://www.501st.com/members/displaymemberdetails.php?userID=32046 Le lien que vous avez posté est incorrect, essayez celui-ci1 point
-
Totally forgot to post a picture, but it turned out great! I've printed 3 so far. First one had a print bed issue, so you had a really flat foot. Second one was good, the last one I made larger sized.1 point
-
The bayonet lug was absent and it took a bit of work, as I had to sculpt one out of layered ABS. An hour or so of carving, filing and sanding and off to be molded. I cast it in black resin and DONE! The last thing to do was the folding stock, which brought a welcome surprise... this is yet another part which I believe was replaced with the "real deal" by the last builder. Let me explain.. While they are very similar and both function, the details are way different in some areas. These are NOT "bad" things, mind you, only different. Airsoft 1. Pivot point is rounded and curves under the front. 2. Hinge pin/washer is farther back. 3. Bottom (and top) of the front is more angular. 4. No divot to hold the stock in place. 5. Opening is a slightly different shape. This is the one that came with it (after refinishing). After comparing it with one of my vintage Sterling stocks, I am convinced that this an original. Like the rest of the metal parts, it had been painted with a really rough finish and had a grainy texture (2). Since it had to match the rest of the paint, I stripped it down to bare metal, sand and repainted it and oiled the moving parts. 2 Real Sterling stock Added the greeblies to the stock, and everything is assembled! After countless hours of work and almost one year exactly, I'm pretty proud of the results. Will I be painting all the parts I replaced? Well, at least a few of them, but for now I haven't in order to see the details. I did some weathering on the scope and power cylinders, and will do some on the rest later. Still a few minor touch-ups, but for now here it is: Weight: 6.75 pounds Gotta' fix that hole! Shout-out- I'd like to thank Chris @fieldmarshall for carrying all the parts I needed and allowing me to use product pics from his website. SUMMARY: This prop arrived unexpectedly when I really needed it. With all that has happened in my life over the last year it gave me something to focus on... a goal. Yeah, I procrastinated at times, but I wanted to complete it to honor the man who gifted it to me. My apologies if I missed any details during the build, but I appreciate anyone who has (unwittingly) been a part of my "therapy" (lol) by viewing it. Last but certainly not least... thank you, Paul. I hope I did it justice.1 point
-
Not to disparage the Hengstler that came with it (below), as it was an actual Hengstler, but it lacked many of the details I wanted. I though about having one 3D printed, but since this will be my "swan-song" for this type of build I went with an alternative. Back to the Blaster Factory for a replacement! Their kit (seen below) is crazy accurate and has all the bells and whistles I was looking for. The kit is pretty easy to put together, and they have a great video to help with assembly. The only part I wanted to change was the numbers. When you order one, you choose one of 2 pre-printed selections (one seen below) that fit inside. BUT... I ended up cannibalizing the old one that came with it for the numbers to get the customized ones I wanted (pic 3). No surprise I used 10963, lol. I just glued the loose ones together and it fit perfectly. I lost the flat counter push button, so I ended up making one out of black ABS, which matches pretty darned good. I like the fact that the previous builder used metal for the power cylinders and mount (not an easy task to accomplish with store bought materials). I found them a little too long, though, and the mounting plate was not too accurate. This is how I received them (they were mounted to the magazine before removal). Again, the need for accuracy is gonna' cost me, but well worth it in my opinion. I looked around online and the best ones I found were again from the Blaster Factory. Fairly easy to build, and they even reproduced the Metalmite capacitors. There are several styles of mounts available, but I went with the "A". Not sure why, but I just like the look. I have built many set-ups like this using resin and 3D prints, but since these were all metal I figured I had better watch their tutorial. The only part I had a small issue with was mounting the ends of the cylinders to the little wing plates. They suggest to solder them, but I simply am at a loss on how to do that. I ended up using JB WELD "SteelStik" moldable epoxy in small amounts in the areas seen in red. This product is made for bonding metal, dries in less than 10 minutes and has bonded them fantastic. After a few coats of flat paint, the capacitors were CA glued in, wires connected and resistors attached.1 point
-
Before we proceed, you will notice that some pics show items that I installed at various times and seem out of order. The reason being is that I have been working on this over the course of a year, and some items were not photographed until after I had installed them. Missing/replacement parts: OK, so there were a few pieces missing from the puzzle which I will have to re-create. Being a pack-rat, I keep all manner of left-over bits and bobs as well as lots of ABS scraps, so it makes life easier when I need something. The front site interior was missing, so I had to make one. I cut quite a few ABS scraps to the general size, lightly sanded both sides of each and CA glued them together to get the thickness. Using needle files I carved out the bottom and gave it the general shape. After sanding and a little glazing putty I drilled out the holes for the site pin on top and the tiny grub screw on the left side. The site pin is just a machine screw cut off and the sides of the top filed down. Yeah, I know I didn't get the groove in the bottom 100% correct, but I needed the strength so it wouldn't snap. The inside bit of the rear site was missing, so back to the ABS scraps. 2 layers glued together and filed/sanded to size. Note the ridges on the back of the arcs (last pic). I wasn't happy with the shape and they didn't have any ridges (4th pic), so I filed them down to a more rounded shape and added the ridges with a file and added a tiny washer over the hole(s). Real Sterling ABS fix Installed/painted The cocking lever (below right) that came with it was metal but unfortunately was not the correct shape. I had an old Doopydoos one (below left) made of resin, but since that piece gets scratched a lot I made a silicone mold and cast one in solid black resin (lost the pic, but it will be shown later). For added strength I drilled out the center and added a screw, leaving half an inch sticking out on the bottom to secure it into the bolt. Two issues on the end of the shroud: 1. The front flash guard was not present. 2. There was an extra hole in the shroud. Ugh. If I would have installed the flash guard in the exact shape as the original, it would not have allowed the T-track to fit without leaving the hole open. I just wasn't up to the filling/sanding to cover the extra hole... sorry. Instead I used more ABS scraps to form a smaller guard with more of an arc. Some sanding, epoxy glue and paint and I think it turned out OK. T-tracks in last pic were temporary. The safety selector switch (first pic) caused me a boatload of problems. Not only was it the incorrect shape, but being a functioning item the base was imbedded in the grip area. (Face palm). To remove it I had to disassemble the entire grip and use a hacksaw to cut it off at the base. Once I got that done it was a matter of drilling out the remainder of the shaft to accommodate a new switch (pic 3). Side note- While I had the grip apart I sanded off the black paint under the interior mechanism below the switch. Back to sculpting a new switch using ABS. I make a silicone mold of the sculpt, cast it in black resin and added a screw inside for strength before installing it with epoxy (last pic). Next up, the bolt, grip screws and such...1 point
-
A friend with a welding torch managed to get the end of the muzzle removed from the shroud, and I filed down the inside. I purchased a metal replacement from the Blaster Factory and added a metal tube to simulate the interior barrel. After more filing and a few choice curse words, it fits! The magazine was missing the arc on the side and the metal post/grub screw. Some scrap ABS, a piece of an aluminum rod and a replacement screw did the trick.1 point
-
Have a look at my first ever video about blaster electronics You have there your magnetic mag switch as well as the ammo counter display. You can of course look for a segmented display, probably there are easy use Arduino libraries to use 'em. If you have any question, this is the right place to ask Sent from my iPhone using Tapatalk1 point
-
The amount of abuse I've put my AP armor through in the past year with nearly ZERO damage is truly exceptional. I sit in it like I wasn't wearing armor. I climb and run. I've laid down and crawled around. The AP armor just takes it. I wipe it off and polish up the scratches and it's ready for more action. I honestly love how the RS armor looks and drool over it constantly, but I wouldn't trade my AP for it at this point. Look at my troop log linked in my signature to see the AP in action.1 point


