Leaderboard
Popular Content
Showing content with the highest reputation on 07/21/2023 in all areas
-
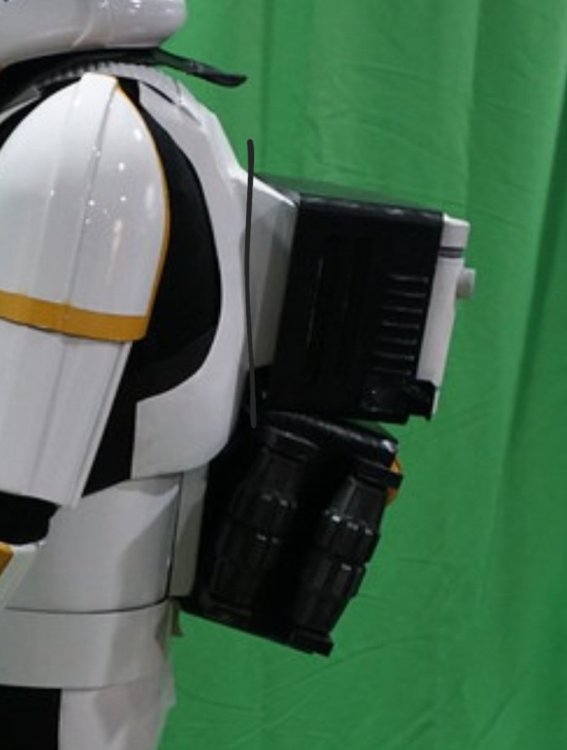
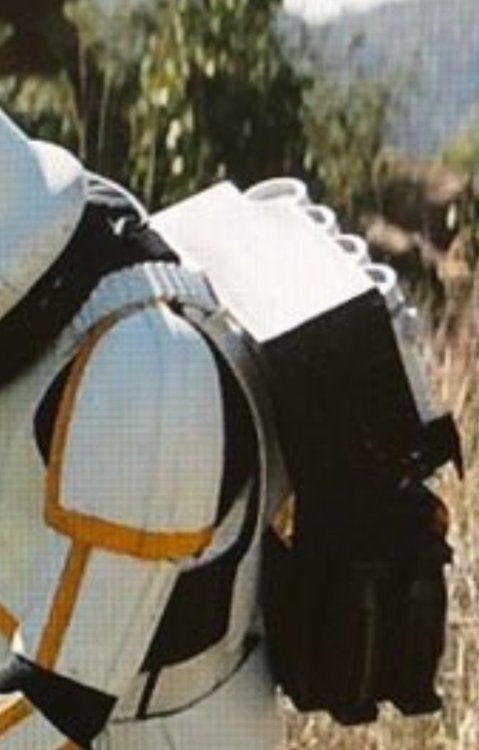
Great attitude and congrats on being the CRL model, if you do end up making the tweaks the CRL image can always be updated Now you have joined our ranks you can also request higher TK forum access here Was just looking again and it may be because your strapping is too low, if you compare with the reference the pack sits on top of the backplate angle which makes the pack parallel to the backplate, may be even worth trying some Velcro on top of the backplate and under the top of the pack so it will lock over and wouldn't be able to slip back.4 points
-
Hey all! just wanted to give a quick update. I haven’t had much free time lately due to the overtime at work… Still looking at how tight I can get the backpack to sit up and whether or not I need velcro or to have an alternate backplate that allows the pack to sit more flush. I also wanted to thank you guys for all the help that you have given me during this build. And with that said I aim to keep making improvements until it’s as good as I can make it. Additionally, I wanted to show how I strapped the backpack. It actually sits like a backpack with full backpack straps that are internalized. The strapping was sandwiched in between two aluminum blocks to provide more stability to the pack itself.4 points
-
Standing in front seem to be the only option. Looks like it only got left bicep pieces, they must have been in a hurry3 points
-
Unfortunately the brackets are what holds the two boxes together as its own frame. I will be most likely look at the depths today as I finally have a day off2 points
-
2 points
-
Lots of things to consider, not just looks but price, durability, comfort, ease of dressing, transportation etc etc Personally I never liked the look of the RO armor, (here's my GML OCD mind at work), we already have armor from just after that timeline yet a costume designer (or someone at LFL) decided to make a new version, with bits and pieces from other newer Star Wars costumes, so lineage wise it doesn't work for me. We know LFL do use some suppliers for some costumes and props so why not just purchase from one of them or the many sellers out there with correct lineage armor. Don't get me started on the rear view of the costumes either, pieces open, others cracked or pieces missing as there is no room for movement ie thighs hitting the belt, at least we know white gaffa tape is still canon Dressing I can get in my OTTK by myself, can't with my FOTK or a RO armor as I recently found out, I need help for those. For me at least the OTTK is the most comfortable and versatile, 2nd would be my FOTK, it is more restrictive, albeit once I'm kitted up I do stand well and for long periods which is great for some of my medical issues. As for looks I was hooked on the FOTK as soon as I had seen the first image (yet I know others hate it), albeit my first love was an OT ANH, always had since seeing it on the big screen back in 1977 Ease of transport and dressing has to be the OTTK once again, everything fits in a clamshell torso and into a suitcase and I can dress myself, FOTK is a little harder, I had to make material covers for all armor pieces because it was painted and needed protecting so it takes up a little more room and need help dressing. Price and again it's the OTTK, so many makers out there and simple black undersuit, no ribs. But here we are, now with other series before and after the original trilogy, timeline really takes a kick in the guts there, but having other versions of this era armor it does give some the ability to do multiple costumes from one set of armor, so that's an advantage. At the end of the day it all comes down to personal taste2 points
-
Let me start off and say I am new to all this. I want to share my experience researching costumes. I didn't know about WhiteArmor.net until a couple of days ago, unfortunately. I started researching costumes and saw a few websites, but then I came across stormtrooper-costumes.com. I certainly wasn't impressed with their website but nothing else seemed to make sense to me, and their website indicated they would contact me after purchase to get me the right size of everything. The cost was upwards of $2000. I did make the transaction. I then learned about this forum and was quickly pointed to the post below. My heart sank as I started reviewing feedback on stormtrooper-costumes.com and Jedi-Robe. I don't know if they make good or bad costumes, and I won't disparage them about their costumes. I will say that I was taken aback that the negative feedback I saw on this forum was going all the way back to 2012! And it wasn't just one or two bad experiences. Also, of course, stormtrooper-costumes.com Jedi-Robe was called out as specifically a bad vendor. Since they never followed up, granted, it's only been three days to get my measurements, and with the negative feedback I saw, I requested them to cancel the order and a refund. I have not seen a response to any of the emails I have sent them. I would certainly follow the advice of this forum and the many, many, many negative reviews of On stormtrooper-costumes.com Jedi-Robe. One of the goals of this post is to make it a little easier for new folks to find this and hopefully not make the same mistake as I did. On a positive note, I was able to connect with Dave from Daves Darkside Depot and purchased a costume from him! I was very impressed speaking with him and can't wait for the costume to get here! It's like Christmas, only 10x better!1 point
-
Hello white armor net. TK 74182 here. I have non serious question that's been floating on my mind ever since it came up in a discord conversation last month for any standard TK members here. are rouge one stormtroopers suits the best one out of any variation so far? including anh, tfu and rotj versions? since they'er perfectly symmetrical, use longer boots that are easier to put on and have more accessories like cuffs and different blasters than any other one?1 point
-
Greetings all, It gives me great pleasure to announce the newest CRL for FISD and the Legion! The Artillery Stormtrooper as seen in the series The Mandalorian today has the green light form the LMO office and is live and ready to use. I would like to thank Honeymustard TK-22540 (Logan Hole) of the Wisconsin Garrison for his epic work and research and assistance is helping us bring this CRL to fruition. A new to Legion and legion first. Congratulations Logan, your hard work has paid off. Costuming:ArtilleryTrooper - Databank (501st.com)1 point
-
Hey, everyone! What seems like a long, long time ago, I started the process of adding shims to the back of my thigh pieces. I think I finally got a point where I'm comfortable with how the pieces look and fit on my leg. This is the back of the thighs after adding plastic and painting. The paint doesn't completely blend with the pre-existing plastic, but I think you have to be pretty close to the back of the thigh to notice it. Here is the updated fitting now that the shims have been added: In the picture, the right thigh fell downward towards the leg a bit, but it has room to move up with strapping. My plan now is to fill in the gaps in the thighs, make the mobility cuts, and see if the tops need to be cut down at all before adding the internal strapping system. I just wanted to post this first in case anyone had any feedback.1 point
-
Proud to be able to make this request. TK-22540 requesting access! https://www.501st.com/members/displaymemberdetails.php?userID=193531 point
-
Would it be possible to move the metal bracket up towards the top maybe? And thereafter do the same thing you've done below but above the box area on the back plate? Your previous strapping holes would still be covered by the backpack i feel?1 point
-
When I think about it, the fact that they knew they had many series in the works (when creating RO), I could understand that they might need something new they can throw themselves around in - and they could produce a new armor with toys in mind at the same time (I guess?). I like the look of the helmet by itself, and I'm not dying for the armor, but in the context of the movie timelines I align with Glen! I'm not sure that the boots of the ROTK are easier to put on than the OTTK boots, they just slip on and it seems with the taller boots they would be a little more chunky? I have no clue really just that I have no issues putting on my OTTK shoes Just to drop my favorite TK, it would have to be the ANH Hero, it is currently tied with the ROTK on accessories with 6 each, but will soon overtake it when the space pack comes to the Hero as well!1 point
-
1 point
-
Back in the day when it was just LFL, the "agreement" was that LFL would say nothing so long as we didn't make any profit off of his IP. That is why we can not take any money from trooping, and in theory all armor/props must be sold at cost.1 point
-
That's actually a great point and something I never thought of!1 point
-
Remember, having a public facing website where you sell a notoriously litigious company's intellectual property for personal profit is a great way to get a cease-and-desist letter from the Mouse. Some companies operate in countries where they don't have to care, but many makers are intentionally low-key. There's a reason that research is strongly suggested before spending potentially thousands of dollars on any hobby.1 point
-
That is what this forum is all about Dale, and I'm glad you had a good experience. Do you know why I created this forum? It was because back in 2005 when I joined there was *no* transparency at all. There was no forum, no Facebook, and certainly *noone* talked openly about armor. When you were new the answer was "I know a guy" or you took your risks on Ebay, paying ~$1500 for FX armor (which is how I started). Only when you got in did you get access to the Legion Yahoo group, or your local garrison, who would give you more information. "Is that armor recast?" "Hey man, why are you asking so many questions!" was the answer. Having even this page where anyone could read it was novel and we got a lot of pushback about doing so. Thankfully I was new to the Legion and just kept pushing forward, and was surrounded by a core team of like minded people. Yes, this type of transparency is now normal and expected, but at one point it would have been considered heretical.1 point
-
That's everyone for the responses. I spoke to Dave at Dave's Dark Side Depot yesterday and he is going to help get me squared away! This forum rocks!1 point
-
Almost anything can be made good enough to be approved. Question is how much effort you need to put in and how you value your time and effort. It's a bit like trying to make a race car out of an old Volvo. It can be done, but by the time you're finished you've probably spent more time and money than it would cost to buy a good used Porsche to begin with.1 point
-
Congrats on the big 25 Gerald! I'll get there soon but your tempo is hard to keep up with1 point
-
Hello all! I've seen a lot of confusion about wetsanding and polishing with the goal of increasing the shine. Lots of people mixing up terms and using the wrong methods/products at the wrong time/place. So I decided to put up a little tutorial to clear (hehe) things up. DISCLAIMER: I am not a professional, I do auto detailing in my spare time and have some experience with paint correction. This will be a pretty long tutorial but stick with me and hopefully we'll learn something 1. What is shine? To be brief: when something is really really flat, it will reflect a lot of light directly into your eyes, making it appear shiny. Below is an illustration of perfect paint reflecting light, this would look like glass: (Illustrations are not to scale, just there to give you an idea). But that's a show-car-130-hours-polishing-lunatic-finish. Most of us use spray cans, and spray cans suck. They spit out paint unevenly and most of it is propellant anyway. And we do it in conditions that are not optimal, so we end up with very uneven paint full of orange peel. For this tutorial i've prepared a plate of ABS plastic which has been painted black (easier to demonstrate) and clear coated. See this pic below? See that wrinkly, orange'y look to it? That's orange peel. Image 1: If we want to go the extra mile to get rid of this, we need to do.. 2. Sanding - Levelling the paint Using sandpaper is ABRASIVE. From Merriam-Webster: abrasive 1: causing damage, wear, or removal of surface material by grinding or rubbing Focus here being "removal of surface material". Every time you swipe that sandpaper it removes some material. What we are trying to achieve here is a flat surface, we are trying to flatten out those "peaks and valleys" by removing/flattening the clear coat. A sandpaper's "grit" determines if it's coarse or fine. A higher number means it's more fine, and will remove less material. A lower number means it's more coarse and will remove more material. You need to have enough clear coat on your piece to be able to do this correction. Or else you might sand into the basecoat or even the primer. Which sucks because that means a re-paint.. Here is a list of my PERSONAL sandpaper grits: 40 - Super coarse for doing an Alderaan on whatever you are working on, I never use this 80 - Very coarse, for removing material quickly. I use this on woodworking projects 120 - Quick removal of material while still being in control 180 - I use this to knock down 3D-print lines and filler 240 - Smoothing filler if i'm feeling a bit scared 320 - This is what I sand my parts with before primer 600 - For wetsanding my primer 800-1000 - Anything from color-coat/clear-coat fixes to wetsanding hard clear coat 1200 - For knocking down tough orange peel 1500 - For knocking down orange peel 2000 - For removing 1500 scratches 3000 - For removing 2000 scratches For this test piece I started with 1500 grit to knock down the orange peel as the clear coat I used is kind of soft. Keep in mind every sanding step in this tutorial is done wet/wetsanding. As you can see here i've flattened out the peel on most of the piece but I missed a spot. I went over it again and made sure the entire surface was equally "dull". After this I went over it with 2000 grit. This is a finer sandpaper and my goal here is to eliminate the scratches from the 1500 job. Notice the sanding marks going the opposite direction this time. This is a good way to gauge if you've successfully sanded away the marks from the previous steps. And finally I went over it with 3000 grit in the opposite direction to remove the 2000 grit marks. At this point you should start seeing some shine My camera really struggled to focus taking these pictures. And we're done with sanding! Dry off your parts and move on to.. 3. Polishing - Levelling the paint again, just very very little From Merriam-Webster: polished; polishing; polishes transitive verb 1 : to make smooth and glossy usually by friction : burnish 2 : to smooth, soften, or refine in manners or condition 3 : to bring to a highly developed, finished, or refined state : perfect This is were it gets confusing. Some people "put polish" on their car, but they really mean wax. Some people "polish in the wax". I mean, it's been used so much in so many different ways I know it seems confusing. For simplicitys sake: Polishing is the last step in paint correction. In the auto detailing world, if you would let's say fix orange peel on a car, you'd go through all the steps above then.. 1. Use a RUBBING COMPOUND with a machine to knock down the 3000 grit scratches, paint should look like ANH Vader at this point 2. Use a POLISH with a machine to further level the paint from the faint marks the COMPOUND may have left, at this point the paint will be as clear as an ESB Vader 3 Apply a WAX/SEALANT/COATING on top of the newly corrected and flawless paint, to protect it (and also add a tiny bit more shine). Wax/sealant/coatings will fill in tiny tiny scratches making the paint appear more shiny, but the effect will diminish as the wax deteriorates. Rubbing compound and Polishes are ABRASIVE, they will REMOVE clear coat, just like sandpaper, only much much finer. Think of them like liquid 30000 grit and 80000 grit sandpaper After drying off my newly 3000 grit sanded piece, I found a foam polishing pad, and primed it with some rubbing compound. Priming is basically just "feeding" the working area of your pad with polish so there are no dry spots. All my compounding/polishing was done by hand. I then applied some more compound to the pad, a pea sized drop and went to town in small, circular motions. Follow the instructions on your product. After finishing I wiped off with a microfibre cloth aaaand... BAM! Shine!! The compound I used was Menzerna FG-400. It's a really good compound, it finishes super fine and you could just leave it as it is right there! You can also use Meguiars M105 for this step. Or any "rubbing compound", as long as it doesn't have fillers/wax in it which will trick you and lie to you. You can also just straight up use a polish, but you might have to work a bit longer to achieve the same effect. Now on to the polishing, for this I did the exact same thing with a finer foam pad and Menzerna SF-3500 (Meguiars equivalent M205). Honestly it didn't make much of a difference since the FG-400 finished out so nicely. If you're using other products you may have to do this step if you see "haze" from the compounding step. I tried my best getting an in focus picture but my camera got so confused because of the shine 4. Wax/Sealant/Coating - Protective Layer A wax is a protective layer, it is NOT abrasive. At this stage you can add wax if you want, it'll protect the paint a bit and also give it a tiny bit more shine. It's the prep-work and COMPOUNDING/POLISHING that really makes it shine. I didn't bother adding wax to my polished test piece as it was already as good as it gets. I did however tape off the piece before polishing, so I had one side which was 3000 grit sanded, and one side that was polished. I tried adding wax to the sanded side: After buffing it off with a microfibre and removing tape: And that's it Hope you learned something! Any questions feel free to post them here and i'll do my best to answer. After closely inspecting the piece I can see some orange peel left, but that's from when I put my color coat on, which is under the clear coat.. oh well.. Spray cans suck!!1 point
-
1 point
-
Had to dig into old pictures of the kit I had which I used her harness with, but here’s the general idea I had 4 male snaps I installed inside the abdomen and then 4 female snaps in the corresponding places on the harness to hold the abdomen there. I don’t have this armor anymore, but my only recommendation would be not to use the harness for your thighs too. You could, but the weight of the thighs and abdomen really can pull down on your shoulders a lot. I’d recommend strapping the thighs to a separate nylon belt you wear underneath so they are held up separate by that belt and not by the same rig that is holding up your abdomen. It’s up to you, but figured I’d share how I had used it. Sent from my iPad using Tapatalk1 point
-
I use a belt with braces and elastic to thighs, with the braces the belt can't drop. Not my image but similar Some just use a belt1 point
-
1 point


