Leaderboard
Popular Content
Showing content with the highest reputation on 07/04/2023 in all areas
-
Printing lines have been sanded down, bondo-ed, and repainted.2 points
-
Regarding the sniper knee position, Every armor maker has their sculpture details that needs to be considered when building . In this case the RS sniper knee typically doesn't has a perfect alignment with the ridges , so what we could suggest to ge it close to the ideal position is like the bellow image. Try to align the Sniper Knee with the shin ridges the more you can and trim a little over the ridge. Or a small gap in the lower section is allowed too . References2 points
-
1 point
-
Hello, My name is Shawn I'm from Baltimore Maryland. I am not part of a garrison as of yet, but when I get my armor built I will apply to one. I'm starting doing research to build armor.1 point
-
I use a belt with braces and elastic to thighs, with the braces the belt can't drop. Not my image but similar Some just use a belt1 point
-
Regarding the lower ear section, checking others WTF armor builds and EIB and Centurion submissions it looks like this armorer in particular has this detail in the ears armor. Looking to the back view of this helmet and compared to reference , the ears looks ok But if we see the front view, the WTF ear mold is thicker. This is not a issue in any level, and it could be just a suggestion to leave a little gap to make the ear looks thiner. Keep it up1 point
-
Thanks, Glen. [mention]justjoseph63 [/mention], here’s a photo. In certain light the difference is a bit more apparent. Sent from my iPhone using Tapatalk1 point
-
To prevent myself from getting overwhelmed thinking about what needs to be done with everything for the full set of armor, I've decided to see the chest, back, and torso pieces through to completion (minus painting) before moving on to anything else. I determined I was at the point of needing to sand off the last remaining excess on the edges of the chest, back, and torso pieces before proceeding to the next stage of test fitting. I went ahead and sanded the edges by using a couple of different sanding drums on my Dremel, sanding from roughest to finest grain, and ending with a a quick bit of sanding my hand using a really fine grit. All of this sanding brought the edges to their proper dimensions, straightened the edges as best as possible, and made these edges much smoother! I then proceeded to do a test fitting and found that, although the elastic I have to hold the torso pieces together and the chest and back pieces together work just fine, I need to have something to hold the chest to the front torso piece and back to the back torso piece. I tried as best I could to get the bottom of the back piece to line up properly with the top of the back torso piece, but I could not close that gap. As such, I decided to add velcro to these areas to allow myself more ability to adjust the vertical spacing of the armor pieces, as well as close the gaps present between those pieces. The velcro was glued onto the interior of the various pieces yesterday. The rougher side oft he velcro is what is glued to the interior of the pieces. The softer part of the velcro will remain loose pieces that will be attached when needed for wearing the armor. Today, I went ahead and did another test fitting. I am pleased with the progress so far! Nevertheless, I think I have more to do before I complete all of the test fittings. I found that I need to shorten the elastic straps at my sholders as the current arrangement allows the top of the chest and back pieces to sit a bit too far forward and backward, respectively, for my liking. The bottom piece clearly needs to be worked on in terms of how it attaches, and I may have more excess to cut off. Also, the newly-added velcro certainly helps keep things together, but I don't think 2 pieces of velcro for each will be sufficient. I glued the velcro to the areas closer to the center of my back and front, rather than to my sides. I think I will add further velcro to the sides (where the back and chest pieces butt together and the front and back torso pieces butt together) to help in these areas as well. Even with the addition of more velcro I am not very concerned about restricting my movement in these areas for two reasons. First, I attach the velcro with an eye toward a little bit of play, so this will be sufficient as to not restrict movement. Second, as I have mentioned this is a crossplay, I am wearing a corset when I am wearing the armor, and the corset itself restricts movement more than the armor itself would. I also made sure to perform common movements during my test fitting today, and I had no issues, so I think I am okay as it comes to movement. The photos below are of the test fitting today. I am holding the best piece in the first photo as I have not yet done any work to get that piece to attach properly. The other photos show other angles:1 point
-
Can happen with different delivers of plastic, there is a huge difference in color between makers too. Not sure if this would work but it does for yellowing, Retr0bright I've used it on a 10 year old helmet that yellowed and it worked great. As I say this is for yellowing, may be worth trying but no guarantee as the color may have come from the factory that way.1 point
-
1 point
-
1 point
-
Thanks Tino. I considered that, but the BlastFX comes with 3 fire modes: Semi Auto, Full Auto and Stun. I would be losing one fire mode which I don't really want to do. I can possibly do surgery on this switch to add a ground, plus adjusting the contacts somehow. It would not be difficult per-say, but could end up not working. I have sent BlastFX a PM through FB to see if there are solutions, plus I have the CO of Great Lakes Garrison possibly sourcing a switch. I just really want to get this blaster done as I am going to a troop at a Star Wars themed wedding and would like some flashy light up blasters for people to see. I'll be bringing my DLT-19 which has BlastFX, but this would be icing on the cake.1 point
-
1 point
-
Ears Update IV Got the right one trimmed and attached. How does it look? …they look?1 point
-
Denver Fan Expo My first big con was a blast. Definitely the most fun I've had at any trooping event as far as volume of people, photos taken and number of club members. Our area was combined with the Rebel Legion and Mandalorians so we had a great mix. Unfortunately I had an obligation on the last day, so I feel like I missed some of the best moments, I would have kitted back up for the rest of the day if I hadn't had to leave, but what I got to do was definitely plenty of fun. Great image, but not the friendliest of backdrops. The Garrison, Mando Mercs and Rebel Legion put together an amazing set for our corner of the con. A young trooper stopped by with a great armor kit that I had to get a few extra shots with. (pun intended) The kids parade. Our last day had a much bigger crew that Saturday. Of course there is only One Way Out! Nutty fun.1 point
-
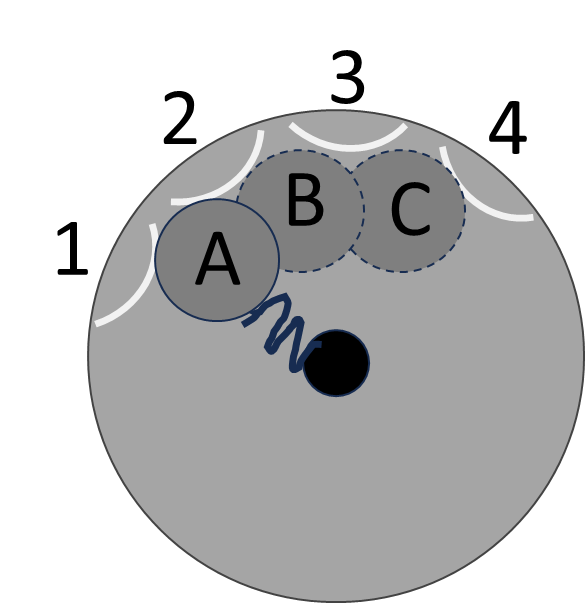
Back from the camping which was awesome! Tino, the issue is the switch included with my Blaster Factory E-11 will not work with the MY BlastFX system (stay tuned for why Adam...) So, the switch diagram provided by Adam for the Blaster Factory switch is incorrect. 1- 4 are the curved contact points inside the switch. They are attached to corresponding soldering tabs on the outside of switch as seen in Tino's post. A is the little metal circle that is inside the switch lid. B and C are alternate positions as you rotate the selector. The squiggly line between A and the central black circle is a spring inside the switch lid. See my previous pics. There is no "common" ground in this switch as is required by the BlastFX program and wiring The little metal circle sits between 1 and 2, not ON TOP of 1 as seen in Adams pic. Therefor, A will short out contacts 1 and 2. As you rotate the selector to choose another fire mode (position B ) the metal circle squishes against the spring and snaps into position B and now shorts out 2 and 3. Same for position C. So, Adam, you are correct in your explanation of what to do with the BlastFX memory card. HOWEVER, I bought my system in 2020 or early 2021 (I believe) before this was probably an issue and solved. I'm just getting around to installing it now. I just confirmed on my card that there is no Fieldmarshall setting for my version of BlastFX. I've attached a link to the BlastFX FB page video concerning the build he did. At timestamp 14:30, he explains the switch issue as well. In this video he hasn't solved the issue yet. BlastFX in Blasterfactory E-11 Hence, I am on the search for a switch that will work (with a common ground). I know the BlastFX owner does an amazing job, and helped me solve an issue I had with DLT-19 build. I shipped him my BlastFX harness for the DLT-19, he fixed the issue then updated the software for free. I just paid for shipping. If I can't find a good switch I may have to do the same with this one...1 point
-
There sure to be a couple of ppl on here selling these items, else ebay has several sellers, I'd personally not recommend the boiled water method (unless however) you have a buck for the lenses? or a FG lid? hope this helps? it looks like its coming along nicely continued good luck wished1 point
-
Hi Ian and welcome to FISD mate. This is also a good resource to use as everything is in one post with links to a lot of things that are going to come in handy for you. This one is specifically for the ANH Stunt variant, there is also the Hero version with a few differences. The Stunt ANH is by far our most popular Stormtrooper around the world. Best of luck on your new and exciting journey and don't forget, if you have any questions, please ask away, we are all here to support you in every way we can.1 point
-
Hello Ian! First off, congratulations on taking the first few steps!! Now the ball is rolling! Being willing to learn as you say is exactly how you become a good builder, and research is key when doing builds! We have a good list of vetted vendors here! Some armors are maybe better suited for you depending on your measurements, like height or things like that! I am 182cm and 90+kg, and I've got an RS Prop Masters kit, but taller humans might go for other makers! I personally love the RS armor because it is currently the only armor with direct lineage from ANH Have a look below!! If you have any questions, we're here for you! Good luck in your research!1 point
-
21. 2023-07-01, Pride Parade, Västerås (Hero)1 point
-
A sneak peek at how the CRL will look, Only helmet section complete ATM, but once all taxt is adjusted I'll share that for in house review.1 point
-
Small update. All the main pieces are painted except for the bolt. I actually thought the bolt was supposed to be bright aluminum, but ref pics of real Sterlings show them as a worn blackish metallic color. I basically sprayed all the body pieces a rattle can semi-gloss, but now I think it's too shiny. It leans more towards the gloss instead of the semi. I'll see how it all looks when put back together, then maybe overspray with a dull coat. I'm also trying to figure out the speaker placement. Black is the new black. Some pieces aren't pictured as when I brought them into the better light of my workbench I noticed I had missed a few areas with the spray paint. Pictures of the speaker sitting in the back end of main tube. The little soldering stubs (it is sticking out of the right hand side of speaker in the pic) just catches the edge of the main tube. The whole assembly is about 1mm to wide. My thought is to cut two grooves opposite each other in the main tube to allow the soldering connectors to just slip inside. Once the new wire is attached (remember they snapped...) I'll wrap the speaker outer ring in electrical tape to protect everything from shorting against the tube body. And my scope greeblies arrived! I ordered a pack of 10 off Amazon. If I don't hear from Joseph about his greebly bits, I'll take a look at what he designed and make my own. It's not a dig at him, I just know he's got stuff going on. I'll just have to decide if I will install just one at the front of the scope, or two, with one over the rear lens. Cheers!1 point


