Leaderboard
Popular Content
Showing content with the highest reputation on 06/05/2023 in all areas
-
Hello all! My name is Eleanor, i'm 30 years young and from the city that does not exist - Bielefeld. I blame my father for having introduced me to his VHS collection of Star Wars when i was little. Laughing his butt off to my reaction when i discovered there is someone even above Vader! Spent many days rewinding favourite scenes from the movies, watching them over and over again and slowly but surely setting the course for becoming a full blown nerd in my later years. Next to sci-fi i found a passion for classic cars and beginner level mechanics in general, as well as larp and cosplaying. Especially combining the latter with charity or simply making kids (and grown ups) smile from ear to ear fills my heart. Well, what can i say. Just today i sent out a good sum of credits to Imperial Surplus in exchange for a FemTK kit with the goal of joining the German Garrison. Now the wait begins! I did some basic and advanced research here on the forums already, especially for the two versions for the FemTK armor. In talks with Imperial Surplus i was told they only sell one version nowadays. As i prefer version B without heels, i might have to see about the backplate and thermal detonator and how i do those. Finding shoes for my size is always a struggle, but i'm happy i found fitting boots in a white color, only needing that strip along the middle. Fingers crossed they work out with my orthotics in the end. Shoes are always a "Why do i hear boss music?"-moment for me in any costume i work on.3 points
-
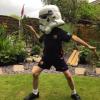
Superhero Scuttle @ Children's Hospital Had fun in spite of miserable weather. I look like an action figure next to a fellow trooper. So, no, I'm not short for a stormtrooper ftr.2 points
-
OK, future Troopers, many of you have asked about how to set snaps for your armor connections, so I thought I'd whip up a little tutorial. Please note that the example that I am making is based on using the "double snap" connection system (see last photo). I highly recommend this method, especially on the back/kidney, kidney/butt, and ab/kidney connections, as it provides an extra layer of confidence. Yes, it costs a bit more to do due to the extra snaps involved, but you can be sure that no matter what happens, you will NEVER have a piece come loose or fall off on a troop. Some builders may have used others, but after countless troops I have experienced no problems. So here we go.... Materials needed: 1. Hammer 2. Soldering (woodburning) iron. (Available at home improvement and craft stores. WELL worth the $10-$12.00 investment). NOTE: The tip of this thing gets CRAZY hot, so be very careful where you set it. Many come with multiple tips, but I suggest the pointed one. 3. Snap setting kit. (Available at all craft stores). Please note that I am showing both sides of the base... more on that later. Convex side Concave side 4. For this purpose, I am using 2 inch (5cm) wide black nylon and 1 inch (2cm) black nylon. The 1 inch strips will be attached directly to your armor. I suggest using E-6000 glue and clamps for this. 5. Snaps, of course! Don't "cheap-out" when buying these. The cheap ones come undone very easily and are garbage. For this tutorial, I am labeling the 4 parts as such: STEP ONE Cut the 2 inch strapping to about 4 inches long** (or as needed) for the particular connection. Cut the 1 inch nylon into 2 inch lengths as seen below. **NOTE: The actual length will depend on there you are using them, i.e. the kidney to posterior plate connections will be shorter. Just be sure there are no gaps, and that the 1 inch wide base pieces are in the correct position before attaching them. Example: The ends will be a bit ragged and will fray. Use the soldering tool to seal them. Again, using the soldering gun, make 4 holes in the 2 inch wide nylon as seen below. Be careful not to make them too large (just larger than the shaft of the snap base) or the snap may eventually pull out. Take one of the 1 inch wide nylon pieces and slide it up under one end of the 2 inch wide piece, even with the end. Once it is lined up, use the soldering iron to make holes in the 1 inch wide piece. This will assure that the holes for the snaps line up correctly. (VERY important)! You should end up with this: Repeat for other side, but be sure not to get the sides mixed up, as one set of holes may be farther apart. Insert one of the male bases into one of the holes in the 2 inch wide piece. Flip it over and place one of the male snaps on the post. Place the base in the concave side of the snap setting kit base. Place the striking rod in the center (straight up and down) and strike it several times firmly with the hammer. The inside shaft should be sufficiently widened to keep the top from coming off. There... your snap is set! NOTE: Do not attempt to do this step on a regular table. You need a hard surface, and a heavy duty workbench or concrete surface works best. Repeat this step for the remaining 3 holes. Now onto the 1 inch wide strips.. Insert one of the female bases into one of the holes, then (as above) place one of the female snaps on top. Place the female snap base into the convex side of the snap setting base. Again, using the striking rod, give it a few good whacks. (Getting the hang of this now)? This is what you should have at this point (only one end shown) CONGRATULATIONS, you have one strap completed! Now that you realize how easy this is and have it down to a science, repeat as necessary. NOTES 1. For added security, the double snap system can be applied to other areas as well, including shoulder bridge attachments and bicep to shoulder bridge, (example below) This is especially good for those who wear packs (HWT, Sandie, Spacetrooper). 2. Snaps set in elastic (as seen above) can pull out over time with repeated use. For added strength I recommend doubling the elastic over before attaching the snaps. 3. Be sure to use the female base on all the straps that will be glued to your armor. The reason being is that the bottoms are flat, insuring a tight seal. 4. Some folks set the female snaps in ABS instead of nylon when gluing them to the armor. There is absolutely nothing wrong with this, it's just a different way of accomplishing the same goal. The reason I use nylon is that I find it conforms to the curved parts of the armor better, and gives a larger surface area for the glue to adhere to. 5. Some use CA (super) glue to attach the 1 inch nylon to their armor. I have found that it can get brittle and break off or even cause warping on ABS due to the heat it puts off while drying. E-6000 needs to be clamped and takes more time, but trust me, it's worth the wait. 6. When gluing the 1 inch nylon to your armor, do NOT keep the 2 inch wide nylon attached with the snaps. Some of the glue may seep through the hole in the snap and glue the whole connection together. Not a good thing. If you should have any questions, just ask here or PM me, and best of luck on your build! Photo 1 (Double snap system.. note clamps). SHOUT OUTS: Gary jr. ( @flashpoint0214 ) The guy who introduced me to the double snap system! Jeremy (Copper) who supplied the nice clean photo of the double snap system.1 point
-
Trooper information: Name: Marcel Fleiner Height / weight: 178cm / 83kg FISD User name: Marz Elson Legion ID: TK-26476 Garrison: German Garrison Squad: Echo Nova Squad 501st profile: https://www.501st.com/members/displaymember.php?userID=36780&costumeID=124 Mandatory Information: Armor Maker: RS Prop Masters Helmet Maker: RS Prop Masters – lens (by OPLE Props) and padding upgraded, frown mesh added, cooling, Stormtrooper Audio System w/Voice Modulation from UkswrathsSpeciality, helmet interior by ArtneoES Blaster Maker: RS Prop Masters Boot Maker: RS Prop Masters (Imperial Boots) Canvas belt supplier: RS Prop Masters Hand guard supplier: RS Prop Masters Holster Maker: RS Prop Masters Neckseal: RS Prop Masters Full Body: Armor Details: Helmet: Accessories:1 point
-
1 point
-
1 point
-
1 point
-
Hi Marcel, Thank you for applying for EIB. One of us will be with you as soon as possible.1 point
-
1 point
-
I went ahead and trimmed the chest and back pieces based on the lines I drew and posted (with the exception of the bottom return edge on the chest and back. Those return edges remain untrimmed. The shoulder tabs are also untrimmed to this point.) I went ahead and fitted the two pieces after trimming the return edge, and my initial thoughts are that it seems to be an improvement. The back and kidney pieces no longer overlap and the corner wings don't hook with the kidney. The front looks to be closer to the appropriate length based on the reference images. I just wanted to see what you guys thought about the updated fitting. Also, I marked the shoulder straps for trimming. Do these lines look accurate?1 point
-
1 point
-
Congratulations trooper. Welcome to the ranks of CNT (again).1 point
-
I would add a few more things: At the Hengstler counter section, I'd not use the last 3 images as they are of screen used Sterlings from various auctions like Prop Store, but the E-11 parts were added later on. I would be wary on using those images for the greeblies, the screen used sold on auctions Sterlings should only be used for the blaster itself and not for the parts added on it later. In ANH the Hengstler counters were in various positions depending on how they were glued on, see images attached.1 point
-
19. 2023-06-03, Nördarnas Sommarmarknad, Stockholm (The Nerds' Summer Market) (Hero) The obligatory selfie! Lookin' scary while herding the nerds! Photo: Patrik Ander Photo: Patrik Ander We bumped into some Mandalorians! Photo: Patrik Ander We looked the other way and we now have some credits to spend1 point
-
This weekends trooping was at Glasgow Central train station raising funds for Glasgow Children's Hospital charity. Local citizens of the Empire were very generous with donations for the cause.1 point
-
Troop 20 Mackids Walk and Wheel Hamilton, Ontario June 3, 2023 This was a fundraising troop for McMaster Children’s Hospital. Lots of fun interacting with people, playing games, taking photos and cheering on the walkers, runners and riders. Group shot at the start / finish line. The boss watched intently as I played a game of connect for with one of his mechanics. Victory. Had a go at some calisthenics. Need to keep in shape to run up and down all those deathstar hallways. Stopped for a bit and mingled with some of the local law enforcement. A great turn out and big boost for the hospital. This is why we do it.1 point
-
That would be the Centurion ranks again1 point
-
Congratulations trooper. Welcome to the ranks of EI (again).1 point
-
1 point
-
Orchard Park Academy A fun troop event interrupting kids during their classes during the afternoon. The school had called too late to get a group on the 4th, but they went with the next best for the Revenge of the FIfth. Even better in my opinion. Amazing how hard our teachers work. I hear it, I know it, but seeing it is just amazing.1 point
-
This is how i did mine.. hope it helps (The scoop I took out of the left forearm was purely to aid movement... some do that, others don’t) Sent from my iPhone using Tapatalk1 point
-
The little extra won't make too much of a difference, my ears tend to catch when putting on my Hero version, Stunt helmet not so much, if you can get in and out without seeing blood you should be fine1 point
-
They're pretty straight forward, elastic loops attached to the wire arms screwed on to the armour. Let me know if you need any close up photos.1 point
-
Hmm all I got in the box was a letter piece of paper specifying the email address you need to contact in order to order replacement parts. That and a certificate of authenticity. Don't see any DVD or CD or URL link to a file.1 point
-
Here's a quick tutorial on how to add some ventilation to your helmet. *EDIT - I just noticed CheckWan had posted a similar thread in April (I didn't scroll far enough) but if you prefer a photo step by step here you go. Also I found my fans on AliExpress, 5 for $6.50 with free shipping. Shipping took 4 weeks from China to the US but at the time I was still building my armor so I didn't need them right away. I used this set up on my first troop that was a 1 1/2 mile parade in 96 degree heat! It was still horrible but this helped me make it through!! Here's what you'll need: -2x 5v two wire blower fans -USB cable -5v cell phone charger -Soldering iron -Heat shrink tubing -Wire cutter/stripper First cut the USB cable to desired length. There will be some outer protective wire and foil electrical shielding as you work your way towards the 4 inside wiring. There should be 4 colored wires. Red, Black, Green, White. Clip off the green and white wires (they aren't needed) and strip the ends of the black and red. Clip the small plugs of the 5v fans and strip the ends. Twist together like colors. Slip the appropriate size heat shrink over both the USB cable and the ends of the fan wires. **Important step** TEST THE CIRCUT!! Make sure it works before proceeding. The first one of these I made I went through testing the voltage and figuring out which wires were what. In the 4 I've made this far the colors have been the same but that doesn't mean there isn't some off brand USB cable with weird colors inside. Solder together like colors. Slide heat shrink over soldered connections and heat shrink. Slide larger heat shrink over both and shrink. This gives it all a cleaner look and added strength. Power provided by one of these. I got approximately 2 1/2 hrs run time from one of these fully charged. The whole set up doesn't weigh much and was added to my bucket with a few pieces of industrial strength Velcro on a mounting bracket I made with some styrene sheet I had from another project. The battery nestles in the back hump with a bit of Velcro quite well. -FIN [emoji846] Jim - TK508991 point


