Leaderboard
Popular Content
Showing content with the highest reputation on 04/23/2023 in all areas
-
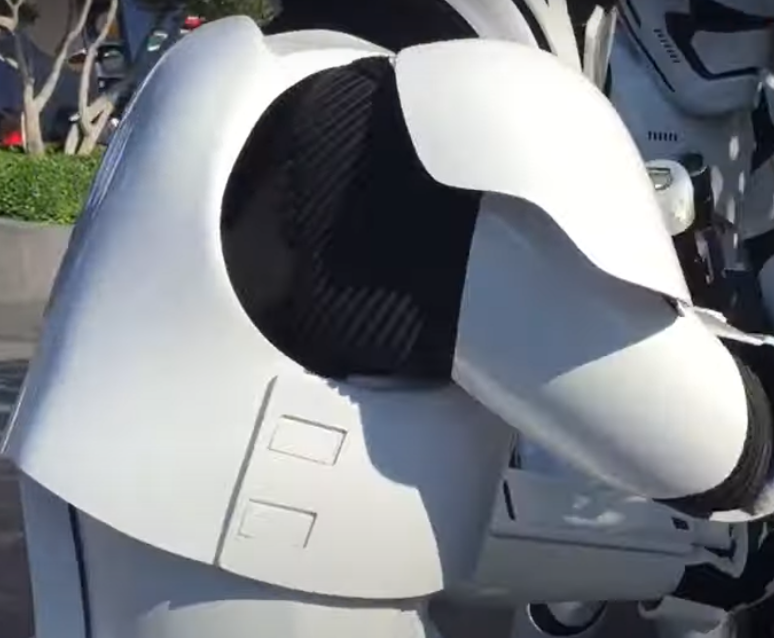
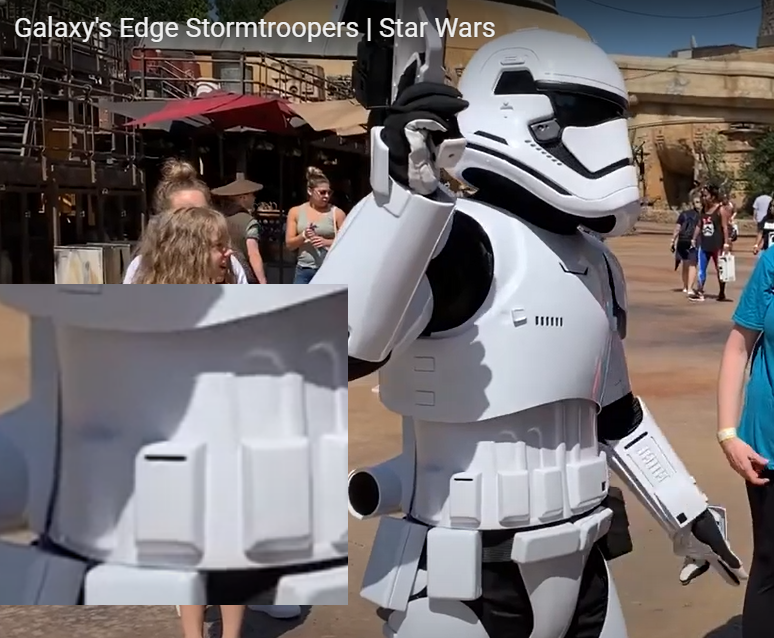
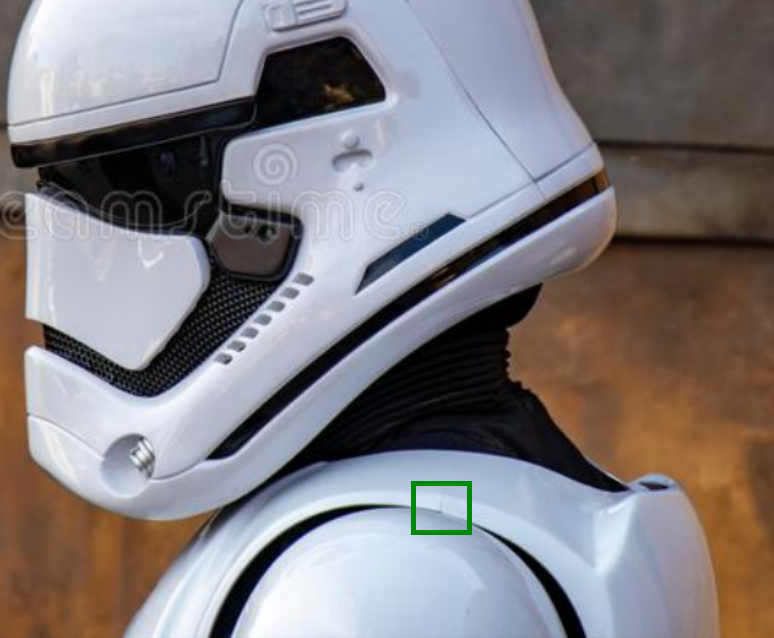
Sorry but I have to call this quote out, "This debate is a clear case of elitism and "if I had to do it, everyone should have to do it" This is not the case at all (well not in my case anyway) it's a case of following what we see on screen, references are what the CRL's are based on, not how an armor supplier has made their kits, other armor makers have supplied kits with seams/joins in the same way DN have and members have been dealing with them since 2015. There's some pretty big differences between screen used and Disney troopers, BUT you can plainly see they also don't have the side seams on the AB same as screen used or the join between the top of the yoke and backplate same as screen used. References They do however have a one piece chest/yoke And of course they suffer cracking in the same stress points just like the rest of us. Screen suits displayed at Celebration 2015 No join top of yoke/backplate No seam on side of AB but you can clearly make out where they have been joined as their is a high point there I just don't see a valid argument to basically add/allow seams to a costume when they aren't present, the references are there and we've had members with DN kits who have used ABS paste successfully to remove the joins/seams to meet the current CRL's.6 points
-
As one of the 3 FOTKs at celebration I might say there’s possibly a couple of answers for that Perhaps before DN starting shipping kits after Anovos failed, there wasn’t a huge number of places to go to get FO armour. You had Jim’s which is heavy and needs work to be super accurate. KB and some other ABS kits that weren’t super crisp. Personally I went the 3d printed route and let me tell you, there is a sh1t ton more work involved in that than there is filling one seam on a shoulder. I’m am also one of only 18 FOTS, in the 501st and that is even more down to lack of suppliers. There isn’t the love for FO armour as there is for standard TKs because it’s a harder suit to wear and there isn’t the love for the sequels that there is for the OT3 points
-
I'm a bit concerned that a few vocal individuals still seem to be really missing the point of this thread and the core argument being made. WE ARE ALL AWARE AND AGREE THAT THE MOVIE SUITS DO NOT HAVE SEAMS. No question there. No reference needed. The matter in question and the point that is trying to be made is: Disney and LFL approved the Parks suits, the LICENSED Denuo Novo suits, and the Resistance version to represent their character, the First Order Stormtrooper, WITH SEAMS PRESENT in the aforementioned areas for practical reasons. If Disney and LFL are okay with it, why aren't we at Basic? Is the hyperfocus on this detail at the Basic level worth the exclusion of new members and perceived elitism? This proposal is an acknowledged concession in accuracy in order to remove a potential blocker to membership and to help extend the service life of the ABS armor for more troops, and overall imo, isn't something that makes a significant difference to the appearance or impact of the suit. It is not a question of what is accurate or not, of new CRL creation, or even if the seams SHOULD be filled or not, it's about whether this requirement belongs at the Basic level. I'd like to see it go to a vote of the general Detachment. I acknowledge and agree with this as well, but I see this proposal as a possible effort to increase those numbers and show support for builders of FOTKs now that we DO have a consistent, quality, licensed supplier of what SHOULD be one of our CORE costumes. These kits have been out for over a year now, and ONE SINGLE PERSON has submitted for EIB on these forums, which is telling. Some people just want to troop and don't care about the seams. And the Star Wars-loving public doesn't either. Instead of turning people away from Basic membership, let's welcome them to these forums and encourage them to learn more about how to improve their accuracy while we make our push for 1500 EIBs. I can't see how we're going to hit that number any time in the next several years with the ever-increasing difficulty of DO review and revision of existing CRLs. Per the current administration, they "have never dumbed down a CRL to suit one manufacturer"... but I think this is a prime example where there is precedent, a clear argument, and some level of demand to make a logical exception to a standard of questionable value. I appreciate the debate and everyone's input. I feel like the case has been made, and this can always be revisited under future leadership.2 points
-
Was recently at Galaxy's Edge for 2 days and tried looking for whatever "seam" you are all talking about and for the life of me I couldn't see it. They looked like the walked off the movie set. No one, not even most 501st member could spot the difference. This debate is a clear case of elitism and "if I had to do it, everyone should have to do it." Just look at the pictures of events and even Celebration, how many FOTKs did/do you see? Exactly, ask yourself why? This is not a request to allow a Rubies custume. We can be inclusive while still maintaining a high standard.2 points
-
I agree, mostly because of the functionality factor, and well, yes, Galaxy’s Edge’s troopers do it. Seeing them in real life was absolutely spectacular and I for sure didn’t notice the shoulder straps, nor would I even give it a second thought if I did notice. I really don’t think it should be a requirement.2 points
-
Thank you. I kinda like the immersion into it. I am learning about so many things with this hobby. It’s not unnecessary expense, I just think people are amazing and the work is impressive. My first helmet, it has become my personal helmet to explore and deconstruct and plan out. now my thigh armor…..it can go screw itself….. I don’t like thigh Armour right now…. https://imgur.com/a/ZV6xxai thanks for your encouragement.1 point
-
Sounds good! I'll see if I can get those updated pics today! Thanks!1 point
-
Hi Marek! We are working on your request, the armor looks great! Just one last favor so we can see the Centurion badge under your name. So as not to create confusion in future applications, we need you to update/correct two photos in this request. The photos are Nº1 and Nº23. About No.1, the belt is too low, which is something we emphasize a lot in the applications. It probably moved during the photo shoot. Regarding No. 23, the plastic belt does not seem to keep the 45° angle with respect to the canvas belt. In the other pictures it looks like it, but to avoid confusion, we prefer that you replace the photo with a clearer one. Thank you for your patience and understanding, Marek.1 point
-
Troop 1, also listed in Fire Team Sousa Troop Log (2023/APR) Event: Books for Love 2023 (Week 1) Location: Taikoo Place (QuarryBay, Hong Kong Island) Date: 23 / APR / 2023 First time as a bad guy doing good. Felt great.1 point
-
Hey, Im Vasco i have 20 years old, i live in Portugal. I am interested in being a ANH Stunt Stormtrooper. I like to join in 501 legion.1 point
-
1 point
-
1 point
-
1 point
-
I just purchased an Anovos TK kit and it will arrive this week! Excited to build this, but want to make sure I take my time. Looking forward getting to know you all and plan to post my progress. I understand Tony has the thread to follow for the full build, but I am a sponge for the knowledge and wisdom of all TK builders here!1 point
-
1 point
-
Troop 16 Oshawa Comicon, Oshawa , Ontario April 22, 2023 A small Comicon to raise money in support of the Oshawa Community Centre. We started outside and grabbed a photo in front of the tank outside of the Armory. Greeted people passing on the street and sidewalk. Rainy weather forced us inside after a bit where we mingled and interacted with guests. The other TK whom I have trooped with several times, always has a dog squeegee in his glove that he squeeks when the kids high five or fist bump him. He brought a bag full this troop and passed them out to everyone else. It really makes the shy kids come out of their shell when they fist bump you and they get the big squeak. Last but not least, I achieved a perfect level 4 sit in a fairly low chair. This should solidify my level 4 achievement now.1 point
-
Troop #165 Martinsville - Green Top. Elementary School Spring Fling - 4/14 edited1 point
-
Thanks guys! I am hoping to build Centurion worthy TK armor. I am purchasing an officers uniform so that I can Troop and handle as a 501st member and not feel rushed to complete my TK kit. That way I can make sure to do it right the first time. I am friends with Ukswrath (Stunt) and I understand he has a pretty extensive run down on the build, plus a friend of mine is TK 77776 and lives locally so will be helping me along. Will keep you all posted as soon as my kit arrives. Thanks again!1 point
-
Thank you both! [44] 07.04.2023 -- Star Wars Celebration London, Friday Without a break, the next weekend saw my longest travel to my largest troop so far: Star Wars Celebration. The Chaos Division met up on Wednesday, drove 11 hours by car on Thursday, and was ready for Celebration on Friday. Due to all the horror tales we'd heard regarding wait times and queues we arrived a short time after opening on Friday. I was the only one in my armor that day, everyone else wanting to see something at the convention. Mostly, we saw lots and lots of people, but we managed to run into some friends and one of the droids we were looking for. Although I didn't get to see much of the event itself, I still had lots of fun -- until I discovered that there were few to no seating options. When I had said before the convention that one could recognize me, since I'd be either dancing Macarena -- or sitting down on the floor... I did not expect to do both of those things during my first day. [45] 08.04.2023 -- Star Wars Celebration London, Saturday Saturday was the day of the group photos. Before we even got to enter the ExCel center for the first time that day, we were at the Garrison Group photo, the Squad group photo and -- finally! -- the 501st group photo. Whilst waiting for said photo I finally got to meet @Chemi and @Hoda. Meeting people from the forums in real life was simply amazing. Although the Detachment photos had originally been planned for the stairs in front of the center as well, said plan was changed and we finally got to enter the convention. In the empty hall behind the changing room was enough space for all the Detachment group photos and whilst waiting there was enough time to get to know even more Detachment members. Later that day the Chaos Division would come back for some pictures of our own: we'd film getting chased by Ahsoka and Rex, took a proper Fireteam photo, and we made fun of TIE pilots. I'd missed trooping with the whole team. [46] 09.04.2023 -- Star Wars Celebration London, Sunday These two Jedi had a bad feeling waiting for the DLR -- who expects to run into four Stormtroopers in the Railway, after all? On Sunday our day started with possibly even more pictures than the previous day, as we were held up before entering the convention. Later, we would discover a picture of ourselves in a German newspaper. We also arrested some of the local police. What for? No idea, but it was fun. During Sunday I finally got to meet the last people I'd been looking for, and we once more barely got to go anywhere. We took photos at the VW booth, with a Death Star, and with various visitors. During midday I entertained myself by acting as if I were a statue next to the 501st booth, scaring some of the visitors. Completely exhausted, we finished off the day by playing ball with Grogu before going back to the hotel a bit earlier than planned due to an injury. I went back in casual clothes for another hour before getting to meet even more people during the FISD Meet and Greet. Thank you to all who were there, I had an amazing time! [47] 10.04.2023 -- Star Wars Celebration London, Monday Last day of Celebration and I was the last trooper standing, as the rest of the Fireteam had decided to go casual once more. Everything hurt, I was exhausted, but at least I got to sit down during the Bad Batch Panel. Monday was a bit calmer than the previous days, which I greatly enjoyed. We ended the day a bit earlier to go explore London instead. It was my first time in the UK and I'm glad I got a bit of sightseeing in before we had to go back the next day. Thank you all for the wonderful time, and a #notatyourpost (except Danny) for my fellow FISD Staff TK-66744 signing off1 point
-
This is a joke, all the coins are still being packed and shipped, I'm just playing around at work...1 point
-
1 point
-
Yeeaaahhhh buddy! Mark your calendars for 2026! I actually sent a similar photo to Adam (and Luca, who was less excited) two weeks ago when that covert mando debuted. Bonus that it's confirmed as a trooperbay pauldron, so attainable screen accuracy!1 point
-
1 point
-
1 point
-
1 point
-
1 point
-
I would laugh but it's true my F-11D build is now over 5 years long, and my SE-44C getting on for 6 and here I am thinking I should just start over on both!1 point
-
1 point
-
1 point
-
1 point
-
1 point
-
I might just take you up on that (any interest in an Excelsior or Nickel City coin), but let me try this first:1 point
-
Can we put this up for a vote? I’m on my 3rd FOTK kit and the yoke has always been a problem. Recently I 3d printed the back/yoke and while trying to put it on, it snapped. Vacuum-formedABS doesn’t necessarily snap in that way, but it goes to show how much stress and repairs are needed in that area over time. There’s a reason why the Disney World troopers have the seam. It’s simply not easy to put on and take off. There are other CRLs that completely omit parts from level 1. Think the ANH stunt TK and the snaps/rivets. Seams IMO feel less important than components. And if someone is building a TK, “couldn’t they reasonably add snaps/rivets?” Let’s also not forget when the CRL allowed classic TK boots with the FOTK. It was an accommodation based on supply, but it was still an accommodation nonetheless. And at a much larger expense of accuracy than a seam. To me, this all comes across as exclusionary. We now have a new supply of FOTK kits that makes both the building process (no paint!) and the trooping much easier and accessible. It’s at the expense of a minor detail, but let’s be honest, the original kits were made of polyurethane which had flex capabilities. So if we are so stringent on accuracy then why aren’t we requiring poly kits? In summary: -We don’t have a supply of poly kits that flex -Current kits can be made to look like movie kits but break over time -People refuse to accommodate from the lack of supply of poly kits, but were perfectly fine to accommodate classic TK boots Makes total sense.1 point
-
1 point
-
1 point
-
1 point
-
1 point
-
1 point
-
1 point
-
*Southern California Garrison Photo Shoot - "Endor" Theme, Porter Ranch, CA - 3/5/23 Not a troop, but figured I'd share some photos from a recent photo shoot event for the Southern California Garrison that @KC Grim organized with an "Endor" theme. Understandably, attendance from the Pathfinder's Detachment was excellent, with both the Detachment Leader, @BikerScout007 and our Garrison Commanding Officer @ramey making it out as well. It was nearly a two hour drive up from south Orange County to north Los Angeles County, but @Dsposato0 (with his recently submitted ROTJ Scout!) and I carpooled and the location was beautiful and green after recent rains. It was also pretty easily accessible, considering we had armor and... a full size speeder bike to haul up there! Super cool and big ups to @mrpoopie and @JollyRajR for making that happen. Credit and many thanks to KC for these incredible photos and edits. In all of the photos, I'm the TK on the right unless otherwise noted. Enjoy. @Surfintrooper @TK-12248 above, and both he (left) and I (right) below! There were HUNDREDS of beautiful shots that were the result of this super fun day, but I picked just a few of my favorites (especially with TKs) to share! It was well worth the drive for the fun of spending time with these awesome people (and sharing some In-N-Out burgers after) and the incredible photos to show for it!1 point
-
Yes the CRL's are evolving, noone can state they aren't after this last major update to this very CRL. What we do absolutely need to do is follow a process, and there are several reasons why. First there is no agenda, why would there be, and to safe guard against that type of thing from happening, we have not only the open discussions on the forum, but staff discussions and LMO discussion where needed. The other part is the members Polls, this is done again for the same reason, so it is not a one person decision, not mine, not a DO's and not just one member. You cant loose sight of the fact almost every legion member also makes changes to there armour after approval, even basic approval so everyone can do what they want to make their armour more comfortable etc etc. Second, the system is in place to help minimize errors, but also to not present what can very easily look like favoritism towards one member over another. These things have a Butterfly effect, and we do everything possible to remove that, and keep all members comfortable. You presented a case, and it is being worked on, your case is not ignored, it is being handles with the same level of action ans seriousness that all CRL potential updates are given. In fact it is also being expanded upon, but like all balanced and fair systems the process takes time. You know this first hand as the TLJ thread has been running for over 2 years, we had no correct images so we couldn't update until we did. Patience is the key here, this needs to be done in the correct fashion and that is the fair and balanced way to do it for everyone concerned including our current and future members. I have offered up more possibilities in that thread because you are correct, this isn't about a D ring colour, it is about multiple variations and different parts, and if we consider one, we need to consider more, and it deserves the due process of discussion, and outcomes to be put to membership polls. I think its pretty clear that we are invested in continuing to update our CRL's, so your patience and understanding are appreciated.1 point
-
At a Troop yesterday I had a discussion with a fellow Garrison TK about the strength -- or lack thereof -- of Shoulder Bridges. It occurred to me that the method I used to beef up the Bridges from my build might be useful as a standalone How-To article. Shoulder Bridges are perhaps the most fragile part of TK armor, so it's always a good idea to reinforce them in some way. Also, since the underside of the Bridges is basically hollow there's nothing there to glue to. Most builds I've looked at fill in all those hollow spaces with slivers of ABS glued in to add both strength and gluing surface. I decided to try something different. My plan was to cover the entire underside of the Bridges with a strip of thin ABS cut from a For Sale sign I picked up at Lowe's for $1.99. First, though, I needed to trim the Bridges down a bit to remove excess edge. I have AM armor, which comes nicely trimmed, but there is a bit extra left on so trimming these was my first step. The AM Shoulder Bridges are already curved (almost perfectly, for that matter), so using the score-and-snap method wasn't an option and I relied on my trusty Lexan scissors. Notice here that I'm not cutting all the way to my line. That's because I'll be gluing ABS to the entire underside and I want more surface to work with. I'll trim them to their final size after the gluing is all done. I had already cut out the ABS from my For Sale sign -- again slightly oversized -- so gluing started by attaching the ABS to the Bridges at the middle. The reason for this is that all the critical gluing of the ABS is mostly around the edges, and I wanted a solid center all the way down the middle for strength and rigidity, and to support the thin ABS. To do this, it only takes a dollop of glue on the center of each "rib" where it'll make contact to the ABS sheet. I'll use something different gluing the edges, but I'm using E6000 here for the longer working time and adjustability. With the glue dolloped on, I pressed the ABS into place and added a series of small clamps down the center and set the Bridges aside to dry. A couple things to keep in mind if you decide to do this --- 1) First, shape the Bridges as closely as possible to the shape you want them before starting this. Yes, you can still bend them afterward but it's not quite as easy, so bend them to shape now. 2) When you clamp on the ABS, ensure that you keep the curve intact the way you want it while the glue is still wet. This is pretty easy to adjust, even with the clamps on. But once the glue is dry it will hold the curve, so you want the curve to be right where you put it. 3) I've talked a number of times in my official build thread about how you can work with things glued with E6000 after only a few hours without waiting for a full cure. That doesn't apply here. You want the glue down the center to fully cure before proceeding. Why? Well, E6000 is strictly evaporative and needs air to cure. The inside of the Bridges won't have air circulation once the edges are glued. So let that glue cure at least the full recommended 24 hours. OK, lecture over. To glue around the edges I'll use Plastic Weld, which does exactly what it says. This glue is very thin, cures very quickly, and makes a permanent, nearly invisible joint. It's also easy to use since capillary action does most of the work for you. Work in small sections at a time -- about three or four ribs length -- from one end to the other. I alternated sides. Dip the brush into the bottle, apply liberally to the edge (the slightly oversized ABS forms a little "shelf" that acts as a guide) and capillary action instantly sucks the glue right into the joint. Brush on a bit more in the same spot, and again it'll be drawn right in. Keep doing this till no more gets sucked in; at that point the joint is fully filled and you can apply your smallest clamps. You only need minimal pressure, and you only have to leave the clamps in place for a couple minutes. The glue works that fast. Important note: Be extremely careful with this stuff! It will instantly start fusing any plastic it touches, including your armor, so get it and anything else out of the way. Keep a cloth or paper towel handy for drips and spills -- it will also start fusing the plastic laminate on my worktable, for example -- and wipe up any spills immediately. Note how I keep the glue bottle in what I call my Tray Of Isolation that I use for glues and other caustic chemicals, plus I have it nestled into a hole in a piece of wood that prevents the bottle from tipping. Then I just kept working down around the edge, alternating sides, until I'd gone entirely around the Bridge. Done? Nope. When this kind of glue cures, it shrinks ever so slightly, and if you look at the glue joint you might see tiny gaps that look like bubbles. Go all the way around once more with your brush applicator, adding a second line of glue. You'll see it suck right into those little gaps. Once you see no more tiny gaps, then you're done. Set it aside for an hour or two. Yeah, the glue is dry, but you want it to fully cure. An hour or two is more than enough, but best to be sure. Now, trim that oversized ABS right up to the edge of the Bridge plastic with a sharp knife, and sand the edges smooth. This is a straight edge, so either use a sanding block, or better yet a full sheet of paper held flat to your work surface. I did a quick rough sanding with 150-grit just to level the edges and bring them to the final size, then followed with 220-grit, then 320-grit for a really smooth edge. And here's the magic: Because this is a welded plastic joint, there is no appreciable glue line. Seriously, take a look: There you go. The Bridges are strengthened from one end to the other, and you have a smooth, flat gluing surface ready to go on the underside for attachment to the armor. Which, by the way, we'll do after making an adjustment to the armor. Strengthening the Shoulder Bridges is only part of reducing their fragility. The second part is how they're mounted to the armor. Here, you can see that although the shoulder extensions at the top of the Chest and Back Plates are trimmed to length and shaped to my shoulders, the ends of those extensions weren't quite in the same plane. You can see what I mean with the armor on my mannequin. The armor feels good on and fits just right, but no way those Bridges are going to lay correctly on that. Sure, the elastic hold-down straps will force the Bridges into the correct position when you wear the armor, but that also stresses the Bridges by twisting them unnaturally. But you can fix that. Leaving the armor on the mannequin, I reshaped those extensions by heating them with a hair dryer. (I'm terrified of using a heat gun, but a hair dryer works great on small, thin areas like this and it's far safer.) Essentially, I just heated up the ends of those extensions, then twisted them until they lay in the same plane with one another. Once I had the left shoulder nice and planar, I did the same thing with the right shoulder. When finished, the bridges will lay perfectly over the top. Now, it was just a matter of lining up the Bridges to center them over the shoulder extensions and making a few registration marks, then removing the armor and gluing the Bridges to the Chest Plate over on my workbench. This is another critical glue joint, by the way, so allow the full curing time for the E6000. All right, let's take off the clamps, reattach the shoulder strapping and put this back on the mannequin and see what we got. Nice. Now, just a little cleanup for some E6000 squeeze-out, add the thin elastic hold-down loops for the backs of the Bridges, and you're ready to enjoy the strongest Shoulder Bridges ever. A.J.1 point


