Leaderboard
Popular Content
Showing content with the highest reputation on 04/04/2023 in all areas
-
I know some parts are not sitting 100% right, but for a first try with the new parts Im very happy with it4 points
-
UPDATE: In case you haven't figured it out yet, this topic is an April fool's joke! Many thanks to the rascals who are behind the idea for this post- @Morgi (Luca), @MaskedVengeance (Caleb) and co-conspirator @revlimiter (Adam). Also a big shout out to those TKs (listed above in Justin's @TheRascalKing )post that had to endure relaxing in that hot tub, lol. Our apologies, but all submissions for LBT EI approval are indefinitely on hold (much to the relief of our D.O. staff).4 points
-
Indefinite hold on my EI app! Nooooo... But in all seriousness, truthfully it is @TheRascalKing and TK-97253, TK-42077, TK-82077, TK-62345, and Casey Kwock (as Justin mentioned in his post above) who deserve credit for this joke. It was them that formulated the idea, and only after their completion of the CRL did Justin approach Luca and myself about implementation on FISD. Adam, Luca, and I only took it a step further with our own threads based on the CRL. So BIG THANKS to the SoCal Garrison troopers on the amazing concept! Luca, Adam, and I myself had an amazing time spinning off your vision and work!3 points
-
2 points
-
I may have archived (hidden) that purchase on my Amazon account last week lest my wife wonder what the heck is going on with my silly stormtrooper friends, or worse.2 points
-
Added some black abs strips 20mm wide on the inside edges of the abdomen for strength reinforcement as well as strength for the split rivets that will go there. I’ll do the same on the kidney edges as well after I’ve measured again to know how much to trim off.2 points
-
Updates for today (links to sections have been updated in the opening post of my build thread to make it easier to find them. I mounted the holster to the belt. finished the rear cover strips of the shins got the thighs pretty much ready for rigging And as you can see above I got the Thermal Detonator in the works. I’ve also made progress on the abdomen, the button panels are done curing to the abdomen and the Han snap and bottom split rivet are in place. I’ve added the two male snaps to the posterior armor. Busy day, but good work.2 points
-
Should be ok but I've not seen them on you. Some references Also note the amount of ridges on the front of the shoulder strap, 4 and 1/2 small ridges and 1 large, this can vary but ideally that's what you would glue onto the chest You can also remove the large tab on the rear of the shoulder straps Elastic on the rear will help hold the backs down.2 points
-
Perhaps you noticed Joseph's coin looks a little... different? A very limited number of GOLD Command Staff MEME Coins exist. Most are currently traveling around the globe in search of their owners.2 points
-
In keeping with my tradition of lightning fast L2 and L3 submissions after approval, today I have prepared for you @Deployment Officer Team my L2 EI application (with some L3 photos) for the newly-established Beach Trooper. I know I'm blazing the trails with this submission, but hopefully I meet all the requirements as noted in the new CRL. If you have any questions or concerns, please don't hesitate to reach out! I'm always eager for feedback to improve my kits! UPDATE: I appear to be having some issues with my Photobucket account. If anybody has any tips on how I can remove the watermarks and regain access to my original images it would be much appreciated! Thanks! (@Sly11 and @gmrhodes13 I know you guys have worked on this during your forum cleanup project) Name: Caleb 501st Unit: Venator Squad, Georgia Garrison Helmet: ATA Works Swimsuit: Official CRL bottoms E-11 Blaster: Hellhounds Props (rubber) circa 2019 Height: 6' 0" (183 cms) Weight: 192 lbs (87 kilos) at time of photos. CRL: Beach Trooper Shout out to @TheRascalKing, TK-97253, TK-42077, TK-82077, TK-62345, Casey Kwock, @Morgi, @revlimiter, among many others, for whom I'm forever grateful. Full Body ** * I had some image rotation issues on this one. Sorry didn't have time for a real fix. Action Shot (for the EI Gallery) @gmrhodes13 Suit Details Note: It's unclear if the color of the suit is Humbrol 14 French Blue. It appears to be more of a cross between French and Mediterranean Blue. Definitely not Midnight Blue. Helmet Details Blaster Details Optional Accessories Proposal I know that CRL has only just been developed, but I thought I might take this opportunity to propose an amendment to the optional items currently approvable for this Beach Trooper. I know that screen references are a bit slim, but in the interest accessorizing this minimalistic trooper, I propose the addition of the optional items listed below. Note that I've preemptively modeled the implementation of these accessories for consideration by the appropriate authorities. OT-style thermal detonator (TD) OT-style pauldron (specific color open for discussion) Imperial binders (with belt-clip) * Once again, apologies for the image rotation issues below * * Action Photo (image rotation issue again) Please let me know if any of you have any feedback on any adjustments that the DOs may require for IE, or even Centurion. I figure I might as well shoot straight for the top and aim to be the first L3 Beach Trooper! If only I could look as good as @justjoseph63 at his beach shoot*. If anybody knows a caricature artist local to me or in the Atlanta area, please put me in touch! * * And that's all for now! If all goes well I hope to submit for Centurion very soon, and who knows, maybe I can finally get my first trading card and show off my dad bod. TK-75276 standing by2 points
-
Thank you all! The Orange County Squad and I send our love. This was in the works for months before we finally worked up the nerve to buy matching "budgie-smugglers" and make it happen. Kudos to Todd M. (@thebearded1ne) for the original idea, Manny D. (@rekked), Scott S. (@TattooedStormtrooper), and Dwight S. (@Dsposato0) for suiting up with me, and to Ryan B. @TKBatchy for providing the perfect jacuzzi location and coordinating with our photographer, Casey K.!2 points
-
Greetings to all Troopers (and future troopers)! On behalf of the staff, I would like to be the first to announce that we have now completed the next CRL to be added to our roster of approved FISD costumes (making a total of twenty)! As a bonus, a new weapon (the Ascension pistol) has been approved for this ensemble. A link will be added to the existing 501st FISD CRL site on 4/3/23 at 09:00 GMT. As with all costumes, please note that requirements are subject to minor updates. Those aiming for Basic 501st approval are urged to review this CRL for any such changes before submitting to their GML. Requirements for Expert Infantry (listed in blue) and Centurion (listed in red) have been included for those wishing to attain higher levels of approval, and may be submitted to the the D.O. department only after Basic approval is granted. Any questions for the staff or comments can be made on this thread. An announcement (as seen below) will be made on all of our social media platforms: SO, without further ado, we present the newest addition to our approved costumes:1 point
-
1 point
-
1 point
-
Awesome work gentleman. It may have started as an April Fool's Joke, but somehow I think someday someone will make this real, even if it's just a con costume.1 point
-
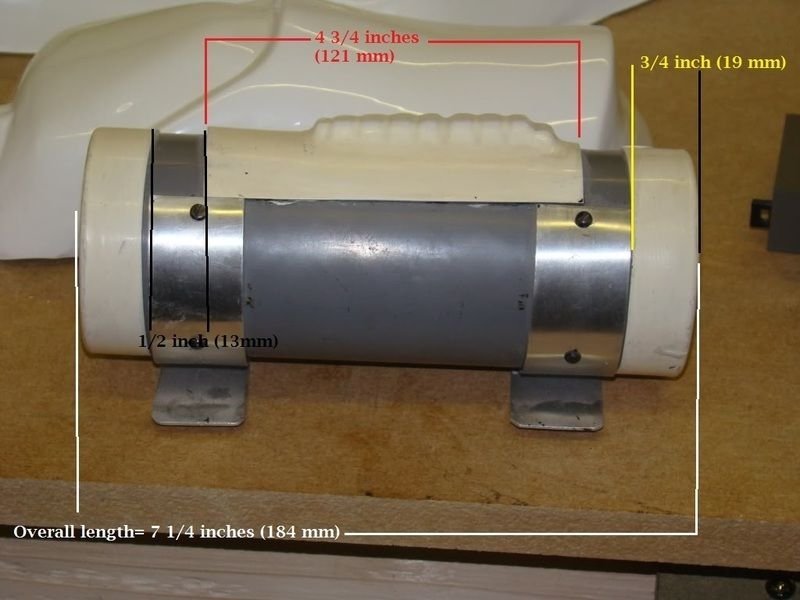
Hey All, I was encouraged by many on here to start my own build thread so I'm going to just that. I got my armor from Dave's Darkside Depot at the beginning of March and I started building it this past weekend. I'm shooting for Centurion straight away as I am somewhat of a perfectionist. Rest assured I watched the OT the whole time I was building. That being said, here is my build so far! Build Day 1 I started with the forearms as I began by following ukswrath's very detailed build. I first taped the forearms up and put them on to get the fitment I wanted. I then made pencil marks about halfway between the two halves of the forearms on each side where I want to make my cuts so that the halves butt up to each other. Instead of using a ruler or straight edge to draw a line down the whole of the forearms I opted to just use a piece of painters tape to make a straight line between my cut marks on either side. Then I used a pair of snips to make a rough cut down the tape I then did some cutting/sanding to get a little closer to the return edge of the forearms to give myself a little more wiggle room when taking them on/off and to prevent it from biting into my skin when trooping. I did this for both the outer and inner pieces of the forearms Then I double checked my fitment by butting the two halves together, taping them up, and putting them back on my arm to make sure they were exactly how I wanted them. Once I was satisfied with the fitment, I used some of my scraps from cutting to make the inner cover strips. For this step I wasn't really worried about the width of the cover strips as it's on the inside. I just wanted to make sure that they were wide enough to have a good hold on each side of the forearms. I've seen some others do it different ways but for myself, I added the inner cover strips onto the inside forearm piece so that half of the cover strip was hanging over the edge (as shown below). After this picture was taken I added the second inner cover strip on this same piece. When the E6000 is cured I will attach the outside half of the forearm. Probably a weird next step but I moved on to the thermal detonator because it seemed easy and quick to do the little sanding and gluing that I need to do with it. I needed to trim the end caps on the detonator a little to match up better with the measurements on the CRL so I made my measurements and then put a piece of tape around them to give me a straighter guide for trimming them. A pair of curved scissors really helped on some of the trimming. Especially for the end caps on the detonator. After I got my rough trim done. I brought it to the belt sander to touch it up and make it a little flatter and nicer looking. I did not glue the end caps on as I'm planning on making it a little storage area farther along in the build. I'm going to probably glue one side down and add some elastic onto the inside of each cap so that the elastic always keeps the unglued cap in place. At least that's the plan for now. I lined up the control panel of the thermal detonator into the middle, added some E6000 and glued that sucker down. Probably could have used magnets but I opted for tape to hold it down while the glue cured I have the clips for the thermal detonator that are from Ukswrath but I will add those the next build day after the E6000 on the control panel is cured. I moved on to the biceps from there and did the same thing I did with the forearms. Fitted, pencil mark, cut, trim to return edge where needed, butt together, tape and re-test fitment I'm glad I made the extra step to butt together and re-test the fitment on my parts though because I actually had cut a couple times on the biceps to get the fitments just right. I tend to cut a little less than the line I marked because I can always take more off but I can never put it back on. And again, I did the same thing as I did with the forearms and just put both inner cover strips onto one side of the biceps. That is all I got done on my build day this past weekend. Would love to hear any comments, criticism or tips y'all have for me! Excited to get this thing done eventually and join the 501st!1 point
-
1 point
-
1 point
-
1 point
-
Tbh with you I didn't measure that. I only measured overall length and endcap width. I figured if I put the control panel in the middle it would be good enough. But now that you say that the gaps do look a little small. I will measure it and try to fix it up a little better. Thanks for the input1 point
-
The total length is approximately 7.50" (190.5mm). Some varied in length, yours the gaps between the endcaps and control panel look a little small1 point
-
Looking much better. A few things missed earlier, a lot would be for higher level approval. White paint on thigh ammo strip rivets, also openings on the side, ab to kidney, tighter strapping perhaps Brow trim is really low, even for a hero, some references here. You could also bring your shoulders in a little more there is a big gap of black between them and chest, rotate them further inwards like on the rear photos. Vocoder pain sides are a little low. Could also fill the gaps between the lower ridge on your thigh, sugru or ABS paste. Your chest could down a little more, looks like it's sitting up on your shoulders, maybe it's the angle of photo Vocoder pain sides are a little low. Shouldn't really have rounded corners on your shoulder straps, you could actually cut half the tab off, which is screen accurate. You could also check your TD measurements, looks a little long NOTE: As seen in the photos below, there are no large tabs on the rear of the shoulder bridges. This is not specifically mentioned in the CRL, but removing them is highly recommended if possible. Good luck and hope to see you approved soon1 point
-
1 point
-
Even though some areas have not hit the 80 degree (or higher) mark yet, summer is outdoor trooping time! While many of us are old pros at this, those who have not participated in an outdoor troop on a hot/humid day should be aware of one word: Hydration. While most of the public will be wearing shorts and T-shirts, we are sporting a full body suit and are 95% covered with plastic... not exactly the perfect scenario to stay cool in the mid-day sun. Keeping your body properly hydrated is the key to successfully making it through your troop. Having cooling fans in your bucket certainly helps, but here are some pointers to stay safe (and upright, lol). THE DAY BEFORE Water- Plain and simple. To get your body ready, increase your consumption (in moderation) the day before. This will help hydrate you at the cellular level. A slow/steady intake the morning of and during the event will ensure that you make it through with no issues. The best way to tell if you are good to go is if your urine is clear . THE DAY OF Again, water. Drink as much as you feel comfortable drinking before and during. IMPORTANT: The sun is hot, you are sweating like a snowball on Tatooine so you decide to take a break. You take off your bucket and chug a big bottle of ice cold water. Bad idea. When your body is overheating, quickly drinking a big frosty container any beverage (even blue milk) constricts your blood vessels and can cause dizziness, nausea, vomiting, esophageal spasms (chest pains/cramping), shock and worse. Take a few sips at a time over the course of your break(s). SPORTS DRINKS If you are going to in the heat for several hours, adding a product that contains carbs, potassium, sodium and amino acids will help, but don't use them instead of water. Save those for afterward. COFFEE/TEA/SODA No need to skip your morning coffee/tea (or in my case Mountain Dew) in moderation, but be aware that caffeine is a diuretic, and too much can actually cause dehydration. IF YOU FEEL TOO HOT If you feel dizzy or need a break, it's nothing to be ashamed of so don't be a hero. Inform a handler immediately to escort you back to the break area. If one is not close by, don't wait, just go. If you feel really bad, have the person trooping closest to you to escort you back and stay with you. Even if in armor, sit down and drink small sips of cool (not ice cold) water. Call for medical help if you feel nauseated or dizzy. I have seen my share of troopers go down from the Florida heat. Not a pretty sight, so please be safe!1 point
-
This is a super timely post. to all who contributed, especially @justjoseph63 I got super dehydrated at a recent troop. It was an EVENING, INDOOR troop in pleasant weather. It totally snuck up on me. Over 50 troops to my credit and I managed to get dehydrated at a fairly low key, chill indoor troop.... it can happen any time. I apparently didn't drink enough that day before the troop. Took me nearly a day to recover. Stay hydrated out there troopers!1 point
-
Whilst not Florida hot we now get our share of warm weather now. I’ll iterate again the secret is to Hydrate the day before and then manage it appropriately on the day. It’s also worth remembering it’s not just the sun to worry about. Convention halls can get hot when full of 1000s of people and you won’t be paying as much attention as you’re inside. And don’t be a hero. When you’re done you’re done, there’s no shame in that.1 point
-
1 point
-
1 point
-
April 2nd... must mean it's time for a COIN CHECK!!! Yeah. It's real. @Morgi Coin Check!!!1 point
-
Hello there! I've had a bit of insight into this costume for some time now, seeing the CRL come to life. So now that the Beach TK CRL is officially launched, I am happy to say that I can finally request pre-approval! Looking forward to your feedback! General Info Name: Luca Hahn ID: TK-66744 Garrison: German Garrison Helmet: RS Propmasters Softparts: self-made Blaster: Troopacoola Height: 177cm Weight: 52kg Full Body Action Shot Helmet Blaster Sadly I seemed to have some problems regarding the forum upload size, hope this is still good Thank you!1 point
-
Hi Luca. as Caleb rightly said, you still have to do some fixes... You must also fix this, as it is a requirement for the basic level.: Reference images For basic level, they can be stickers, but if you want to apply for higher levels, they must be hand painted.... I'm sure you can do that. Hope to see your EI application soon!!!!1 point
-
Wow Luca! You've done a phenomenal job with this submission! You've really matched the two-piece variant of the Beach Trooper quite well, and you even struck the proper pose! Well done, sir! If I may, I think there are only two items that may need to be addressed, though ultimately the decisions in these areas will be up to your GML (Garrison Membership Liaison). First, as shown below, it appears that the red portions on your shirt wrap too far around your suit top. Screen references show that the red stripes do not extend onto the return edges of your shirt. See the following references: The excess material can also be seen from the rear, but a few minutes with lexan scissors or a hobby knife, and you'll have those shirt return edges cleaned up and shipshape! Once again, fantastic work on this submission! With just a few minutes of work I have no doubt that you'll be easily approved! p.s. One last note unrelated to your build. It appears that your images have been compressed in some way, typically due to file size limits when uploading directly to the FISD servers. Many troopers use an image-hosting site such as Photobucket, Imgur, or Flickr, and THIS THREAD may be of help to you in sorting out your photo posting.1 point
-
I’d recommend looking through pre approval posts and expert infantry and centurion posts just to get an idea of the fitting nuances. That way when you get your armor you can know how things should looks when you fit them. Congrats on the shipment! Sent from my iPhone using Tapatalk1 point


