Leaderboard
Popular Content
Showing content with the highest reputation on 03/28/2023 in all areas
-
4 points
-
Troop 23GalaxyCon Richmond, Richmond, VA, Day 2 We have 5 stormtroopers there today. We got to take group shot (Squad) with John Rhys-Davies.4 points
-
Nah, just kidding, there's always something to improve. And this isn't even for Lvl 4 (whatever the criteria might be, aside from "sitting in armor"), but for the upcoming Troops -- and fixing the two remarks on my Centurion Approval Crack Repair Now, the first remark I got, was that I need to repair my cracks. And I do. Always. Now, a lot of these cracks simply come from one bad movement or continuous stress in some areas. Usually, I fix them with poor man's fiberglass -- a thin fabric soaked in superglue -- putting some light scores over the end of the cracks in the hope of preventing them going any further inwards and maybe going over them with ABS paste and/or Acetone in order to hide them. However there have been a few cracks that appear again, and again, and again... and not even a third layer of poor man's fiberglass is helping anymore. So I needed something stronger. I took some of my leftover coverstrip ABS, cut it to shape and glued it into the armor. This is a lot more sturdy and the fabric and will hopefully ease the stress on my armor. Hand Guard Paint This might as well be a regular feature by now -- for unknown reasons my handguards always yellow and whilst it makes for an excellent marker to recognize me, it doesn't look as good as some white handguards and therefore got a mention in my Centurion Application. Although it takes me several coats of a white paint of my choice (anything works, I've used everything from wall paint to enamel paint), I still prefer this over the admittedly simpler choice of buying myself some nice white latex handguards. Holster Repair During a private troop at the end of February, my Holster Chicago Screw came loose. Although I did manage to find a screw (notably not my screw), I didn't manage to find the small black leather square cover. Luckily I still had some fake leather lying around from a different project, so I simply had to cut a square, punch a hole into said square and I had a new cover. Then, to prevent such a thing from happening again, I put a small drop of E-6000 on all my Holster screws. I do need to order myself some Chicago Screws and properly replace the square, but it's a good solution for now until I can properly rework this. Celebration Prep This is something that I maybe should have done a long time before, but with Celebration coming up I finally had a good enough excuse to go through with it. I wrote my ID into/onto every single piece of Armor that I own. That way, if I loose or misplace something, everyone knows who it belongs to. Whenever possible I tried to put my ID somewhere where there would be no staining should the ink bleed through the armor, such as underneath cover-strips. Luckily, there was no bleed-through anywhere. Phone Thigh Pocket A chest pocket is good, but a place for my phone that I can grab without showing everyone my chest is better. So it was time for a thigh pocket. First I cut a square piece of canvas fabric. The fabric itself does not matter, but white or black are better hidden inside the armor. The fabric was about an inch (3cm) broader on each side than my phone and two centimeters longer on the bottom. I marked the position of the fabric inside my thigh, making sure to keep a slight distance to the top (just far enough to be more hidden, but still reachable), whilst checking that my phone would actually fit in there. I then glued the fabric on the sides and bottom into the armor, leaving the top open. If this works as well in practice as I'm hoping it will, I might add another pocket to my left thigh as well. For more security I intend on adding a few extras, but I need a second phone case for that, so it's only on my to-do list for now. Once I get everything ready, I'll be sure to share the final part of this project with you As always, thanks for reading and I hope I'll see some of you at Celebration2 points
-
1. 11/29/2022 - Bayside Trunk-or-Treat Troop - Rocklin, CA 2. 03/18/2023 - CarrierCon on the USS Hornet - Alameda, CA I give permission to the FISD to repost my photos on social media. Thanks to the GoldenGateGarrison for letting me crash their party1 point
-
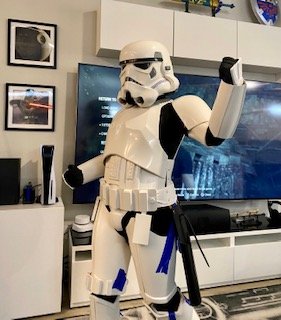
I’m not sure if I’m posting this on the correct thread, and if I’m not, I’m sorry!! First ”full” test fit wasn’t too shabby - it was worthy of a happy dance I’m actually having a lot of fun with this. I’m wearing the Anovos belt since the replacement hasn’t yet arrived. I ordered the canvas belt off of trooperbay and should arrive this week. Thinking of replacing the holster as well for an all black one (if allowed?). My other one is the exact same, except all black. I am also on this next wave for keeptrooping - my boots will be in soon. I purchased Aker 1506 + Troopertalk APP (yet to play around and figure out the settings) - I have found some helpful stuff on it on here and will try soon.1 point
-
Updated progress on the shins in the section for them. I also made some abs slurry to fill in the gaps for the thighs. and I’ve glued my latex hand guards from @justjoseph63 I’m sure I’m only one of many to praise his work.1 point
-
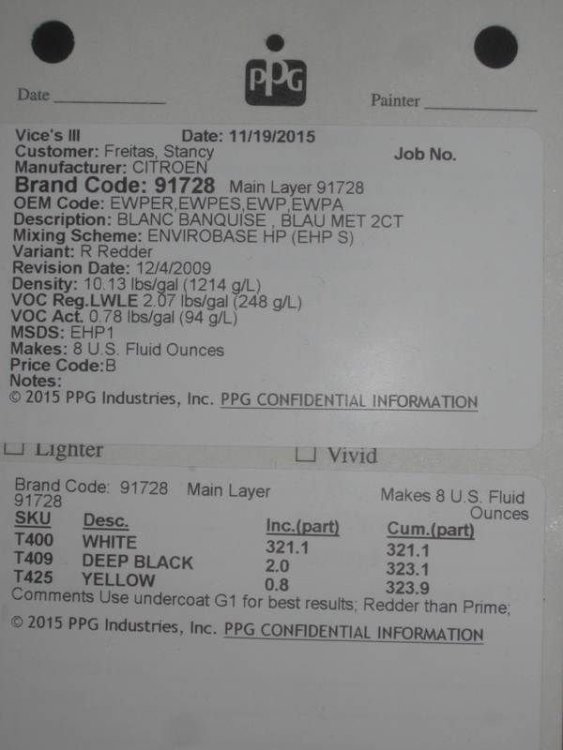
Thanks for your help. I ended up adding more layers of abs on the inside of the shoulders and adding filler. I painted it using my airbrush with the tiny amount of paint i had left over from my helmet. It looks 100% better now. I've seen a few colour codes and this one before.1 point
-
1 point
-
That’s what I was thinking too. Thanks. Sent from my iPhone using Tapatalk1 point
-
They look good as it , I would recommend , when dry, trim the borders following the ridge. Reference1 point
-
Must be one of these (or similar, they came out in many different versions) Doopy Doo's used to do an upgrade kit to bring the blaster up to L2 specs, unfortunately no longer supplying them, they wouldn't make centurion L3 either You can check out my build here There are still options, printing some updated pieces or making from scratch, has been done before, you can actually find full files for the E-11 if needed.1 point
-
I’m taking a guess, is it the Hasbro E-11 toy that is white? That one has been used by troopers before, it does need some mods, but you can find a lot of build threads that can work with that. Here’s a section for blaster builds https://www.whitearmor.net/forum/forum/127-anh-blastech-e11/ Sent from my iPad using Tapatalk1 point
-
I have the Tan strap one that came with my Anovos kit. The black holster is an extra one I have. I’m sticking with the Anovos one. Once the new belt comes, I’ll rebuild it and use the proper holster. Also - save money when you have a hobby as this - said no one ever!1 point
-
Both will work, but be careful, all of those "compounds" and "polishes" are abrasives (think tiny liquid sandpaper), so they take a little (or a lot, depending on the strength) of material away when used. They are taking the top layer (or more) off. Headlight polishing is very similar to the Novus stuff, where it basically takes off the top layer of oxidation. The Novus stuff is nicer though, in that it comes in a few different strengths. If you're just looking to clean up and make it shine, like Sly said, a car polish/protector would be better (like a wax or sealant) and if you want to get fancy, a graphene ceramic coating!1 point
-
While Novus is great and specially designed for plastics, general car polishes work too. I can't see why headlight polish would be any different considering modern vehicle lights are all plastic these days. Like any compound I would always test it in an inconspicuous area first like inside your chest plate to see how well it shines it up.1 point
-
I found different acetones dry differently and can leave A LOT of air bubbles and I ended up finding it was best to apply in light coats. Most fillers I've tried are an off white so you still need to apply paint. On the early Anovos kits we had a lot of areas we had to modify and fill so it was easier just to paint the whole armor. Not sure if anyone has tried matching the DN armor as yet, the Anovos paint was found to be this, not sure how close it will be DN may be using a different supplier For small areas I found I could mix some colors to get a close to shade, I then use an air brush to feather the paint when applying, using compound polish can help bring back the shine.1 point
-
MHS - 2023 MiniCon (Landmark Comic Book Club) I'm not in the photos I've found yet, but I still get blown away every time Threepio & Artoo are present and have to share. Bonus points for Gonk.1 point
-
Here is the forearm fix and build up. I added a thicker backplate and bonded it to the forearm with abs paste. I added a thinner exterior piec of armor scrap of abs to the top. this thinner piece still had the protective plastic. I them seam welded with more abs paste. The added benefit of leaving the exterior plastic was quick cleanup and less paste left over to sand. The paste doesn't bond to the protective sheet. While this wasn't initially planned, I really liked how this accident turned out! It is definitely beefier and should hold up much better for extended durability.1 point
-
As Celebration comes closer every day, I feel like I can do a more or less big update today. I can finally post the first CRL pictures! :-) I hope they are good to work with. The ones that are missing need final strapping which should be done in the next few days. Boots: Spats / Shins: Those parts are glued together as Dan did with his kit. Tricky to get on but everything stays in place :-D Knee plates with gaskets: Thighs: Codpiece: Posterior armor: Abdomen Armor: Detonator:1 point
-
Thought I'd share my framed certificates here, as part of my achievements. I included both my Garrison patches and both sides of my detachment trading card. This is something I will treasure forever.1 point
-
1 point
-
Thanks Chemi. Yes I have everything on flickr. But I read that I have to “upload” not “post” links. Replacing my uploads with links now.1 point
-
Bring the rain, guys! (Looking at all you March to 1000 EI troopers) @Sly11 I know you had to have gotten one.1 point
-
YES!!! Our first garrison merch this year is a hockey jersey!!! ... which I'm sure is coming shortly1 point
-
Also try go to the Pathfinders Detachment, Shoretroopers use them. http://forum.501stpathfinders.com/forum/128-shoretrooper-weapons/1 point
-
Though comparing to the other photos this might work. Seems there’s no set distance just so long as it curves back enough. I will see how things are again and if need be trim another .5 cm off. I just needed to get this amount done so I could better see how things fit with my thighs after the inner cover strips have dried up. Sent from my iPhone using Tapatalk1 point
-
I've got a 850ArmorWorks R1TK set that I'm working on and I've seen a couple possible upgrades, one being rubber shoulder straps, and second being resin hand guards or potentially a styrene pattern. 11B30B4 has both on WhiteArmor but I had two problems, there is an inaccuracy on his straps, and I'm not sure he still offers them, and there is an error in his .stl for hand guards. With these roadblocks I fired up Fusion360 and got to work. As far as handguard progress goes, I started out by gathering as much reference on WhiteArmor as available that shows flatter profile shots of the hand guards from what I'd call top, thumb, and front profiles. I collected photos from R1, Mando and Kenobi, pretty much every tk post Disney acquisition. Here is reference folder so people can see, but if anyone has clearer, flatter views, please put them here and It will allow me to improve upon my files. Photo Reference Folder Here is my methodology thus far for how I'm trying to get an orthographic view of the planes I need to be able to throw together a 3d print model. I take my photos, scale and line them up along the edge of the thumb line Then I start making outline shapes Do that a lot of times and then you see the pattern forming I delete the outliers and take the widest shapes and start taking corners and averaging them in illustrator. Then do this with other important profiles. Thumb Front I arrived with this as the shape, but I've removed curves. The thumb has the flat average, which is wider, and the angled perspective view so I could have something to aim for when angling in the 3d model. And after working in Fusion360 this is where I am at. Please critique with photo reference and let me know how I can improve these files.1 point
-
Event: #164 Event Name: LI Tabletop Gaming Expo Location: Cradle of Aviation Museum - Garden City, NY Date: 3/19/231 point
-
Troop 15 Toronto Comicon, Toronto, Ontario Day 3 March 19, 2023 Another awesome day. We had a group photo with Emily Swallow today. I am out of costume but am in the lower left front of the photo looking back over my shoulder. The final day seemed to be the busiest day at times with a constant line up for photos and blast a trooper all day. All in all, we were probably somewhere over $3000 raised for Make a Wish Foundation.1 point
-
Troop 14 Toronto Comicon, Toronto, Ontario Day 2 March 18, 2023 Returned with sore feet from the day before but once you kit up, the pain is gone. Another fun day of trooping. Had the good fortune of being at the speeder bike -owing for photos when Emily Swallow - “The Armorer” from The Mandalorian stopped by for a visit and took some photos with us. I am the storm trooper on the left.1 point
-
Troop 13 Toronto Comicon, Toronto, Ontario Day 1 March 17, 2023 This was my first big Con and it did not disappoint. Helped with setup on the Thursday before the Con, we were featuring our Mandalorian street inspired Droid Scrap Yard. We featured photos on the speeder bike, which was repainted during our setup on Thursday, Blast a trooper and an Auction to raise money for Make-a-Wish Foundation. Day 1 was spent mainly trooping the booth and a 1 hour period of being the target for blast a trooper with a second 3- minute blast a trooper shift to cover someone who did not make it. Very tiring being the target, but so much fun that I would not give it up for the world. Set up photos. Trooping photos Could not resist a photo with the droids on the speeder bike when we had a free second.1 point


